Advertisement
Quick Links
1-866-839-2888, 8 a.m. - 5 p.m., EST, Monday - Friday
1-866-839-2888, du lundi au vendredi de 8h00 à 17h00 HNE.
1-866-839-2888, 8 am. – 5 pm., HDE, Lunes a Viernes.
OVE 2022-02-16
INSTALLATION MANUAL | MANUEL D'INSTALLATION | MANUAL DE INSTALACIÓN
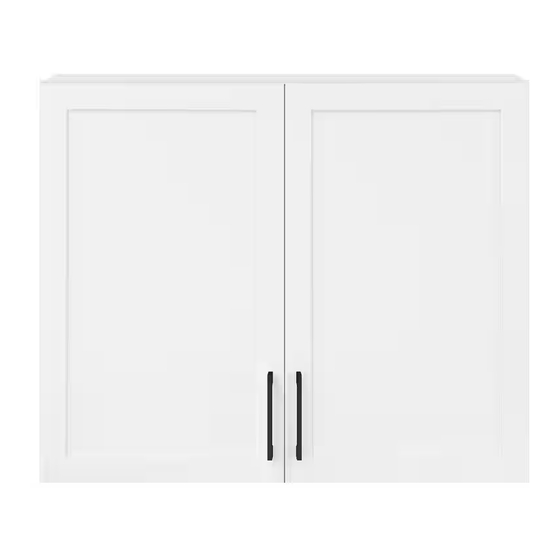
91.4 cm
36 in
36 po
An installation video guide can be found on our Youtube channel:
Un guide d'installation video est disponible sur notre chaîne Youtube:
Una guía de instalación de vídeo está disponible en nuestro canal de Youtube:
https://tinyurl.com/2p86ek9c
Questions, problems, need help?
Call our customer service department at
English and French speaking representatives available
Questions, problèmes ou besoin d'aide?
Contactez notre service à la clientèle au
Langues ; anglais et français
Preguntas, problemas o necesita ayuda?
Llame a nuestro departamento de servicio al cliente al
Representantes disponibles para inglés y francés
www.ovedecors.com | customerservice@ovedecors.com
CABY 36 KD
33.0 cm
13 in
13 po
76.2 cm
30 in
30 po
(Canada and United States only)
(Canada et États-Unis seulement)
(Canadá y Estados Unidos solamente)
PAGE 1
Advertisement

Subscribe to Our Youtube Channel
Related Manuals for OVE CABY 36 KD


Summary of Contents for OVE CABY 36 KD
- Page 1 CABY 36 KD INSTALLATION MANUAL | MANUEL D’INSTALLATION | MANUAL DE INSTALACIÓN 33.0 cm 13 in 13 po 91.4 cm 36 in 36 po 76.2 cm 30 in 30 po An installation video guide can be found on our Youtube channel: Un guide d’installation video est disponible sur notre chaîne Youtube:...
- Page 2 PART LIST LISTE DES PIÈCES LISTA DE PIEZAS PAGE 2...
- Page 3 PART LIST LISTE DES PIÈCES LISTA DE PIEZAS PART # DESCRIPTION QUANTITY CODE # DE PIÈCE DESCRIPTION QUANTITÉ CODE PARTE # DESCRIPCIÓN CANTIDAD CÓDIO Front Frame Cadre frontal 99WCA0001-EI Marco frontal Side panel Panneau latéral 99WCA0005-EI Panel lateral Top and bottom panel Panneau supérieur et inférieur 99WCA0002-EI Panel superior e inferior...
- Page 4 SUPPLIED HARDWARE LIST QUINCAILLERIE FOURNIE CONTENIDO DE HARDWARE Screw Screw Screw Screw Screw Screw Tornillo Tornillo Tornillo Tornillo Tornillo Tornillo M4x25mm ST3.5x12mm ST4x30mm ST4x15mm ST4x19mm ST4x60mm Screw Wall Anchor Ancrage mural Tornillo Tarugo ST4x75mm ø8x40mm TOOLS REQUIRED (not included) OUTILS REQUIS (non fournis) HERRAMIENTAS NECESARIAS (no incluido) Pencil Screwdriver...
-
Page 5: Installation Installation Instalación
INSTALLATION INSTALLATION INSTALACIÓN 1.1. Align the holes on the brackets (H) with the holes predrilled on the front frame (A). Secure the brackets (H) with the screws (BB). 1.2. Line up the edge of the top and bottom panels (C) with the groove on the front frame (A). Insert the brackets (H) from the front frame (A) into the slots on the top and bottom panels (C). - Page 6 INSTALLATION INSTALLATION INSTALACIÓN 2.1. Line up the edge of side panels with the groove on the top and bottom panels (C). Insert the brackets (H) from the front frame (A) into the slots on the side panels (B). 2.2. Using the screws (BB), connect each bracket (H) and the slot. 2.1.
- Page 7 INSTALLATION INSTALLATION INSTALACIÓN 3.1. Tip up the top panel (C) and insert the back panel (F). 3.2. Using the screws (CC), connect the back panel (F) and the side panels (B). 3.3. Using the screws (BB), connect the back panel (F) and the top and bottom panels (C). 3.1.
- Page 8 INSTALLATION INSTALLATION INSTALACIÓN 4.1. Install the hinges (I) onto the doors (E) with the screws (DD) 4.2. Install the doors (E) onto the front frame (A) with the screws (EE). 4.1. Installer les charnières (I) sur les portes (E) à l’aide des vis (DD). 4.2.
- Page 9 INSTALLATION INSTALLATION INSTALACIÓN 5.1. Insert the shelf holders (J) in the pre-drilled holes. 5.2. Place the shelves (D) onto the holders. 5.1. Insérez les supports d’étagères (J) dans les trous pré-percés. 5.2. Placez les étagères (D) sur les supports. 5.1. Inserte los soportes de los estantes (J) en los agujeros preperforados. 5.2.
- Page 10 INSTALLATION INSTALLATION INSTALACIÓN 6.1. Secure the handle (K) with bolts (AA). 6.2. Stick the bumper (L) onto the corners of the door panel (E) inside. 6.1. Fixez la poignée (K) avec les boulons (AA). 6.2. Collez le pare-chocs (L) sur les coins du panneau de porte (E) à l’intérieur. 6.1.
- Page 11 WALL MOUNT INSTALLATION GUIDELINES DIRECTIVES D’INSTALLATION D’UN SUPPORT MURAL DIRECTRICES DE INSTALACIÓN DEL SOPORTE DE PARED When installing this product, it is recommended to hit as many wood studs as possible behind the plasterboard wall. It is not recommended to install only on the plasterboard wall using only wall anchors.
- Page 12 WALL MOUNT INSTALLATION INSTALLATION DE MONTAGE MURAL INSTALACIÓN EN LA PARED Plus 60.3 cm (23.7 in) to the height, this calculated measure is the distance of the bottom of the support bar to the floor, as illustrated below. Mark the bottom position of the support bar on the wall. Ajoutez 60,3 cm (23,7 po) à...
- Page 13 WALL MOUNT INSTALLATION INSTALLATION DE MONTAGE MURAL INSTALACIÓN EN LA PARED 9.1. Keep the support bar in the position, then drill pilot holes on the wall through the support bar at the marked positions using ø2.5mm (0.1 in) drill bit. 9.2.
- Page 14 WALL MOUNT INSTALLATION INSTALLATION DE MONTAGE MURAL INSTALACIÓN EN LA PARED 10.1. Open the door, measure and mark two holes to secure the cabinet. Make sure the two holes avoid the existing screws behind the cabinet at the indicated locations as shown below. The cabinet could be moved horizontally in a range of about 20mm (0.78 in) before it is secured, so if the existing screws happen to be located over the studs, move the cabinet left or right a bit to avoid the existing screws overlapping with the two holes to be drilled.
- Page 15 HOW TO REMOVE / ADJUST THE SHELVES COMMENT RETIRER / AJUSTER LES ÉTAGÈRES CÓMO QUITAR/AJUSTAR LOS ESTANTES HOW TO REMOVE / ADJUST THE SHELVES. Press the clip of the shelf holders and take out the shelf. COMMENT RETIRER / AJUSTER LES ÉTAGÈRES. Appuyez sur le clip des supports de tablette et retirez la tablette.
- Page 16 HOW TO ADJUST THE DOOR’S POSITION COMMENT RÉGLER LA POSITION DE LA PORTE CÓMO AJUSTAR LA POSICIÓN DE LA PUERTA PAGE 16...
-
Page 17: Maintenance
CONSUMER RESPONSIBILITIES RESPONSABILITÉS DU CLIENT RESPONSABILIDADES DEL CONSUMIDOR The DISTRIBUTOR’s products will remain beautiful for Les produits du DISTRIBUTEUR garderont leur belle Los productos del DISTRIBUIDOR permanecerán many years if you properly care for them. apparence pendant de nombreuses années si l’entretien est hermosos durante muchos años si los cuida correctamente. - Page 18 Distributed by: Costco Wholesale Canada Ltd.* Importado por: Costco Wholesale Corporation 415 W. Hunt Club Road Importadora Primex S.A. de C.V. P.O. Box 34535 Ottawa, Ontario Blvd. Magnocentro No. 4 Seattle, WA 98124-1535 K2E 1C5, Canada San Fernando La Herradura 1-800-463-3783 Huixquilucan, Estado de México 1-800-774-2678...
Need help?
Do you have a question about the CABY 36 KD and is the answer not in the manual?
Questions and answers