Advertisement
Available languages
Available languages
SPECIFICATIONS
Total Capacity . . . . . . . . . . . . . . . . . . . . . . . . . . . . . . . . . 70 LBS each
Total Height . . . . . . . . . . . . . . . . . . . . . . . . . . . . . . . . . . . . . . . . . . 5.5 in
Total Width . . . . . . . . . . . . . . . . . . . . . . . . . . . . . . . . . . . . . . . . . . 28 in
Total Depth . . . . . . . . . . . . . . . . . . . . . . . . . . . . . . . . . . . . . . . . . 15.5 in
Loading cart beyond rated capacity may cause structural damage to the
PLEASE NOTE:
cart as well as personal and /or property damage. Please educate your customers to
the dangers of overloading. Do not attempt to push cart with items on the top lid.
Drawer Height . . . . . . . . . . . . . . . . . . . . . . . . . . . . . . . . . . . . . . . . 4 in
Drawer Side Height . . . . . . . . . . . . . . . . . . . . . . . . . . . . . . . . . 3.625 in
Drawer Depth . . . . . . . . . . . . . . . . . . . . . . . . . . . . . . . . . . . . . . . . 15 in
Drawer Width . . . . . . . . . . . . . . . . . . . . . . . . . . . . . . . . . . . . . . 27.75 in
ASSEMBLY INSTRUCTIONS - ADDING TO UC3016 CART
Step 1
Place washer (#15) onto round head bolt (#14) and insert from top
of front left bolt hole of top shelf (#1) and into front left bolt hole of
MBD100B. Place washer (#15) and then hex nut (#16) onto bolt
assembly and loosely tighten.
Step 2
Repeat step 1 for front right, rear left and rear right.
Step 3
Align Add-A-Drawer to operational and cosmetically straight.
5
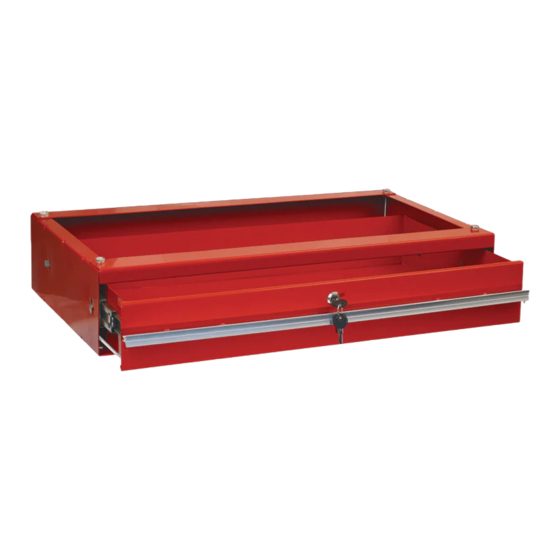
Handle (#23)
MBD100B/ MBD100B-BK/ MBD100B-BL/ MBD100B-LG/ MBD100B-OR ADD-A-DRAWER UNIT
(6) Pan
Screws
(#22)
Drawer (#21)
MBD100B/MBD100B-BK
MBD100B-BL/MBD100B-LG
PARTS LIST
Item
Part
No.
No.
1
RS8006LK
2
RS8006HDL
WARNING
• Read, study, understand & follow all instructions before using. • Do not load beyond rated
capacity (70 LBS) • Lock lid and drawers before moving. • Apply brake on locking casters
anytime cart is in place. • Units can tip or fall causing damage or personal injury. • Keep
children away from unit. • Wear gloves when lifting edges. • Failure to heed these warnings
may result in personal injury and/or property damage.
WARNING: This product can expose you to chemicals including nickel, which
is known to the State of California to cause cancer and birth defects or other
reproductive harm. For more information go to www.P65Warnings.ca.gov.
1
Top Shelf
(#1)
Step 4
Tool Needed: Phillips® #3 Screwdriver & 13mm Combo Wrench
Torque all four bolt assemblies to 5 ft-lbs
Step 5
Tool Needed: Phillips® #2 Screwdriver
Center the handle (#23) onto the holes of the drawer (#21)
and insert the six pan screws (#22) and tighten to 3 ft-lbs.
1
MBD100B-OR
ADD-A-DRAWER UNIT
Description
Single Lock with Keys for Lid or Drawer
(Sold Seperately)
Chrome Drawer Handle with 6 Pan Screws
#14
#15
#15
#16
MDB100B
(inside view)
14
16
(6)
RSDWRBK Bolt kit
(Incl. 6 each of #14, #16 and 12 each of #15)
No.
Req'd
1
(6)
15
(12)
07/16/2020
Advertisement
Table of Contents

Subscribe to Our Youtube Channel
Summary of Contents for MAC TOOLS MBD100B
- Page 1 Top Shelf of front left bolt hole of top shelf (#1) and into front left bolt hole of (#1) MBD100B. Place washer (#15) and then hex nut (#16) onto bolt assembly and loosely tighten. Step 2 Repeat step 1 for front right, rear left and rear right.
- Page 2 Step 6 Tool Needed: Phillips® #2 Screwdriver Handle (#23) Center the handle (#23) onto the holes of the drawer (#21) and insert the six pan screws (#22) and tighten to 3 ft-lbs. 07/16/2020 MBD100B/ MBD100B-BK/ MBD100B-BL/ MBD100B-LG/ MBD100B-OR ADD-A-DRAWER UNIT...
- Page 3 (#1) estante superior (#1) y en el agujero del perno izquierdo de la MBD100B. Coloque la arandela (#15) y luego la tuerca hexagonal (#16) sobre el conjunto de pernos y apriételas ligeramente.
- Page 4 (#18), y en posterior (#20) el agujero de perno izquierdo delantero de la MBD100B. Coloque la arandela (#15) y luego Vista Posterior del Carrito la tuerca hexagonal (#16) sobre el conjunto de pernos y apriételas ligeramente.
- Page 5 (n°1) boulon avant gauche de MBD100B. Placez la rondelle (n °15), puis l'écrou hexagonal (n °16) sur l’assemblage boulon et serrez-les sans trop serrer. n°15 Étape 2 Répétez l'étape 1 pour l'avant droit, l'arrière gauche et l'arrière droit.
- Page 6 Poignée (#23) Centrez la poignée (n ° 23) sur les trous du tiroir (n ° 21) et insérez les six vis à tête cylindrique (n ° 22) et serrez-les à 3 lb-pi 07/16/2020 MBD100B/ MBD100B-BK/ MBD100B-BL/ MBD100B-LG/ MBD100B-OR ADD-A-DRAWER UNIT...
Need help?
Do you have a question about the MBD100B and is the answer not in the manual?
Questions and answers