Table of Contents
Advertisement
Quick Links
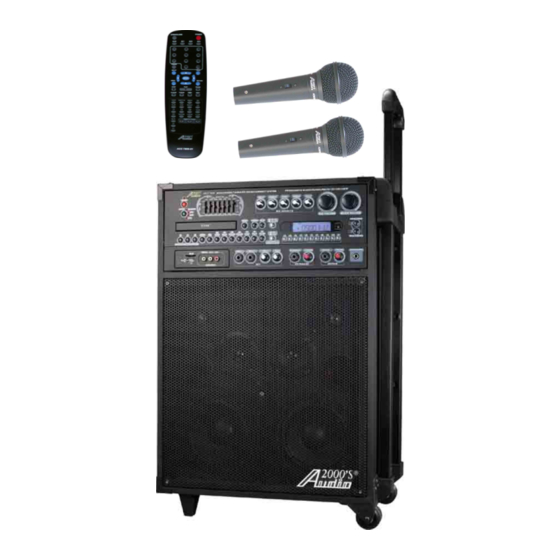
RECORDABLE ALL-IN-ONE KARAOKE/PA SYSTEM WITH DUAL-CHANNEL WIRELESS MICROPHONES
Thank you for purchasing the
system with dual-channel wireless microphones! For the best results and the utmost
satisfaction from your new unit, please read this manual thoroughly, and retain it for
future reference.
AKJ780C
OWNER'S MANUAL
AKJ780C
AKJ780C
Recordable & Wireless All-in-one Karaoke/ PA System
Recordable & Wireless All-in-one Karaoke/ PA System
Audio2000'S
For more information, please visit our website (www.audio2000s.com).
VCD
L R
A
B
®
AKJ780C recordable all-in-one karaoke/PA
ACC 780C-01
Advertisement
Table of Contents

Related Manuals for 2000'S Audio AKJ780C

Summary of Contents for 2000'S Audio AKJ780C
- Page 1 ACC 780C-01 ® Thank you for purchasing the Audio2000'S AKJ780C recordable all-in-one karaoke/PA system with dual-channel wireless microphones! For the best results and the utmost satisfaction from your new unit, please read this manual thoroughly, and retain it for future reference.
- Page 3 Preference Page...
-
Page 4: Important Safety Instructions
WARNING * TO PREVENT FIRE OR SHOCK HAZARD. DO NOT EXPOSE THIS APPLIANCE TO RAIN OR MOISTURE. *THIS APPLIANCE SHALL NOT BE EXPOSED TO DRIPPING OR SPLASHING WATER AND THAT NO OBJECT FILLED WITH LIQUIDS SUCH AS VASES SHALL BE PLACED ON APPARATUS. IMPORTANT SAFETY INSTRUCTIONS 1) Read these instructions. - Page 5 13 ) Unplug this apparatus during lightning storms or when unused for long periods of time. 14 ) Refer all servicing to qualified service personnel. Servicing is required when the apparatus has been damaged in any way, such as power-supply cord or plug is damaged, liquid has been spilled or objects have fallen into the apparatus, the apparatus has been exposed to rain or moisture, does not operate normally, or has been dropped.
- Page 8 Front panel AKJ780C AKJ780C Recordable & Wireless All-in-one Karaoke/ Pa System Recordable & Wireless All-in-one Karaoke/ Pa System - This button toggles through all the INPUT channels (Disc/USB/SD, AV 1/2/3) for available 1.INPUT INPUT SOURCES. - This button is used to turn the AKJ780C 'ON'/ 'OFF'or place it in STANDBY mode.
-
Page 9: Digital Key Control
Front panel 18 19 AKJ780C AKJ780C Recordable & Wireless All-in-one Karaoke/ PA System Recordable & Wireless All-in-one Karaoke/ PA System Please refer to page 23 for the details. 13.REC button 14.MP3 COPY button Please refer to page 23 for the details. - Page 10 Front panel AKJ780C AKJ780C Recordable & Wireless All-in-one Karaoke/ PA System Recordable & Wireless All-in-one Karaoke/ PA System 26 25 25. SD Memory Card - Slot The SD memory card slot accepts SD memory card formats. media stored on a loaded memory card can be played.
- Page 11 MAIN POWER switch to the CHARGE position will start to charge the rechargeable batteries. Note: The red POWER /STANDBY button on the front panel will not turn the AKJ780C on if the MAIN POWER switch is switched OFF.
- Page 12 Connect RCA-style AV cables (R, W, Y) from these jacks to the AV OUTPUT jacks on your external AV devices. jacks- These jacks are for connecting the AKJ780C 's VIDEO OUTPUT to TV 14.VIDEO OUT 1-2 JACKS (RCA) or DISPLAY devices. Connect RCA-type patch cables from these jacks to the VIDEO INPUT jacks on the connecting TV or display devices.
- Page 13 Number/Preset buttons. button - Please refer to page 20 for the details. 6.PROG NOTE: The AKJ780C must be in DISC mode in order to access the PROGRAM menu. 7.SETUP button - Use this button to access the AKJ780C’s setup page on the video screen.
- Page 14 button - Cycles through the available viewing 21.Angle angles on DVDs with multiple viewing angles available. Remote control Note: Not all DVDs will have multiple viewing angles available. button - Turns on Playback Control (PBC). For use 22.PBC with VCD 2.0 discs, PBC allows you to navigate more conveniently through VCD 2.0 discs.
-
Page 15: Power Switch
AKJ780C can be used as a self-contained sound system. Furthermore the AKJ780C contains various audio video outputs to allow the AKJ780C to be connected to multiple TV sets, external sound systems, and/or multiple sound effect devices. The following content demonstrates the procedures for connecting the AKJ780C to the AC outlet and other audio video devices. - Page 16 TV / video monitor with a RCA video input Connect one end of the RCA video cable to the yellow Video Out on the rear panel of the AKJ780C AKJ780C has two RCA-type VIDEO OUTPUT jacks for connecting to TVs or monitor devices.
- Page 17 ●Connect one end of the XLR cables to the left and right BALANCED AUDIO OUTPUT jacks on the AKJ780C. ● Connect one end of the XLR cables to the left and right AUDIO/LINE/AUX INPUT jacks on the external device 3.¼ INCH PRE-OUT CONNECTIONS: ●...
- Page 18 DVD OUTPUT CONNECTIONS 1.Connecting to a Dolby Pro logic amplifier AKJ780C allows DVD audio output for 5.1 or 7.1 configurations. With a 5.1 amplifier, you will need six RCA patch cables. Connect the plug from one side of each cable to the...
- Page 19 (not included). .Connect the connector of the headphones to the ¼ inch HEADPHONES output on the front panel of the AKJ780C. Microphone/instrument input connections After completing your main system connections, it is time to get your microphones and instruments connected and ready for performing.
-
Page 20: General Operations
General Operations Turning the A KJ780C On, Off and to Standby Press the power button on the AKJ780C to turn the unit on or off. Input Channels AKJ780C has 4 available input channels: ● Disc USB/SD: Turns on the AKJ780C ’s disc player for playing DVD, CD, CDG, and other discs. - Page 23 Example: Selecting a Title and Chapter Jumping to title 2 and chapter 2 Press the TIME button until TITLE “__ / __ CHAPTER __ / __ “ appears on the top of the TV screen Press 2 on the number pad to select Title 1. Now chapter will be highlighted Press 2 on the number pad to select Chapter 2 Playback will begin at that on Title 2 and Chapter 2 Viewing and setting the On Screen Display (OSD)
- Page 24 2. DVD Playback ● Insert a DVD in the disc tray and press the PROG button to enter the program mode. The TV monitor display will show the program menu as in Photo L. In the program menu, enter the title number under the column “T” and enter the chapter number under the column “C”.
- Page 25 ● Use the directional buttons to select videos, music, or images. Press the Enter button to play a selected video, music, or image. AKJ780C AKJ780C Recordable & Wireless All-in-one Karaoke/ Pa System With Rechargeable B Recordable & Wireless All-in-one Karaoke/ Pa System With Rechargeable B...
-
Page 30: Microphone Operations
Adjusting the individual Microphone volume controls Each microphone channel has its own volume control located on the front panel of the AKJ780C . Each one can be adjusted separately, providing a great sounding vocal mix. -
Page 32: Descriptions And Functions
Using the remote control When operating the remote control, point the top of the remote control toward AKJ780C 's remote sensor on the front panel and ensure that there is a clear line of sight between the remote control and AKJ780C void of obstacles in order to prevent signal deflection. -
Page 33: Dvd System Setup Menu
RATING settings is 0000. If you are a parent and want to limit the types of DVD's to be viewed with the AKJ780C, type this password using the NUMBER keys on the remote, and then press ENTER to unlock the RATING setting. -
Page 34: Language Setup
RESTORE 7.2. RESUME RESUME ON:RESUME the last spot played on a disc and PREV PAGE returns to it when the AKJ780C is turned back on from the Standby mode. OFF:RESUME is off. 7.3. PREV PAGE L ANGUAGE SETUP This menu is used to set up the language preferences for the functions described as follows. -
Page 35: Speaker Setup
DVD System Setup Menu SPEAKER SETUP 1. DOWNMIX LT/RT The left channel and the right channel sound outputs SPEAKER SETUP are mixed first and then the mixed sound output is redirected to the left speaker and the right speaker simultaneously. DOWNMIX LT/RT STEREO - Sound output is in Stereo Mode. -
Page 36: Troubleshooting
NTSC: In North America, Japan and many other Asian countries PAL: In Europe ● Try restarting the AKJ780C 7.The Music from an MP3 player or CD sounds hollow or very reverby ● Make sure the surround sound quality, using the SURROUND button on the remote control or front...
Need help?
Do you have a question about the AKJ780C and is the answer not in the manual?
Questions and answers