
Summary of Contents for Daniela DAN45ACM
- Page 1 DAN45ACM 45CM FULL AUTOMATIC BUILT IN COFFEE MACHINE A p p l i a n c e U s e r M a n u a l danielaappliances.com.au...
- Page 2 From an Italian heritage our brand Daniela was then established in 2005 from a father’s love to a daughter and naming it after Daniela, now the new proprietor. Daniela has worked closely with her father for many years learning from his decades of industry experience.
- Page 3 DAN45ACM 45CM FULL AUTOMATIC BUILT IN COFFEE MACHINE PA G E 3 02 9604 1226 sales@danielaappliances.com.au danielaappliances.com.au...
- Page 4 SAVE THIS INSTRUCTION IN A SAFE PLACE FOR FUTURE REFERENCE Thank you for choosing Daniela appliances! Please read all instructions before using this appliance. This book contains valuable information about operation, care and service. Keep it in a safe place for future reference.
-
Page 5: Danger Of Burns
IMPORTANT • The appliance is designed and produced for domestic use only. • The appliance is not intended for use by person (including children) with reduced physical sensory or mental capabilities or lack of experience and knowledge unless they have been given supervision or instruction concerning use of the appliance by a person responsible for their safety. -
Page 6: Preliminary Checks
NOTE THIS APPLIANCE CAN BE INSTALLED IN COMBINATION WITH A BUILT-IN OVEN IF THE LATTER IS FITTED WITH A COOLING FAN AT THE REAR (MAXIMUM OVEN POWER: 3 KW). • FAILURE TO DESCALE AND CLEAN THE APPLIANCE VOIDS ALL WARRANTIES. •... - Page 7 IMPORTANT Safety cut out devices must be included in the mains power supply in compliance with the installation regulations in the country concerned. • If your appliance comes fitted with a plug, it will incorporate a 13 Amp fuse. lf it does not fit your socket, the plug should be cut off from the mains lead, and an appropriate plug fitted, as below.
-
Page 8: Built-In Installation
BUILT IN INSTALLATION Verify the minimum measure required for correct installation of the appliance. The coffee maker must be installed in a column and the column must be firmly fixed to the wall with commercially available brackets IMPORTANT • All installation or maintenance operations must be performed with the appliance disconnected from the mains electricity supply. - Page 9 Step 1: Install guide connect bracket – Step 2: Fix with the screws. If using button fix with the screws if using side install method. install method. Step 3: Fully extract this guide to the outside. Step 4: Put coffee machine in the guide. PA G E 9 02 9604 1226 sales@danielaappliances.com.au...
- Page 10 Install 2 screws in each side. Step 5: Extract this machine to the outside. Open the coffee bean cover at add coffee beans in container. Step 7: • Take out the tank and fill it with fresh water, then insert in original position. •...
-
Page 11: Using The Appliance For The First Time
USING THE APPLIANCE FOR THE FIRST TIME • All machines are tested at time of manufacture; therefore, it is completely normal for there to be traces of coffee in the mill. • Water hardness should be set as soon as possible following the instructions in the “Setting water hardness”... -
Page 12: Description Of The Appliance
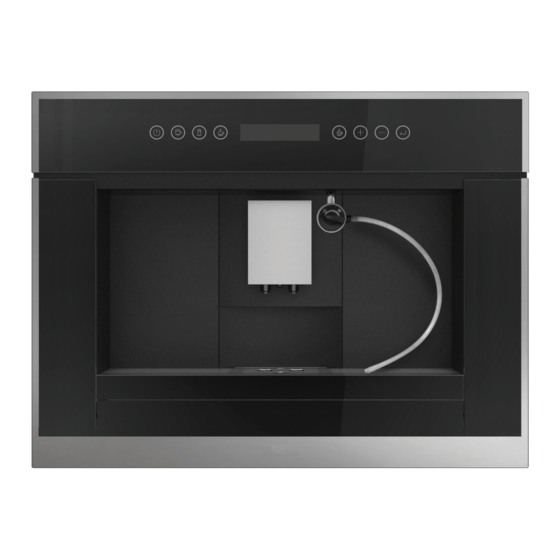
DESCRIPTION OF THE APPLIANCE A1. Display screen A2. Milk frothing unit A3. Frothing nozzle A4. Coffee nozzle A5. Main switch A6. Adjustable mill knob A7. Coffee grounds container A8. Load tray A9. Drip tray A10. Metal drip tray A11. Tank A12. - Page 13 ACCESSING YOUR MENU After the appliance displays “ready” select “menu” or select “display” we can use the internal menu to modify the following parameters and functions: • Time • Unit on • Unit off • Water hardness • Cups statistics •...
-
Page 14: Setting The Water Hardness
SETTING THE WATER HARDNESS The harder the water is, the more frequently your DANIELA coffee machine will require descaling. Purchase a special strip then deep fully in the water for a few seconds, remove and wait about 30 seconds, until it changes colour and forms red squares, according the colour gauge you can Read out the water hardness level. -
Page 15: Making Coffee
• The machine display “self-check”, and next display “heating” … • Wait for some time, this machine will automatic start “rinsing” ... • When rinse program ends, this machine will display “ready”. • When this machine reaches this state, that means the machine is ready for use. You can now make coffee, espresso, cappuccino, and even re-program the to suit your own cups. - Page 16 NOTE 3: Tips for a hotter coffee: • When you turn the appliance on, if you want to make a short coffee (less than 60cc/ml), rinse the cups with hot water to preheat the cups. • If more than 2-3 minutes have passed since the last coffee made, before requesting another coffee, you must preheat the infuser.
-
Page 17: Adjusting The Coffee Mill
ADJUSTING THE COFFEE MILL The coffee mill is pre-set in the factory to make coffee correctly and should not require adjusting initially. However, if after making the first few coffees you find that delivery is either too fast or too slow (a drop at a time), this can be corrected by adjusting the grinding adjustment knob (A6). - Page 18 NOTE 4: Introduce only pre-ground coffee for espresso coffee machines into the funnel. Never fill with coffee beans, freeze dried coffee or other substance that could damage the appliance. NOTE 5: If more than one measure of pre-ground coffee is used and the funnel clogs, push the coffee down with a knife then remove and clean the infuser and machine as described in the “Cleaning the infuser chapter”.
- Page 19 IMPORTANT! When removing the drip tray, the ground container must be emptied, even if it is not completely full. If this is not done, when you make the next coffee, the ground container may fill up more than expected and clog the machine. •...
- Page 20 FROTHING MILK/STEAM AUTOMATICALLY Pour some milk directly into a cup as per the diagram, or alternatively insert the hose directly into your bottle of milk. Then select the automatic coffee you require from the control panel (see above description for assistance). The steam function can also be used to froth milk manually utilising either a mug or frothing jug.
- Page 21 MAKING A CAPPUCCINO (BEAN TO CUP) To make a cappuccino the milk frothing nozzle and hose will need to be attached. For more information, please refer to the section on frothing milk. When the machine is in “ready” mode: Press B2 button to automatically make cappuccinos. 2.
-
Page 22: Cleaning And Maintenance
RINSE FUNCTION When the machine in “ready” state, press B8 button quickly twice to automatically run “rinse” program, the screen will display “rinsing”. After rinsing the machine go back to “ready” state. NOTE: When you press B8 button quickly twice and the machine does not commence automatic rinse cycle, this means the temperature is too high. -
Page 23: Cleaning The Water Tank
IMPORTANT! If the drip tray is not emptied regularly, the water could overflow from the edge and seep inside or around the coffee maker. This could damage the appliance and cabinet. IMPORTANT! The grounds tray mush be emptied, each time the drip tray is removed, as removing the tray resets its internal coffee puck counter. -
Page 24: Cleaning The Bean Container
Should it be required, the machine can be manually prompted to clean the brewing unit. Proceed as follows: Press B8 button to enter “menu”. 2. Press B8 button when you get to “information”, in menu. 3. Press B8 button next to enter “number of use”. 4. - Page 25 NOTE: Ensure all parts are correctly and firmly re-assembled to ensure optimum operation of the milk frothing/steam system. All forms of milk have natural fats in them, that over time coat the insides of the milk frothing tube, nozzle and system. These traces of oil may have a negative affect on the milk frothing system and frothing nozzle, and milk pipe causing blockages and failure of milk frothing.
- Page 26 4. When the grounds and drip tray are returned, the machine will display “add descaling fluid” 5. Extract the water tank to add descaling fluid (follow instructions on bottle) and top up with water to the MAX line, return the water tank to its original position. 6.
-
Page 27: Emptying The Unit
EMPTYING THE UNIT When the machine has not been used for extended amounts of time or is required to be transported to a different location the internal water can be purged from the machine if required: When in “ready” state, Press the B8 button. 2. -
Page 28: Troubleshooting
TROUBLE SHOOTING DISPLAYED POSSIBLE CAUSE REMEDY MESSAGE/ISSUE Fill water • The water tank is empty. • Fill the water tank and/or insert it correctly, pushing it down as far • The water tank is as it will go. positioned incorrectly. •... - Page 29 TROUBLE SHOOTING DISPLAYED POSSIBLE CAUSE REMEDY MESSAGE/ISSUE Add more powder • Not enough ground • This can be rectified by using the coffee was put into the measured spoon provided to scoop pre-ground scoop. your pre-ground coffee in to the pre-ground shute.
- Page 30 Grinder is making • There are foreign objects • Please contact a very loud noise. in the grinder – this can Daniela Appliances for repair. sometimes happen when high quality beans are not used. PA G E 3 0 02 9604 1226 sales@danielaappliances.com.au...
-
Page 31: Technical Specifications
DANGER OF BURNS! During rinsing, a little hot water flows from the coffee spouts. Avoid contact with splashes of water. To turn the appliance off, keep on press ON/OFF/button (B1). The appliance will turn off at any state. NOTE: If the appliance is not used for an extended period, place the main switch on the back of the appliance in the O position (A5). -
Page 32: Further Information
INSTALLATION RECEIPT NUMBER: ........................If you require more information, service, warranty or spare parts enquiries please contact customer care. DANIELA APPLIANCES PTY LTD (02) 9604 1226 (9am – 5pm EST, Monday – Friday) PA G E 3 2 02 9604 1226 sales@danielaappliances.com.au... - Page 33 DO NOT INSTALL OR USE THE APPLIANCE. In this instance please contact your retailer or Daniela Appliances direct. Keep packing material such as plastic bags, polystyrene, nails or screws out of the reach of children, as they are a choking hazard.
-
Page 34: Terms And Conditions
If your goods remain boxed and in an unopened condition, they may be returned with in 30 days of the invoice date for a full refund. A collection fee of $50 will be charged should you require Daniela Appliances Pty Ltd to collect the stock. - Page 35 NOTES ....................................................................................................................................................................................................................................................................................................................................................................................................................................................................................................................................................................................................................PA G E 3 5 02 9604 1226 sales@danielaappliances.com.au danielaappliances.com.au...
- Page 36 PA G E 3 6 02 9604 1226 sales@danielaappliances.com.au A 8/10 Hume Road, Smithfield NSW 2164 02 9604 1226 sales@danielaappliances.com.au danielaappliances.com.au danielaappliances.com.au...
Need help?
Do you have a question about the DAN45ACM and is the answer not in the manual?
Questions and answers