Table of Contents
Advertisement
Quick Links
Advertisement
Table of Contents

Related Manuals for ReWater Systems COMPLETE CONTROL 9

Summary of Contents for ReWater Systems COMPLETE CONTROL 9
- Page 1 COMPLETE CONTROL ® 9, 12, 15 & 21 STATION CONTROLLERS User’s Guide...
- Page 2 FEATURES Thank you for purchasing a recycling irrigation controller. Listed below ® COMPLETE CONTROL are some of the important features you should be aware of before you begin programming. Details on how to implement these features are described in detail on the following pages. ...
-
Page 3: Table Of Contents
TABLE OF CONTENTS FEATURES CONTROLLER COMPONENTS GENERAL INFORMATION OW THE BACKUP SYSTEM WORKS OW THE ELEC TRONIC CIRCUIT BREAKER WORKS OW THE SENSOR FEA TURE WORKS PROGRAMMING THE CONTROLLER ETTING TARTED ELECTING THE UMBER OF ECYCLING ALVES HAT IS A WATERING P ROGRAM HAT IS A PROGRAM WATERING CYCLE ATERING SCHEDULE FORM SAMPLE... - Page 4 TABLE OF CONTENTS ANUAL PERATIONS INGLE TATI ON ROGRAM YCLE INSTALLATION PROCEDURES ELECTING AN NSTALLATION OUNTING THE ONTROLLER NSTALLING LEC TRICAL ONDUIT ONNEC TING THE ALVE IRING ONNEC TING A ENSOR ONNEC TING ARTH ROUND ONNEC TING THE OWER IRES ONNEC TING THE ECYCLING ELAY...
-
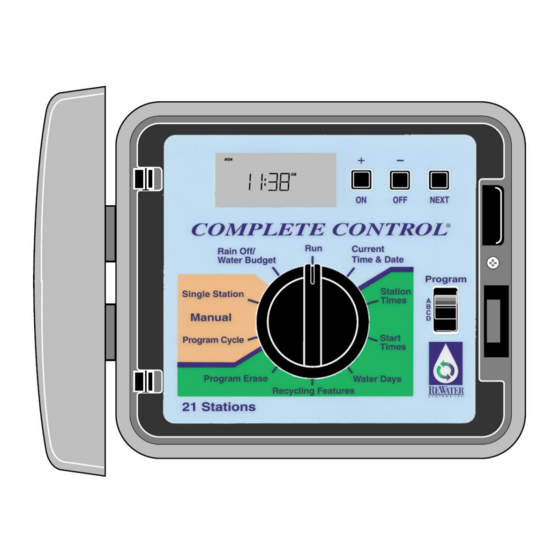
Page 5: Controller Components
CONTROLLER COMPONENTS LCD Display: For viewing time, date, program and status information. + /On & - /Off Buttons: For entry of program information. -> /NEXT Button: For selection of information to be programmed or reviewed. Function Dial: For selecting the programming and operating functions. Current Time/Date: For setting the current time and date. - Page 6 CONTROLLER COMPONENTS 16. 3-WAY Valve: For connection of the 3-WAY valve actuator's three wires. 17. Float Switch: For connection of the 2-wire float switch from the recycling surge tank. 18. Mounting Holes: Pilot screw holes for attaching controller to wall. 19.
-
Page 7: General Information
GENERAL INFORMATION BEFORE CONNECTING ANY WIRE TO THIS CONTROLLER, CONNECT A DEDICATED EARTH GROUND TO THE EARTH GROUND TERMINAL (#23 above) ON THE MAIN PC BOARD. https://rewater.com/wp-content/uploads/2019/05/Owner’s-Operation-Manual-2017.pdf This section contains general information on: • How the backup system works • How the electronic circuit breaker works •... -
Page 8: How The Electronic Circuit Breaker Works
GENERAL INFORMATION OW THE ELECTRONIC CIRCUIT BREAKER WORKS The controller is equipped with an electronic circuit breaker. If the ® COMPLETE CONTROL controller detects a short circuit, the shorted station (valve) will be turned off automatically. The display will then flash "SHORT" and the shorted station number, or “RELAY,” “3 -WAY,” “BW,” or “FW.”... -
Page 9: How The Sensor Feature Works
GENERAL INFORMATION OW THE SENSOR FEATURE WORKS The controller is equipped to operate with an optional rain sensing ® COMPLETE CONTROL device, commonly called a "Rain Switch", to prevent automatic watering during rain. The rain switch is a simple device, typically installed on a roof overhang or stationary structure exposed to rainfall and full sun and shielded from irrigation spray. -
Page 10: Programming The Controller
PROGRAMMING THE CONTROLLER This section covers the following topics : • Getting started • Selecting the number of recycling valves • Setting the current time and date • Erasing existing programs • Setting the recycling features • Setting the station run duration •... -
Page 11: What Is A Watering Program
PROGRAMMING THE CONTROLLER NOTE: Fresh water valves must be plumbed to a constant -pressure fresh water supply, and recycling valves must be plumbed to the recycled water main line from the ReWater System. NOTE: The ReWater System will automatically supplement any shortage of recycled water with fresh water through the FW valve at the filter at midnight. - Page 12 PROGRAMMING THE CONTROLLER Note that we have 40 minutes total watering time per cycle in Program A. If we had set t he next start time at 2:30 a.m., the start time would have been delayed until 2:40 a.m., enabling the first cycle to finish as programmed.
-
Page 13: Watering Schedule Form ( Sample )
PROGRAMMING THE CONTROLLER ATERING SCHEDULE FORM SAMPLE For your convenience, a Watering Schedule Form, with a Quick Reference Card on the backside, is provided. Use the form to plan and record your automatic watering activities. Use the quick reference instructions when minor programming changes are required. Keep the card with the controller by attaching it to the inside front door. -
Page 14: Setting The Current Time And Date
PROGRAMMING THE CONTROLLER ETTING THE CURRENT TIME AND DATE Before you can program the controller for automatic watering, you must set the controller clock to the current time and date. This controller features a 365 -day calendar with automatic leap year compensation. -
Page 15: Setting The Recycling Features
PROGRAMMING THE CONTROLLER To erase program information for a selected program: 1. Select program A, B, C or D with the Program switch. 2. Turn the function dial to the Program Erase position. The display will show ERASE. 3. Press and hold the OFF button until "DONE" is displayed. 4. -
Page 16: Setting The Backwash Interval
4. Use the + and/or - buttons to adjust the backwash interval. Note: The Backwash Interval is set to 14 hours at the factory. This setting should only be changed at the recommendation of ReWater Systems. ETTING THE BACKWASH DURATION This setting adjusts the duration of a backwash cycle in minutes. -
Page 17: Setting Program Start Times
PROGRAMMING THE CONTROLLER Note: OFF is the factory setting for each station. If the station has a run duration and you wish to remove it from a program, use the + and/or - buttons to select OFF, (displayed between 10:00 [ten hours] and 00:01 [one minute]). Note: For recycling stations, the display will show “... - Page 18 PROGRAMMING THE CONTROLLER • Odd Days or Even Days To select every odd or even number calendar day, use this option. Because the 31st and the 1st are both odd number days, the 31st is automatically removed from the schedule . This watering option can be combined with Days of the Week to form a more complex watering schedule.
- Page 19 PROGRAMMING THE CONTROLLER Odd Days or Even Days A. Press the NEXT button until Odd Days or Even Days is displayed. B. Press the ON button to select the schedule. Note: Day Interval must be OFF to select Odd Days or Even Days. ...
-
Page 20: Operating The Controller
OPERATING THE CONTROLLER This section includes instructions for the following controller operations: • Water Budget • Manual Operations • Off and Rain Delay Modes ATER UDGET The Water Budget feature enables you to easily increase or decrease the station run duration (by percentage) of all stations assigned to a selected program. -
Page 21: Program Cycle
OPERATING THE CONTROLLER To set Single Station feature, follow the steps below: 1. Turn the function dial to Single Station position. 2. Select Program A, B, C or D with the Program switch. 3. Use one of the following options to operate the station: For untimed operation: A. -
Page 22: Rain Off
OPERATING THE CONTROLLER Note: You may advance through the stations by pressing the NEXT key for the next station. To terminate operation at any time, press the OFF button. Use this feature to either turn off controller operation (Off mode) or to delay irrigation for a selected number of days (Rain Delay mode). -
Page 23: Installation Procedures
Installation Procedures This section includes instructions for mounting the controller cabinet and making the necessary wiring connections. To ensure safe operation, it is important to follow the instructions carefully. The following procedures include: I. Selecting an Installation Site II. Mounting the Controller III. -
Page 24: Mounting The Controller
INSTALLATION PROCEDURES OUNTING THE ONTROLLER 1. Center the mounting template (supplied) on the wall at about eye level allowing a minimum of 14" (35.6cm) to the left of the template for cabinet door clearance. Using a small center punch or nail, mark the wall at the three mounting hole locations. Note: When installing the controller on a plasterboard or masonry wall, use the appropriate type screw anchors to prevent the mounting screws from stripping. -
Page 25: Connec Ting The Valve Wiring
INSTALLATION PROCEDURES ONNECTING THE ALVE IRING FIRST, CONNECT THE EARTH GRD LUG ON THE PC BOARD TO A GROUNDING ROD 1. Use the lower numbered screw terminals for the dedicated freshwater valves (see page 8). 2. Use the higher numbered screw terminals for the recycling valves. Caution: All wiring splices must be waterproof to prevent short circuits and corrosion. -
Page 26: Connecting A Rain Sensor
INSTALLATION PROCEDURES ONNECTING A ENSOR COMPLETE CONTROL ® is designed for use with a normally-closed rain sensor or “Rain Switch”. (Refer to page 7 for additional important rain switch information.) 1. Route the two wires from the sensor into the cabinet through the field wire access opening. -
Page 27: Connec Ting The Power Wires
INSTALLATION PROCEDURES ONNECTING THE OWER IRES The controller has a built-in transformer which must be connected directly to a grounded three- wire 120 VAC power source, and an ERTH GRD lug that must be connected to a grounding rod prior to any other wire being connected. WARNING All electrical components must meet applicable national and local electrical codes including... - Page 28 INSTALLATION PROCEDURES Wirenut “A” connects the following wires: •Black from AC supply conduit •Black to Complete Control •Brown from Relay (either brown) Wirenut “B” connects the following wires: •Green from AC supply conduit •Green to Complete Control •Green to Pump •Green to Junction Box Wirenut “C”...
-
Page 29: Connec Ting The Recycling Pump Relay
INSTALLATION PROCEDURES ONNECTING THE ECYCLING ELAY The COMPLETE CONTROL ® uses a relay to operate the Recycling Pump. The relay is housed in the electrical junction box under the controller (see Figures 8 and 9). Two YELLOW wires are connected to the coil of the relay. -
Page 30: Troubleshooting
TROUBLESHOOTING ERROR SOLUTIONS Check "Recycling Features" for the RE VN ?: That Recycling valves don't use RE VN number indicates the first REcycling Valve recycled water or can't manually Number of your recycling valve/station series. be made to use recycled water All valves will not turn on 1. - Page 31 TROUBLESHOOTING RROR OLUTION Irrigation Valve stays on. Check station times in all programs and water budget. Up to four programs (A-D) could be running the same valve. Check for Manual mode; place dial in Run position instead. Disconnect valve wire. If still releasing water, a valve malfunction is indicated;...
-
Page 32: Specifications
SPECIFICATIONS Controller Cabinet: Plastic, weather-resistant, indoor/outdoor, wall mount with key-actuated locking cover Junction Box: Metal, weather-resistant, indoor/outdoor, with gasketed cover. Minimum installation footprint for controller and junction box: 14.25“W x 19.5“H x 5“D Wiring/Conduit Provision: Power Wiring - 1/2” NPT Fitting Field Wiring - 11/2”... -
Page 33: Notes
NOTES OTES... - Page 34 ReWater Systems w ww.rewater.com support@rewater.com Thousand Oaks, CA USA Tel: (805) 716-0104 Complete Control User’s Guide English Version RWS21SC.3 Last Review April 12, 2022.
Need help?
Do you have a question about the COMPLETE CONTROL 9 and is the answer not in the manual?
Questions and answers