Table of Contents
Advertisement
Quick Links
Advertisement
Table of Contents

Summary of Contents for Autodesk CP100
- Page 2 © 2008 Autodesk, Inc. All rights reserved. Except as otherwise permitted by Autodesk, Inc., this publication, or parts thereof, may not be reproduced in any form, by any method, for any purpose. Certain materials included in this publication are reprinted with the permission of the copyright holder.
- Page 3 The following are registered trademarks or trademarks of Autodesk Canada Co. in the USA and/or Canada and other countries: Backburner, Discreet, Fire, Flame, Flint, Frost, Inferno, Multi-Master Editing, River, Smoke, Sparks, Stone, and Wire. The following are registered trademarks or trademarks of Moldflow Corp. in the USA and/or other countries: Moldflow MPA, MPA (design/logo), Moldflow Plastics Advisers, MPI, MPI (design/logo), Moldflow Plastics Insight, MPX, MPX (design/logo), Moldflow Plastics Xpert.
-
Page 5: Table Of Contents
About the Autodesk Control Surface ........ - Page 6 About the Tangent CP100 Control Surface ........
-
Page 7: The Autodesk Control Surface
Summary About the Autodesk Control Surface ........2 Control Surface Panel Descriptions . -
Page 8: About The Autodesk Control Surface
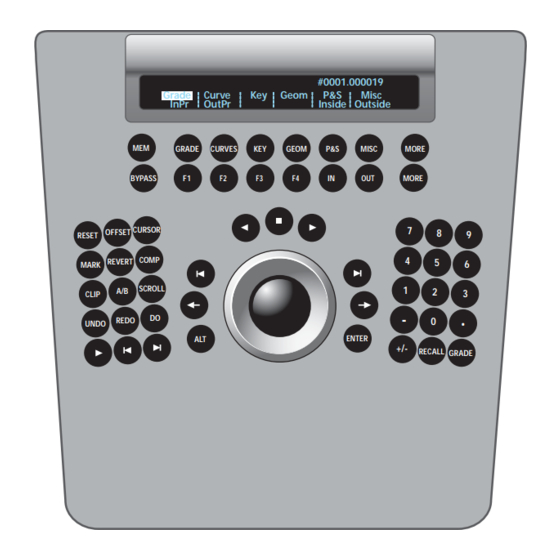
The Autodesk® control surface provides improved interactivity when colour grading film and video footage. You can perform many of the same tasks you do in the Autodesk Lustre® user interface using the control surface. The modular design of the control surface also allows you to work on different grading stages simultaneously. - Page 9 Control Surface Panel Descriptions #0001.000019 Grade Curve Geom P&S Misc InPr OutPr Inside Outside GRADE CURVES GEOM P&S MISC MORE BYPASS MORE REVERT ENTER RECALL GRADE Use the Navigation panel to: • Select menus. Pressing one of the menu buttons along the top of the panel activates a menu. For example, pressing the Grade button activates grading functionality.
- Page 10 The Autodesk Control Surface • Jump to specified frame number or timecode on the Storyboard. • Show or hide user interface elements. • Adjust the appearance of the panels. The following image shows the Function panel. Bright Bright Sh Mid...
-
Page 11: Navigating The Storyboard
Navigating the Storyboard 25 25 25 Shadow Contrast Brightness Use the Colour Grading panel for most grading functions. Colour grading functionality is split between the Colour Grading and the Function panels. The Colour Grading panel is always in grading mode. Depending on the colour space selected in the Setup Project menu, either Linear or Logarithmic functionality is available. - Page 12 The Autodesk Control Surface Shot back Play / Stop Shot forward REVERT ENTER RECALL GRADE Play & Shot Scroll Frame Scrub Enter Frame forward/back shots back timeline TC/Frm forward To scrub the Storyboard: Use the ring portion of the trackball.
- Page 13 Navigating the Storyboard If the Storyboard option does not appear, press the button for Thumbs (the P&S button) to display Storyboard thumbnails. This makes the Storyboard option appear in the digital display. Storyboard view mode switch #0001.000019 Storyboard Label Thumbs InPr OutPr Inside Outside...
-
Page 14: Toggling Play Modes
The Autodesk Control Surface To jump ahead a frame, do one of the following: • Press the Frame Forward button (right arrow button to the right of the trackball). • Simultaneously press the Shot Forward button (below the Undo button) and the Play button (below the Do button). -
Page 15: Activating Mouse Functionality
Activating Mouse Functionality Activating Mouse Functionality You can enable mouse functionality on the Navigation panel. To activate mouse functionality: Press the Cursor button on the Navigation panel. REVERT ENTER RECALL GRADE Use the panel’s features as follows. Use the: As the: Trackball Mouse. -
Page 16: Customizing The View
The Autodesk Control Surface To zoom the image: Hold down the ALT button on the Navigation panel and use the ring on the trackball to zoom in and out. To pan the image: Hold down the ALT button on the Navigation panel and use the jog ball on the trackball to pan the image. - Page 17 Customizing the View To access view options available on the Navigation panel: Press the top MORE button on the Navigation panel. #0001.000019 Storyboard Label Thumbs InPr OutPr Inside Outside GRADE CURVES GEOM P&S MISC MORE BYPASS MORE The Panel, Storyboard, Label, Thumbs, and GUI options appear in the digital display at the top of the panel.
- Page 18 The Autodesk Control Surface To access view options available on the Function panel: Use the viewport options to change the view as you work on your grades. For example, press PROXY to view a proxy version of your shot in the Player.
-
Page 19: Customizing The Panel Sensitivity
Customizing the Panel Sensitivity You can also access the SHOW button in the Function panel. This button shows or hides the geometry wireframe for the current secondary layer. There is no functionality assigned to the Function panel’s ALT button for this release. To change fonts in the digital display: On the keyboard, press S +F until you obtain the desired font. - Page 20 Lustre. Saving the Sensitivity Modifications When you have completed making modifications to the sensitivity of your Autodesk Control Surface panel and tested the sensitivity, you must save your changes.
-
Page 21: Selective Backlighting Of Active And Available Buttons
Selective Backlighting of Active and Available Buttons In order to make it easier to determine which functions are currently available on the Autodesk Control Surface panels, you can select Mid from amongst the options accessible from the Navigation panel. -
Page 22: Toggling Playheads
The Autodesk Control Surface To enable backlighting for active and available buttons: Press the bottom More button on the Navigation panel. The Low, Mid, High, and Screen options appear in the digital display. #0001.000019 Grade Curve Geom P&S Misc High... -
Page 23: Working With The Grade Bin
Working with the Grade Bin Revert Compare REVERT ENTER RECALL GRADE Undo Redo To save a change to the undo list: Press the Do button. To go through the undo list: Press the Undo or Redo button. Reverting to Previous Grades You can use the Navigation panel to toggle between the grade that was applied to a shot when you first selected it in the Storyboard and the current grade. - Page 24 The Autodesk Control Surface Cycle grades Select container REVERT ENTER Save Grade RECALL GRADE mode Grade Load-Recall mode Saving a Grade to the Grade Bin Use Grade Save mode to save one or more grades to the Grade bin. To save a grade to the Grade bin: On the Storyboard, use the ring to navigate to the shot with the grade you want to save.
-
Page 25: Saving The Current Grade
Saving the Current Grade To load a grade from the Grade bin: On the Storyboard, navigate to the shot to which you want to load one or more grades. This step can also be performed after you enter Grade Load-Recall mode. Press the Recall button on the Navigation panel. -
Page 26: Copying Grades
The Autodesk Control Surface To adjust printer lights: On the Navigation panel, double-press the ALT button. The words “Shift ON” appear in the digital display. #0001.000019 Shift ON Grade Curve Geom P&S Misc InPr OutPr Inside Outside GRADE CURVES GEOM P&S... -
Page 27: Adding Keyframes
Adding Keyframes To copy a grade to the current shot from another shot in the Storyboard: Scroll to the shot you would like to copy grades to by performing one of the following two actions: • Hold down the ALT button on the Navigation panel and then press the Frame Forward or Frame Back button to temporarily apply the grade from the previous or next shot to the current shot. -
Page 28: Copying And Pasting Keyframes
The Autodesk Control Surface Copying and Pasting Keyframes You can copy and paste keyframes using the Navigation panel of the Autodesk Control Surface panel. To copy and paste keyframes: On the Navigation panel, press the bottom MORE button. The Permanent Copy / Paste (P. C & P) menu is displayed. - Page 29 Access the following additional options: Low, High, and Screen. These options pertain to the control surface appearance. See “Modifying the Appearance of the Autodesk Control Surface” on page 48. There is no functionality assigned to the Misc button for this release.
-
Page 30: Caching Memory
The Autodesk Control Surface Caching Memory When a shot does not play back in real time, you can cache the frames into memory using the Mem button. Cache #0001.000019 Grade Curve Geom P&S Misc InPr OutPr Inside Outside GRADE CURVES GEOM P&S... -
Page 31: Repositioning Shots
Repositioning Shots To reset parameters for the current menu only: Press the Reset button once. To reset all parameters on the shot: Double-press the Reset button. You can reset individual parameters by pressing its assigned Reset button. These buttons are indicated throughout this chapter. Repositioning Shots You can reposition a shot by: •... -
Page 32: Performing Colour Grading
Toggle the geometry wireframe on or off. Performing Colour Grading You can use the Autodesk control surface to perform input and output grading in Logarithmic or Linear mode. As with other menus, you select the Grade menu from the Navigation panel. This activates... - Page 33 Performing Colour Grading regardless of which menu is active in the Function panel. The features available on these panels depend on whether you are in Logarithmic or Linear mode. You specify the colour architecture in the Setup Grade menu in the user interface. Logarithmic Mode When Log is enabled in the Setup Grade menu, the Colour Grading panel and the Function panel are activated with logarithmic colour grading functionality.
- Page 34 The Autodesk Control Surface To colour grade using the Colour Grading panel default setup: On the Colour Grading panel, use the following controls. Reset Toggle Reset S/M/H S/M/H contrast/ contrast/ Reset brightness toggle pivot pivot brightness 25 25 25 Shadow...
- Page 35 Performing Colour Grading To colour grade using the Colour Grading panel alternate setup: Press the F9 button to switch to the alternate setup. On the Colour Grading panel, use the following controls. Reset brightness Reset brightness Reset brightness in shadows in midtones in highlights 25 25 25...
- Page 36 The Autodesk Control Surface Grading in Logarithmic Mode Using the Function Panel When the Grade menu is enabled, you can use the Function panel to: • Adjust overall hue, brightness, and saturation. • Balance brightness and contrast in the red, green, and blue channels.
- Page 37 Performing Colour Grading minus button (-). To enable layer 11, press 0. To enable layer 12, press the decimal button (.). If you are accessing the Grade menu after having created a geometry or key, do one of the following: •...
- Page 38 The Autodesk Control Surface Use: Knobs at top right Balance S/M/H brightness of the colours, or adjust cutoff values. Knob 4=Brightness in shadows/cutoff values Knob 5=Brightness in midtones/cutoff values Knob 6=Brightness in highlights To toggle knob functionality, press the F4 button in the centre column.
- Page 39 Performing Colour Grading To colour grade in Linear mode using the Colour Grading panel: On the Colour Grading panel, use the following controls. Reset Lift Toggle M/L Reset gain Toggle M/M Reset gamma 25 25 25 Low Lift Low Gamma Low Gain Toggle M/H Lift...
- Page 40 The Autodesk Control Surface To colour grade in Linear mode using the Function panel: Press the Grade button on the Navigation panel. The In Primary, Out Primary, Inside, and Outside options are activated. In Primary Out Primary Inside Outside #0001.000019...
- Page 41 Performing Colour Grading On the Function panel, use the following controls. RGB channels RGB toggle B/W toggle B/W values Lift BlClip WhClip Contrast Gain Saturation Low Mid High Master Reset RGB channels Reset gain SHOW Reset Reset hue saturation Reset contrast Saturation Hue Rotation Contrast...
-
Page 42: Performing Curves Grading
The Autodesk Control Surface Use: Buttons in right centre Toggle the type of black and white values to be adjusted column (Knobs 4-5). F4=Clip F5=Reference SHOW button Toggle the geometry wireframe on or off. Performing Curves Grading When the Curves menus is enabled, you can use the Function panel to: •... - Page 43 Performing Curves Grading Do one of the following: • Press the F1 option button to indicate that you are working on the initial primary grade. • Press the F2 option button to indicate that you are working on final curve modifications. Do one of the following: •...
- Page 44 The Autodesk Control Surface On the Function panel, use the following controls. RGB curve CMY curve points Curve types Geom UI points MasterHue MasterLig LowL-S Master Reset RGB Reset CMY curve points curve points SHOW Reset hue curve Reset saturation...
-
Page 45: Generating Keys
Generating Keys Use: Buttons in centre column Select the type of curve to be modified using the RGBCMY curve points. F1=Hue F2=Light F3=Saturation If you press the F1 button when working with RGB curves, you are toggled to Hue curves. First row of buttons at bottom right Select the low point, mid point, high point, or all for the L-S curve. - Page 46 The Autodesk Control Surface To generate a key: Press the Key button on the Navigation panel once to activate the Keyer menu, and a second time to enable the Keyer channel. The Pick and SrcPrim options are activated. Pick SrcPrim #0001.000019...
- Page 47 Generating Keys On the Function panel, use the following controls to adjust the key for the sampled colour. Tolerance, Channels: Hue, Cleanup, Reset cleanup, Centre, Softness Value, Saturation Shrink, Blur shrink, blur hTol hCen hSoft Blur Invert Softness Tolerance MINUS INVlnk Tol - Tol +...
- Page 48 The Autodesk Control Surface Use: Upper left F3 and F6 buttons Enable either minimum or maximum softness (Knob 3) adjustments. F3=Minimum F6=Maximum Buttons in centre column Adjust tolerance, centre, and softness values separately for each of the channels forming the basis of the key.
-
Page 49: Creating And Grading Geometries
Creating and Grading Geometries To enable or disable the Hue, Value, or Saturation channels: On the Function panel, double-press F1, F2, or F3 to enable or disable Hue, Value, or Saturation. Channels: Hue, Value, Saturation hTol hCen hSoft Blur Invert Softness Tolerance MINUS... - Page 50 The Autodesk Control Surface To create geometries: Press the Geom button on the Navigation panel. The Rectangle, Circle, Wipe (split screen), and Bezier (free-form geometry) options are activated. Rectangle Circle Wipe Bezier #0001.000019 Grade Curve Geom P&S Misc Rect Circle...
- Page 51 Creating and Grading Geometries Use the jog ball as a geometry mover and press the ALT and shot forward buttons to select the geometries on the current active secondary layer. On the Function panel, use the following controls to adjust the geometry. Reset Scaling Delete...
- Page 52 To colour grade the geometry, select either the Inside or Outside option button depending on whether colour grading should occur inside or outside the geometry. See “Performing Colour Grading” on page 26. Geometry Invert Functionality Users can invert geometries on the current secondary layer using the Autodesk control surface.
-
Page 53: Cycling Among Geometries
Cycling Among Geometries To invert geometries using the Autodesk control surface: On the Function panel, press the F4 button in the centre column. Invert Geom MoveY SizeX SizeY Size MoveX Softness Blur Color Opacity MINUS INVlnk Softness: Variable Softer SHOW Cycling Among Geometries You can now move from one geometry to the next in the order of their creation. -
Page 54: Modifying The Appearance Of The Autodesk Control Surface
• Backlighting for a button being pressed • Backlighting for active and available buttons • The digital display To modify the appearance of the Autodesk control surface: Press the bottom More button on the Navigation panel. #0001.000019 Grade Curve Geom P&S... -
Page 55: The Tangent Cp100 Control Surface
..........63 About the Tangent CP100 Control Surface The Tangent CP100 control surface is designed to improve interactivity when colour grading film and video footage. You can accomplish many of the tasks you do in the Lustre user interface using the Tangent CP100 control surface. - Page 56 While you learn how to do each of these tasks, show the user interface so that you can view the results in the menus. Most buttons and dials on the control surface are labelled. For information on connecting the Tangent CP100 control surface, refer to the Autodesk Lustre Software Installation Guide for your platform.
-
Page 57: Customizing The View
Customizing the View To operate the control surface: Do any of the following: • Press a button to select the displayed option. • Turn a dial to increase or decrease the value of the displayed channel or parameter. Turn clockwise to increase the value. Turn counter-clockwise to decrease it. •... -
Page 58: Toggling Play Mode
The Tangent CP100 Control Surface Press the MORE button to view all the available options. button ===== ====== Half | Home | Render |Label|Prim | Result Cache|ClipPl| Gui |GeomUI| Matte | Split names MORE MORE Toggling Play Mode You can loop play a shot or the entire Storyboard using the ClipPL button. This button corresponds to the Play Mode button in the user interface. -
Page 59: Navigating The Storyboard
Navigating the Storyboard ====== Cache|ClipPl| Gui |GeomUI| Matte | Split MORE Navigating the Storyboard Use the Player controls on the lower right and the scrolling controls on the left to navigate the Storyboard. Use the left dial (jog knob) and transport controls to play and scrub the Storyboard. You can also use the Alt button to switch between shots assigned to Playhead A and Playhead B. -
Page 60: Undo List
The Tangent CP100 Control Surface #0003.000025 PERFM CLEAR GRADE EDIT MODE DELETE MOVE SELECT RECALL PREV NEXT UNDO REDO MARK press to to scroll select You can show the Storyboard all the time or only when you scroll. To show the Storyboard all the time, press T on the keyboard. - Page 61 Undo List #0003.000025 PERFM CLEAR GRADE EDIT MODE DELETE MOVE SELECT RECALL PREV NEXT UNDO REDO MARK Reverting to Previous Grades Use the Alt button on the lower right to toggle between the grade that was applied to a shot when you first selected it in the Storyboard and the current grade.
-
Page 62: Resetting Parameters
The Tangent CP100 Control Surface #0003.000025 PERFM CLEAR GRADE EDIT MODE DELETE MOVE SELECT RECALL PREV NEXT UNDO REDO MARK Resetting Parameters On a shot-by-shot basis, you can reset the parameters set in some menus. You can also reset a... -
Page 63: Copying Grades
Copying Grades To reset a parameter: Press the Reset button associated with the dial or trackball. Secondary 1 Secondary 1 Center Hue | Width Hue | Soft Hue Center Val | Width Val | Soft Val Secondary 1 Secondary 1 Center Sat | Width Sat | Soft Sat Hue Rotation | Gain | Saturation blur reset... -
Page 64: Adding And Moving Keyframes
The Tangent CP100 Control Surface To copy grades: Do one of the following: • Press Prev or Next to temporarily apply the grade from the previous or next shot to the current shot (outlined in red or magenta). Press Prev or Next multiple times to move through the shots in the Storyboard. -
Page 65: Repositioning Shots
Repositioning Shots To add a keyframe: Go to the frame where you want to add the keyframe. Press Mark. UNDO REDO MARK To adjust the timing of an existing keyframe: Do any of the following: • Press In and then use the right dial to move the first keyframe. •... -
Page 66: Primary Colour Grading
The Tangent CP100 Control Surface Use the following controls to reposition the shot. Pan & Scan Pan & Scan Pan & Scan Pan & Scan Scale | Pan X | Pan Y | modify modify Scale X axis Y axis... - Page 67 Primary Colour Grading Use the following controls to perform primary colour grading. printer light settings controls overall brightness Primary Primary Red Bright | Green Bright | Blue Bright Red Contr | Green Contr | Blue Contr Primary Primary separate Shadow Brigh | Mid Bright | High Bright Hue Rotation | Gain | Saturation...
- Page 68 The Tangent CP100 Control Surface To modify gamma, gain, and lift: Enable Grade and then do one of the following: • Enable InPr to modify the input primary values. • Enable OutPr to modify the input primary values. ===== Grade|PanScn|Curves|HueCrv|Keyer|Geom...
-
Page 69: Modifying The Hue, Saturation, And Lightness Curves
Modifying the Hue, Saturation, and Lightness Curves Modifying the Hue, Saturation, and Lightness Curves You can modify the hue, saturation, and lightness curves that appear in the Curves menu. You can modify the entire curve uniformly or modify individual vertices for RGBCMY channels (red, green, blue, cyan, magenta, and yellow). - Page 70 The Tangent CP100 Control Surface To access a secondary: Enable Keyer. ===== Prmry|PanScn|Curves|HueCrv|Keyer|Geom Sec | Keyer | Invert | Reset | Inside | Outside MORE The secondary controls for the first secondary appear. Once you enable and key a secondary, you can modify hue, gain, and saturation.
- Page 71 Secondary Colour Grading On the right side of the control surface, press Recall and then press a number between one and eight to go to that secondary. You can also press Selectv to toggle through the eight secondaries. #0003.000025 CLEAR MODE RECALL Applying Secondaries to the Shot...
- Page 72 The Tangent CP100 Control Surface To create a key: Enable Keyer in the upper control surface menu, and then enable Keyer in the lower menu. To sample initial softness and tolerance, press F1 on the control surface and then use the left trackball to position the colour picker over the image.
- Page 73 Secondary Colour Grading Press More (upper left) to shrink, blur, or clean up the edges of the key. Grade |PanScn|Curves|HueCrv| Keyer |Geom Sec | Keyer | Invert | Reset | Inside | Outside MORE The Cleanup, Shrink, and Blur controls appear. Secondary 1 Secondary 1 Center Hue | Width Hue | Soft Hue...
- Page 74 The Tangent CP100 Control Surface To create a geometry: Enable Geom and then select the shape from the second row. ====== Grade |PanScn|Curves|HueCrv| Keyer |Geom ====== Rect | Circle | Wipe | Reset | Inside|Outside geometries Use the controls in the centre of the control surface to modify the shape of the geometry, as well as its colour, opacity, and position on the image.
- Page 75 Secondary Colour Grading To apply logical operations to the geometry, or invert the geometry, press the More button associated with the second row on the left. ====== Prmry|PanScn|Curves|HueCrv|Selectv|Geom ====== Link | and | or | Minus | | Invert Moving Geometries You can move geometries from the control surface.
- Page 76 The Tangent CP100 Control Surface...
- Page 77 Autodesk con- secondaries with the Tangent CP100 trol surface comparing reverting to previous with the Tangent CP100 grades with the Autodesk control surface grades with the Tangent CP100 grading control surfaces See colour grading...
- Page 78 Tangent CP100 primary colour grading overview in Linear mode with the Autodesk control surface in Linear mode with the Tangent CP100 in Logarithmic mode with the Autodesk con- undoing trol surface with the Autodesk control surface in Logarithmic mode with the Tangent CP100...
- Page 79 Index view options accessing with the Autodesk control surface accessing with the Tangent CP100 zooming with the Autodesk control surface...
- Page 80 Index...
Need help?
Do you have a question about the CP100 and is the answer not in the manual?
Questions and answers