Table of Contents
Advertisement
Advertisement
Table of Contents

Related Manuals for Ohmeda Giraffe OmniBed


Summary of Contents for Ohmeda Giraffe OmniBed
- Page 1 Giraffe OmniBed Operator’s Manual...
- Page 2 Ohmeda Medical recommends that a telephone or written request for service advice be made to the nearest Ohmeda Medical Regional Service Center. This Product or any of its parts should not be repaired other than in accordance with written instructions provided by Ohmeda Medical and by Ohmeda Medical trained personnel.
-
Page 3: Table Of Contents
Table of Contents General Information Incubator/Warmer Operating Modes ..............1-1 Control Modes .....................1-2 Controls and Displays ....................... 1-2 Incubator Operation .................... 1-3 Warmer Operation ....................1-4 Operating Mode Transition ..................1-5 Accessory Options ......................1-5 Alarms ..........................1-11 Options Alarms ........................1-15 Alarm Table ........................1-16 Cable Connections and Mechanical Controls ..............1-18 Checkout Mechanical Checks ......................2-1... - Page 4 Detailed information for more extensive repairs is included in the service manual solely for the convenience of users having proper knowledge, tools and test equipment, and for service representatives trained by Ohmeda Medical. Note: A Note provides additional information to clarify a point in the text.
-
Page 5: General Information
General Information Incubator/Warmer operating modes The Giraffe OmniBed combines the features of an incuba- tor and a radiant warmer. When used as an incubator, a fan and heater beneath the bed circulate warm air through the closed infant compartment. The baby can be accessed through portholes or doors. -
Page 6: Control Modes
General Information Control Modes The OmniBed has two control modes when used as either an incubator or a warmer. With the compartment closed, the OmniBed controls the inside temperature comparing air temperature readings from the probe on the compartment wall to a setting you enter using the control panel (air mode) or Options Done/Exit... -
Page 7: Incubator Operation
General Information Incubator operation When operating as an incubator, select the control mode by pushing the Air Mode Button at the bottom or the Baby Mode Button at the top of the temperature regulation controls. Air Control Mode The Air Mode Indicator lights when air mode is selected. Two temperature values are shown in the lower third of the display: the value shown in the larger numerals at the top is the air temperature measured by the compartment probe, the value... -
Page 8: Warmer Operation
General Information Warmer Operation When operating as a radiant warmer, select the control mode by pushing the Manual Mode Button in the middle or the Baby Mode Button at the top of the controls. Manual Control Mode The Manual Mode Indicator lights when the manual mode is selected. -
Page 9: Operating Mode Transition
General Information Operating Mode Transition If the canopy is raised while the OmniBed is being operated as an incubator, it automatically switches to operation as a radiant warmer. If it was in the baby mode as an incubator, after the canopy is raised it will continue to operate in the baby mode, using the same baby set temperature you entered earlier. - Page 10 General Information Alarms Controls Operation Done/Exit Help: Select the Help icon (question mark) to bring up the “Help” screen. The screen will present a menu of topics on how your OmniBed unit works. “Alarms” list all the alarm messages on the left and more detailed descriptions of the alarm and how to react to a given alarm on the right.
- Page 11 General Information Options Done/Exit Timer Start/Stop Timer: Select the Timer icon (clock face) to bring up the Reset “Timer” menu screen. Select Start/Stop to start timer; select it Tones Done/Exit O:OO again to stop the timer. Scroll down and select Reset to return the timer to zero.
- Page 12 General Information Options Done/Exit Comfort zone: Select Comfort Zone icon (thermometer and face) to bring up the “Comfort Zone” screen. Important: The comfort zone screen is only a reference information screen used for calculating suggested temperature ranges* during air control mode from data you supply. You must manually enter the temperature settings using the Name Birth: 6/21/00...
- Page 13 General Information Alarms: Options Done/Exit Setup Temp Units Alarm Volume Setup/Customize: Select Setup/Customize icon (wrench) to Man Temp Alarm bring up the setup screen. Patient Alarm 1.0C Canopy Pedal Enable Select “Temp Units” to change temperature displays from the Elevate Enable Baby Info default Celsius setting to Fahrenheit.
- Page 14 General Information Options Done/Exit Scale: Available if the in-bed scale is installed. Select the Scale icon (balance scale) to bring up the scale menu screen. Select Weigh to start the weighing procedure. An audio prompt sounds and the screen will prompt you to lift the baby from the bed surface while the scale zeros.
-
Page 15: Alarms
General Information Alarms An alarm message appears across the top graphics display screen identifying the various alarm conditions. In addition, the alarm light at the top of the control panel housing activates and an audio alarm sounds. The audio tone varies with the alarm’s priority: an alternating Alarm messages displayed here two tone alarm indicates a critical alarm that triggers automatic Options... - Page 16 General Information Baby Hot - Check Probe 1 Baby Hot- Check Probe 1 Active whenever the unit is in the baby mode, the Baby Hot Options Done/Exit alarm activates when the temperature measured by the probe on the baby skin is 1.0°C above the baby temperature you set previously (this can be adjusted to 0.5°C using the Setup/ Customize screen).
- Page 17 General Information Air Temperature > 40 C Air Temperature > 40 C In the air mode, when the air temperature is set above 37°C by Options Done/Exit using the >37°C key, the Air Temp >40°C alarm activates when temperatures greater than 40°C are read by the compartment probe.
- Page 18 General Information Check Baby Check Baby Active only when the canopy is open, the Check Baby alarm activates Options when the radiant heater has been running at 100% power for more Done/Exit than twelve minutes. Check the attachment of the skin probe to the baby and monitor the baby’s temperature closely.
-
Page 19: Options Alarms
General Information Option Alarms Add Water Options Done/Exit Humidifier Add Water- Water level low in humidifier reservoir. Add distilled water. Water Reservoir Not Engaged Water Reservoir Not Engaged- Humidity water reservoir Options Done/Exit missing or incorrectly installed. Humidity Probe Failure- Probe failed; humidifier not operat- ing. -
Page 20: Alarm Table
General Information Alarm Table Temperature Regulation Alarm Activation criteria Alarm Silence Audio Signal Mode Heater Status Inc/Wmr High Air Temp 1.5°C over AST 10 min On/Off Low Air Temp 3.0°C under AST 10 min On/Off Baby Cold 1.0°C under BST* 15 min Baby On/On 5 min >2°C... - Page 21 General Information Humidifier Alarm Activation criteria Alarm Silence Audio Signal Add Water Reservoir low on water 10 min Check Water Reservoir Reservoir missing or not 10 min fully inserted Humidity Probe Failure Probe failed 10 min open or shorted Humidifier Failure Failure None X appears on icon...
-
Page 22: Cable Connections And Mechanical Controls
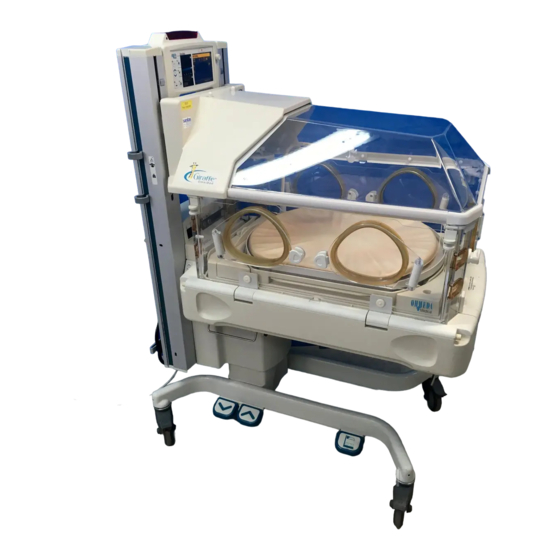
General Information Cable Connections and Mechanical Controls Plug retaining brackets not shown for clarity BACK FRONT 1. Temperature Regulation Controls 1. Ventilator Slot 2. Numeric Temperature Displays 2. Side Door Latch 3. Graphics Screen 3. RS 232 Connector 4. Control Knob 4. - Page 23 General Information 1. Portholes 2. Control Panel 3. Upright 4. Dovetail rail 5. Canopy Raise/Lower Switches 6. Pleural Drainage Hanger 7. Elevating Column 8. Bed Height Pedal 9. Raise Canopy Pedal 10. Storage Drawer 11. Side Door Latch 12. Canopy SIDE 1-19 1-19...
- Page 24 General Information Notes 1-20 1-20 6600-0342-000 08/08/01...
-
Page 25: Mechanical Checks
Preoperative Checkout Procedure Setup Your OmniBed has been shipped to you with the canopy in the locked down position. Before the canopy can be raised the rail locks must be released. They are located in both sides of the OmniBed near the outside bottom of the uprights. An orange tear-away label marks their location. -
Page 26: Controller Checks
Preoperative Checkout Procedure 8. If the unit is equipped with an iris porthole, check that the iris is installed and in good condition. Check that the iris tightens when it is rotated. 9. Check that the tubing access covers in the four bed corners and the large slot grommet at the head of the bed are in place and are in good condition. -
Page 27: Accessory Checks
Preoperative Checkout Procedure 8. With the canopy raised, check the operation of the side panel at the foot of the bed. Check that after you lift up on the side panel, it swings down and hangs perpendicular to the bed. Check that the side panel is securely attached. Check that it swings back up and seats in the closed position. - Page 28 Preoperative Checkout Procedure Notes 6600-0342-000 08/08/01...
-
Page 29: Operating The Omnibed
Operating the OmniBed Basic Operating Procedure w w w w w Always set the brakes before placing WARNING a patient in the unit. w w w w w Do not leave the patient unattended when using the OmniBed. Check the patient’s temperature periodically to ensure the comfort and the safety of the patient. - Page 30 Operating the OmniBed w w w w w When operating as a radiant warmer, use the baby mode unless the manual mode is specifically prescribed. While both modes require patient monitoring, the manual mode requires constant attention. In the manual mode, you must take the responsibility for detecting changes in the environment (drafts, direct sunlight, phototherapy lamp...
-
Page 31: Operation As An Incubator
The patient probe is not isolated from earth WARNING ground. Any additional equipment used with the Giraffe OmniBed must comply with IEC 601. Operation as an Incubator Always preheat the bed before placing the baby in the bed. 1. Select air control mode. If the baby mode is desired, preheat the bed in air mode. -
Page 32: Attaching The Skin Temperature Probe
• Regularly check that the probe is attached- if the probe is not in contact with the baby’s skin inaccurate readings will result. • Only use Ohmeda Medical probes; other manufacturers probes are not calibrated to Ohmeda Medical equip- ment. Using probes from other manufacturers may... -
Page 33: Additional Operating Procedures
Operating the OmniBed Additional Operating procedures w w w w w When opening or closing the doors or WARNING portholes, make sure the infant, any clothing, monitoring leads, tubing, etc., are completely within the con- fines of the bed. Inspect all patient connected tubes or leads before and after sliding out, rotating, tilting, raising or lowering the bed. -
Page 34: Raising The Canopy
Operating the OmniBed Raising the Canopy To allow immediate access to the baby when the OmniBed is being used as an incubator, one touch of the foot pedal, or the canopy up switch at the head of the bed, raises the canopy to its upper travel limit in one uninterrupted movement. -
Page 35: Using The X-Ray Tray
Operating the OmniBed Using the X-ray tray Raise the canopy and place a film cassette on the tray that slides out from under the mattress for X-ray procedures. The tray slides out on either side of the bed (A). The cassette can be slid into the cavity under the mattress without moving the baby. -
Page 36: Using The Humidifier
Operating the OmniBed Using the humidifier w w w w w Allow the heater cylinder to cool WARNING about ten minutes before removing the reservoir. The OmniBed servo-humidifier maintains a selected humidity percentage relative to readings from a humidity sensor in the infant compartment. -
Page 37: Thermalink Option
Operating the OmniBed Note: Do not fill the humidifier past the fill level. Filling past the fill level actually DECREASES humidification. ThermaLink option The ThermaLink Serial data interface and Nurse Call connections are options offered with the OmniBed. Your unit has these features if there is a nine pin connector on the back of the controller, near the top of the electrical enclosure cover. -
Page 38: Using The In-Bed Scale
Operating the OmniBed The Nurse Call alarms works with the OmniBed’s audible alarm. Silencing the audible alarm on the OmniBed stops the Nurse Call alarm even if the alarm condition still exists. At the end of the silence period, the Nurse Call alarm and the audible alarm reactivate unless the condition has been resolved. -
Page 39: Mounting Accessories
Operating the OmniBed 5. Hold the baby until the second tone sounds and the “Re- place Baby” icon appears on the screen. Place the baby back down on the mattress while holding up any leads or tubes attached to the baby. The scale will now calculate the baby’s weight which will appear in the display. -
Page 40: Gas Cylinder Holder
Operating the OmniBed Gas Cylinder Holder The gas cylinder holder may be mounted on the outside or the back of the dove tail accessory rails. Slide the holder down from the top of the dovetail rail and secure it by tightening the mounting nuts. -
Page 41: Maintaining The Omnibed
Repair Policy Warranty repair and service must be performed by an Ohmeda Medical Service Representative or at the Ohmeda Medical Service and Distribution Center. To contact an Ohmeda Medical Service Representative, call the your Ohmeda Medical Service Office listed on the back cover. -
Page 42: Maintenance Schedule
Maintaining the OmniBed Maintenance schedule The unit should be maintained in accordance with the proce- dures detailed in the Service Manual. Service maintenance must be performed by a technically competent individual. Operator maintenance This schedule lists the minimum frequencies. Always follow hospital and local regulations for required frequencies. -
Page 43: Disassembling The Omnibed For Complete Cleaning
Maintaining the OmniBed Disassembling the OmniBed for a complete cleaning If the OmniBed has been exposed to body fluids, check your hospital’s infection control procedures. You may need to wear protective clothing and eye wear or use special sterilization agents and cleaning procedures. 1. - Page 44 Maintaining the OmniBed 1. Mattress pad 2. Clear plate 3. X-ray tray 4. Rotating bed 5. Translation deck 6. Tilt platform 7. Pan 10. Remove the mattress pad. Remove the clear plate under the mattress. Remove the X-ray tray by sliding it all the way out of the bed.
-
Page 45: Cleaning And Disinfecting Individual Components
Maintaining the OmniBed Cleaning and disinfecting individual components Humidifier The humidifier reservoir may be disinfected chemically or steam sterilized. w Do not use peroxide solutions to clean CAUTION the humidifier reservoir. Disassemble the humidifier. Clean the interior with a mild detergent-disinfectant solution. Rinse and thoroughly dry the parts before reassembly. - Page 46 Maintaining the OmniBed • Disposable probes come with a smaller heat reflecting patch already attached, are white and have no metal disk at the patient end. Note: Disposable skin temperature probes cannot be cleaned. 2. Clean the reusable patient temperature probe by gently wiping with a soft damp cloth containing a disinfecting agent safe for use on the probe materials.
- Page 47 Maintaining the OmniBed The following list some cleaning solutions that may be used safely: Generic Formulation Maximum Concentration Level Sodium Hypochlorite (bleach) 0.5% Aqueous Solution Glutaraldehyde Hydrogen Peroxide Iodophor Solution 0.27% Cavicide 100% spray Do not use the following cleaners; they will damage the parts you are cleaning and are not recommended: –...
- Page 48 Notes Maintaining the OmniBed 6600-0342-000 08/08/01...
-
Page 49: Accessories
Accessories Air intake filters (10), replace every 3 months ... 6600-0207-850 Humidifier reservoir ........... 6600-0216-850 Reservoir top only ............. 6600-1492-500 Reservoir bottom only ..........6600-1493-500 Disposable patient probe (10) ........6600-0873-700 Disposable patient probe (50) ........6600-0874-700 Re-useable patient probe .......... 6600-0875-700 Heat reflecting probe patch (50) ........ - Page 50 Accessories 6600-0342-000 08/08/01...
-
Page 51: Appendix
Appendix Specifications Power Requirements Accessory Outlets 10.5A @ 100v ~, 50/60 Hz 2A @ 100v ~, 50/60 Hz 9A @ 115v ~, 50/60 Hz 2A @ 115v ~, 50/60 Hz 4.5A @ 220v ~, 50/60 Hz 1A @ 220v ~, 50/60 Hz 4.5A @ 230v ~, 50/60 Hz 1A @ 230v ~, 50/60 Hz 4.5A @ 240v ~, 50/60 Hz... -
Page 52: Performance
Appendix Performance System Control accuracy ± 1.0°C Control Temp vs. Avg. Incubator Temp with level bed in manual mode. Variability ± 0.5°C Incubator Temp vs. Avg. Incubator Temp Warm-up time < 50 min. Time to reach 39°C control temp from cold start in 25°C 50% RH room ambient Patient measurement accuracy ±... - Page 53 (30) days with respect to expendable parts. The foregoing warranties shall not apply if the Product has been repaired other than by Ohmeda Medical or in accordance with written instructions provided by Ohmeda Medical, or altered by anyone other than Ohmeda Medical, or if the Product has been subject to abuse, misuse, negligence, or accident.
- Page 54 410-888-5200 Fax 410-888-0544 Asia/Pacific Europe Latin America, Caribbean Japan France Ohmeda Medical Datex-Ohmeda K. K. Datex-Ohmeda S.A.S. 8880 Gorman Road TRC Annex 9F 17 rue Jean-Elysée Dupuy Datex-Ohmeda Ltd. Laurel MD 20723 USA 6-1-1 Heiwajima F-69410 Champagne Au Mont Ohmeda House...
Need help?
Do you have a question about the Giraffe OmniBed and is the answer not in the manual?
Questions and answers