Table of Contents
Advertisement
Quick Links
Advertisement
Table of Contents

Summary of Contents for Delfast Top 3.0
-
Page 2: Table Of Contents
USER MANUAL Contents Dear Customer ................................4 Introduction ................................... 5 Use of Product ................................Behavior in road traffic ............................... 6 General recommendation for use ........................... 6 Overview of the e-bike ..............................8 Quick start guide ................................ 10 Turning the bike on and off ..........................10 Function buttons .............................. -
Page 3: Dear Customer
Service record ................................57 Dear Customer, Welcome to the Delfast Bikes community! We are thrilled you have joined us. To get you on your bike as quickly and safely as possible, we have developed a Quick Start Guide which will give you an overview of all the main features of your Delfast Top 3.0 e-bike. -
Page 4: Introduction
Use of Product The Delfast Top 3.0 e-bike was designed to ride for long distances. Delfast is not liable if the e- bike is used against its original purpose or for damages resulting from a breach of instructions laid out in this manual. -
Page 5: Behavior In Road Traffic
Behavior in Road Traffic Due to the electrical auxiliary propulsion power of Top 3.0, the rider will reach high speeds and accelerations much faster than they are used to on a regular bicycle. Therefore, the rider should familiarize themselves with the bike’s power on a legal and traffic–free road before entering into road traffic. - Page 6 Do not allow liquid or any object (especially conductive) into the battery charging connector. Never short-circuit the contact terminals of the battery. Not when it is discharged, charged, or during use. Wash your bike regularly to ensure its longevity and prevent corrosion. a.
-
Page 7: Overview Of The E-Bike
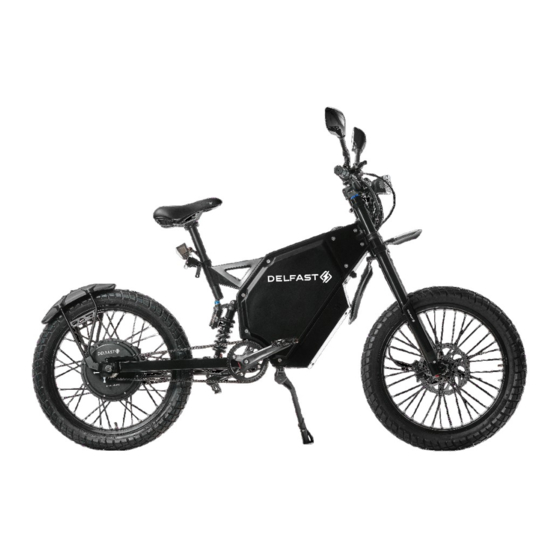
Function Overview of Top 3.0 eBike Battery Headlight Rear light Front fork Rear shock Rear fender Charge socket Motor Kickstand Belt transmision Display Front brake Rear brake lever lever Throttle Start / Stop button... - Page 8 Display UKC-1 Block of buttons High-contrast 3.5” IPS color matrix screen. ● Suitable for low temperature, Max -5℃ ● Screen rotates and can be easily switched from horizontal display to vertical. ● Speed displays: AVG SPEED, MAX SPEED, SPEED (Real–time). ●...
-
Page 9: Quick Start Guide
Quick Start Guide Turning the bike on and off Before you start riding your e-bike with the help of the motor, turn off the Bluetooth alarm system using the remote control by pressing the button with the image of the open lock. Next, turn on the e-bike by double-clicking on the button with the image of a lightning rod on the remote control, or by pressing the Engine START/STOP button on the bike frame. -
Page 10: Display
Main Display Using the display and block of buttons, you get access to information about the state of the e-bike: 1. Display backlight 11. Fault indicator 2. Speedometer 12. Battery charge 3. Speed mode 4. Speed 13. Assist level 5. Mileage 14. -
Page 11: Charge The Battery
Charging the battery Your Delfast Top 3.0 has a high-quality new generation lithium-ion battery. After turning on the e-bike, check the battery charge level on your e-bike’s display screen. Charging the bike will take approximately 6 hours. Be sure to fully charge the battery before operating your e-bike for the first time. -
Page 12: Mirror Adjustment
Mirror adjustment Sit on your e-bike in the riding position to adjust the mirrors. Look into your right and then left mirror and set your elbow in the center position between the top and bottom of the mirror – you shouldn't be blocking more than 1/4 of the inner corner of the mirror. The remaining area should reveal the side and back visibility. -
Page 13: Throttle/Pas Switch Positions
WARNING! When you select in the pas (pedal assist) mode, be careful when using the pedals. The e-bike can accelerate and the loss of control can cause injury. Throttle/PAS Switch positions: I – Throttle mode activated; Throttle / PAS Switch 0 –... - Page 14 Recuperation: The motor can generate energy and charge the battery through the regenerative braking system, which activates when braking to decelerate or stop. Recuperation begins when you slightly push one or both of the brake levers, the e-bike begins to slow down because the motor works like a generator.
-
Page 15: Display And Block Of Buttons
Display and block of buttons Block of buttons Button Button Button Button let to move through the menu right and up, or increase value let to move through the menu left and down, or decrease value short push will change the speed mode short push will change the mileage mode or enters exits the menu, confirms the values Display 1. -
Page 16: Display Backlight
1. Display backlight Icon show that the night mode of the display backlight is on. Push and hold the button on the block for 3 sec to turn ON/OFF the night mode. This mode is used to prevent the driver from being blinded during a night trip. By default, the night mode is off. -
Page 17: Speed Mode
3. Speed mode Speed mode: RT SPEED – real-time speed ● AVG SPEED – average trip speed ● MAX SPEED – maximum trip speed ● A short push of the button will change the speed mode. RT SPEED AVG SPEED MAX SPEED 4. -
Page 18: Mileage
5. Mileage Show a numeric value depending on the selected [6] Mileage mode By default is km 6. Mileage mode Mileage mode: TRIP/KM – trip distance ● ODO/KM – whole distance travelled ● TIME – time trip ● Short push the button on the block to change the [6] mileage mode 0 0 2 4 0 1 2 4... -
Page 19: Brake Indicator
7. Brake indicator The brake icon shows that the left or right brake lever on the handlebar is pushed If the icon is not shown when you push the left or right brake lever, this shows a malfunction of the related brake lever. 8. -
Page 20: Logo Or Error Code
9. Logo or Error code At this area of the display is shown the logo or error code If an error code is shown it is the malfunction of the system 10. Power scale Graphic [10] power scale shows the power consumed by the engine... -
Page 21: Fault Indicator
11. Fault indicator The fault icon shows that the e-bike has malfunctioned. The error code must be shown at the [9] Logo or Error code area and [15] Clock or Error area If a fault icon is shown contact the service. 12. -
Page 22: Assist Level
13. Assist level The [13] assist level is the range into which the maximum speed can be divided. You can change the [13] assist level with buttons on the block of buttons. You can change the quantity of the [13] assist levels in the menu Changing the quantity of [13] assist levels will divide the maximum speed By default, it is 5 ranges of the [13] assist levels You can change the quantity of the [13] assist level to the 3…9... -
Page 23: Clock Or Error
15. Clock or Error At this area of the display is shown the clock or error code. The clock is not set by default, you can set the clock through the menu. The display has its own battery and the settings will not be lost. When an error occurs, this area of the display will show the name of the system in which the error occurred. -
Page 24: Menu
Menu Double push the button to enter the menu. To move through the menu and change the values use the buttons. Push the to set the value or enter. 2. Clock settings 3. System settings 7. Battery info 8. Factory settings 9. -
Page 25: Backlight Brightness
1. Backlight brightness Select the “Brightness” icon and push the to get into the brightness adjusting settings. Push to change the backlight brightness, it has 5 levels, you can choose the most comfort. To get into the previous menu push the button. -
Page 26: System Settings
3. System settings Select the “System” icon and push the to get into the system settings. Push to сhoose following settings: Unit system – Metric/Imperial Power system – 24V/36V/48V/72V. Always must be 72V, if the power system value is not 72V the malfunction or damages may occur. -
Page 27: Wheel Size
5. Wheel size Select the “Wheel” icon and push the to get into the Wheel size settings. Push to set the diameter in inches or circumference in centimeters of the afterward wheel. By default must be 34 in., do not change this value unless necessary, the incorrect speed measurement can be. -
Page 28: Battery Info
7. Battery info Select the “Battery information” icon and push the to get into the “Battery information” window. Battery info, this values do not operate and can not be changed. To return in previous menu push the button. 8. Factory settings Select the “Factory setting”... -
Page 29: Password And Access
9. Password and access Select the “Password” icon and push the to get into the “Start password” window. You can set the password to enter the menu. The password is not set by default. Setting a password and losing it will result in inability to enter the menu. 10. -
Page 30: Exit
11. Screen orientation Select the “Screen direct ” icon and push the to get into the “Screen direct ” window. Screen direct - changing the orientation of the display, you can choose horizontall or vertical orientation By default the display is horizontal. To return in previous menu push the button. -
Page 31: Battery And Charging
Battery and charging Rules for using charging the battery WARNING! Do not open the battery. The battery explosion or electrolyte leakage can cause injury. The battery is protected automatically from overheating, overloading and deep discharge. That makes it, in practice, very easy and simple to handle. Nevertheless, you should consider some important things in order to maximize the life and performance of the battery. - Page 32 CAUTION! Do not store your e-bike in temperatures below -5°C / 14°F or above 45°C / 113°F for long time. It can cause malfunction to the battery Avoid charging outside in winter at low temperatures. vStore the battery, if possible, in a dry, cool and dark place.
- Page 33 CAUTION! Do not leave the e-bike unnattended when charging. Monitor the e-bike during the entire charging process. CAUTION! When the e-bike is fully charged disconnect the charger cable from the battery and power supply. 4. Connect charger to the power supply. A.
-
Page 34: Rules For Using The Lithium-Ion Battery
Rules for using the lithium-ion battery Lithium-ion batteries are the most expensive element of an e-bike. The correct operating and storage conditions will significantly extend their life, which will greatly save your money. All lithium-ion batteries supplied with the e-bike have an internal electronic battery protection system from excessively deep discharge of the battery during operation and from overcharging the battery while charging the lithium-ion battery from the electric network. -
Page 35: Storage Regulations For The Lithium-Ion Battery
Storage regulations for the lithium-ion battery The most favorable temperature for storage is +5 – +25 C, with the humidity 75% PH. Whenever possible, the battery should be stored in a closed, clean, dry and well–ventilated area, away from oxidizing, highly flammable substances, heat sources and open flames; Lithium-ion batteries are not recommended to store at fully charged at 100%. -
Page 36: Unpacking And Assembling The E-Bike
Unpacking and assembling the e-bike Front wheel – Installation Carefully unpack the front wheel [4]. Do not contaminate the brake disk. 2. Do not apply unwanted weight to the disc, it could lead to brake disc deformation Remove the transport brake cap from the brake pads. Install the front wheel [4]. -
Page 37: Handlebar - Installation
Handlebar – Installation Install the handlebar [4]. Put the handlebar [4] and stem clamp [3] on its position. 2. Loose tighten the upper screws [1] with your fingers. 3. Put the bracket [2] on its position. 4. Loose tighten the lower screws [1] with your fingers. Make sure that the handlebar [4] is centered. -
Page 38: Rear Light Mounting Bracket - Installation
Rear light mounting bracket – Installation If the plate [5] and pad [4] was removed, do as follows: Put the plate [5] and pad [4] on the bracket [3]. 2. Install the screws [7] and nuts [6] on the bracket [3]. Put the bracket [3] on its position. -
Page 39: Mirror - Installation
Mirror – Installation These steps are applicable to both right and left mirror. Install the clamp [3] and mirror [2] on its position. Install the screws [1] on the mirror [2]. Tighten the screws [1] with the #10-12m open-end wrench. Connect the electrical connector to the mirror repeater. -
Page 40: Horn - Installation
Horn – Installation If necessary, turn up the headlight. Put the horn [2] on its position. Install the screw [1] and nut [3] on the bracket [4]. 2. Tighten the screw [1] with the #10 hexagon socket head screw. Connect the electrical connector to the horn [2]. Do a check of the horn [2]. -
Page 41: Headlight - Installation
Headlight – Installation Put the headlight [3] on its position. Install the bolt [1], washer [4] and nut [3] on the bracket [4]. 2. Tighten the nut [5] and bolt [1] with two #10 open-end wrenches. Connect the electrical connector to the headlight [3]. Do a check of the headlight [3]. -
Page 42: Pedals - Installation
Pedals – Installation Install the pedal [1] on the crank [2]. Make sure that the mark on the end of thread matched the side of installation. a. The L (left) and R (right) markings. 2. Install the pedal [1]. a. Turn the left pedal counterclockwise b. -
Page 43: Battery Connection
Battery connection If this is the first ride or the e-bike has just been unpacked, it may be that the battery is not connected. This is intentionally done to prevent accidents. You must connect your battery: A. Open the XIAOXIANG application on your smartphone https://www.lithiumbatterypcb.com/ smart-bms-software-download/ B. - Page 44 E. Connect the charging connector and the power connector. F. Switch the Discharge slider in the XIAOXIANG application to the on mode. The battery will go from “Protection locking” to “Protection none” mode. 2. Make sure that the power is supplied to the e-bike. G.
-
Page 45: Maintenance Guide
6 mph (10 km/h). While riding the e-bike on a steep hill or a long hill, help your e-bike with the pedals, that will increase battery charge and prevent motor from overheating and power loss. In order to ensure your bike's steady operation, we recommend riding your Delfast bike at lower speeds. -
Page 46: Electricity Consumption
Wear Your Delfast is technical product consists of many components, which are subject to normal wear due to their function. Therefore, all the following components should be regularly checked and if necessary, replaced immediately: Brake Discs and pads are claimed during each braking operation and worn appropriately. -
Page 47: App & Gps
While riding the e-bike on a steep hill or a long hill, help your e-bike with the pedals, that will increase battery charge and prevent the motor from overheating and power loss. Delfast is not liable if the Delfast e-bike is used against its original purpose or for damages resulting from a breach of important instructions in this manual. - Page 48 Log in with your e–mail and password or All possible information about your e-bike on via Facebook. one screen and at your fingertips. Never worry about malfunctions! Contact All vital on–board diagnostics available support at any time. customer on a single screen.
- Page 49 Never get lost with turn–by–turn and always Plan your trip with the nighttime interface be aware of the exact distance to destination. navigation in the daytime interface. Enjoy peace of mind knowing where your e-bike is at all times.
- Page 50 GPS Tracker. Please be advised that there is a GPS tracker installed inside your e-bike's frame. With its help, you can track the location of your e-bike, travel routes and analyze trips. In order for your GPS tracker to start working, you need: Sign up at my.delfastbikes.com, if you are already registered then skip this step.
-
Page 51: Faqs
What is the maximum weight Delfast can carry? Total weight for our Delfast is limited up to 265lb (120kg). This weight includes the weight of the rider and all equipment. Is it safe to leave Delfast on the street? Yes, Delfast is equipped with alarm for security. -
Page 52: Battery & Charge
The driving conditions, such as mountains, wind and temperature, affect the range of batteries. How much will Delfast cost to charge? In the US, where KW/hour electricity costs about 12 cents, the cost of recharging Delfast battery to cover 13,500 miles (average yearly distance covered by average American citizen by car per year) would cost about 24 bucks a year. -
Page 53: Other
Still, every bike has a useful product lifespan and the Company’s warranty cannot suggest or imply that the frame or components of the Delfast bike can never be broken or will last forever. To ensure the legal rights of its customers the Company gives the following warranty on its products. - Page 54 3. This warranty is void in case of non-observance of Delfast Operating Instructions (which are provided with the sale or posted on the Company’s web-site), and any amendments thereto.
- Page 55 Whenever possible, report damage claims within 10 days of delivery to the Company’s customer service representative. Please contact us support@delfastbikes.com or our authorized reseller. DISCLAIMER: THIS LIMITED WARRANTY SETS OUT THE FULL EXTENT OF THE COMPANY’S RESPONSIBILITIES, AND THE EXCLUSIVE REMEDY REGARDING THE PRODUCTS. ALL IMPLIED WARRANTIES, INCLUDING WITHOUT LIMITATION, IMPLIED WARRANTIES OF MERCHANTABILITY AND FITNESS FOR A PARTICULAR PURPOSE, ARE LIMITED TO THE DURATION OF THIS LIMITED WARRANTY.
-
Page 56: Service Record
Service record 1st Inspection Replaced or repaired parts: Within 6 month of purchase or within the first 300 miles. Order number: Date: Stamp / Signature: 2nd Inspection Replaced or repaired parts: Within 1 year of purchase or within the first 1250 miles. - Page 57 4th Inspection Replaced or repaired parts: Within 3 years of purchase or within the first 3750 miles. Order number: Date: Stamp / Signature: 5th Inspection Replaced or repaired parts: Within 4 years of purchase or within the first 5000 miles. Order number: Date: Stamp / Signature:...
- Page 58 7th Inspection Replaced or repaired parts: Within 6 years of purchase or within the first 7500 miles. Order number: Date: Stamp / Signature: 8th Inspection Replaced or repaired parts: Within 7 years of purchase or within the first 8750 miles. Order number: Date: Stamp / Signature:...
- Page 59 Talk to us! support@delfastbikes.com Delfast Inc. 13575 Whittier Blvd. Whittier, CA 90605, US bikes@delfastbikes.com Sales: +1 925 384 2010 Support: +1 213 933 2123 www.delfastbikes.com...
Need help?
Do you have a question about the Top 3.0 and is the answer not in the manual?
Questions and answers