
Related Manuals for Sharper Image LM516


Summary of Contents for Sharper Image LM516
- Page 1 Sun/Moon Wireless Weather Center with Radio-Controlled Atomic Clock LM516 Instructions Read and save these instructions.
- Page 2 Dear Sharper Image Customer, Thank you for your purchase of a Sharper Image product. We appreciate your business very much. Please accept my personal assurance of your complete satisfaction with this product’s quality and performance. We offer generous return privileges and excellent warranties on all our products.
-
Page 3: Table Of Contents
Table of Contents Introduction ......................4 Quick Start......................5 Setup........................6 General Instructions .....................8 Explanation of LCD ..................8 Function Key Layout ..................9 Program Mode ....................9 United States Cities Listed by State ..............11 Settings......................13 Features and Operations.................14 Mounting......................20 Maintenance and Care ...................21 Troubleshooting ....................22 Specifications....................24 Statement of FCC/DHHS Compliance ..............25 FCC Label Compliance Statement ..............25... -
Page 4: Introduction
Introduction The main features of the Wireless Weather Center are as follows: 1. Calculation of sunrise, sunset, moonrise, moonset and moon phase based on selected city location (database includes 245 cities in North America). 2. Radio-controlled time and date (automatic setting and adjustment). 3. -
Page 5: Quick Start
Quick Start 1. Insert 2 AA batteries into the remote transmitter(s). Insert 3 AA batteries into the Weather Center. 2. Wait 6-10 minutes (in ideal reception conditions) for the WWVB time and remote temperature humidity to be displayed. If the WWVB takes longer to set, you may manually set the time (see Setup), or you can wait until after the weather station conducts its programmed search at the ideal reception period of midnight to 6:00 a.m. -
Page 6: Setup
Setup Installing Batteries Batteries will fit tightly. To avoid start-up problems, make sure that the batteries do not spring free. Be sure to insert batteries into the transmitter(s) first, then the Weather Center. Initial setup should be done with the transmitter(s) and weather station in the same room. - Page 7 Setup WWVB Reception Once the batteries are installed in the Weather Center, it will automatically search for the WWVB signal. If it receives a good signal (which is unlikely during daylight hours in most locations), the WWVB reception indicator (tower icon) will flash. The weather station requires five full minutes of good reception to successfully capture the signal and set to the correct hour, minute, second, month, day and year.
-
Page 8: General Instructions
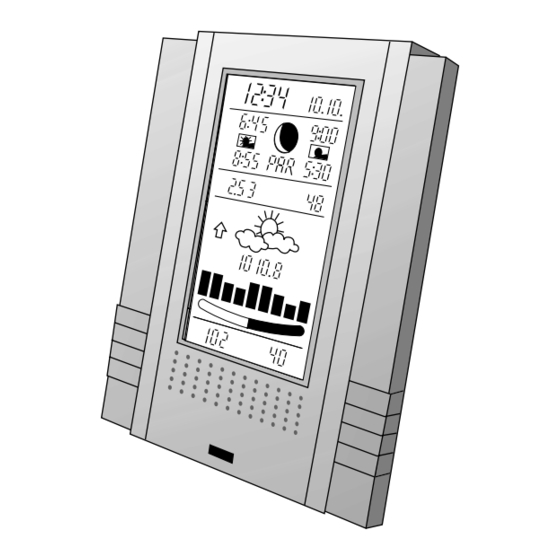
General Instructions Explanation of LCD There are many different modes to which Weather Center can be set. The LCD shown is the normal operating mode. The actual data shown will be different, based on your local settings and conditions. WWVB reception indicator Alarm on indicator Radio-controlled time Radio-controlled date... -
Page 9: Function Key Layout
Function Key Layout The image below shows the eight function keys used in the programming and operation of the Weather Center. Program Mode The program mode is laid out in a manner that allows you to program each function separately, or you can follow the instructions entirely to program the Weather Center. - Page 10 Program Mode Setting City Location 1. If starting from the normal mode, press SET seven times. 2. The country location will flash (USA default). Press + or - to select the country (USA = United States, CAN = Canada, MEX = Mexico). 3.
-
Page 11: United States Cities Listed By State
United States Cities Listed by State Code State/City Code State/City Code State/City Code State/City Alaska Delaware Kansas Missouri continued Anchorage Dover Dodge City Kansas City Fairbanks Florida Wichita Memphis Juneau Key West Kansas City Poplar Bluff Nome Jacksonville Wa Keeney Springfield Alabama Miami... - Page 12 United States Cities Listed by State Code State/City Code State/City Code State/City Code City New Mexico Pennsylvania Virginia Canada City Listing Vienna Albuquerque Harrisburg Edmonton Lynchburg Magdalene Philadelphia Yellowknife Norfolk ROW Roswell Pittsburgh Charlotte Town Richmond Raton Scranton Calgary Roanoke Santa Fe Puerto Rico Ottawa...
-
Page 13: Settings
Settings Setting Time Zone and Daylight Savings 1. If starting from the normal mode, press SET 10 times. 2. The time zone will flash based on the city selected. Press + or - keys to adjust to the correct time zone. 3. -
Page 14: Features And Operations
Settings 7. Press SET to advance to the storm warning alarm on/off setting. The storm warning on or off setting will flash (OFF default). Press + or - to select whether or not the storm warning alarm is activated. Press SET to advance to the LCD setting. - Page 15 Features and Operations 7. Press SET to advance to the date setting. The current date flashes. Press + or - to select the date desired. 8. Press SUN/MOON to calculate the new city location at the date selected. (You may instead press SET to select a different location, starting at step 2 above.) Once SUN/MOON is pressed, the sunrise/set and moonrise/set times will flash dashes while the Weather Center calculates the times —...
- Page 16 Features and Operations To reset the indoor minimum and maximum temperature and humidity, press and hold IN for at least two seconds. Outdoor Minimum and Maximum Temperature and Humidity The Weather Center automatically stores the minimum and maximum outdoor temperature and humidity. The minimum and maximum values are updated auto- matically when a new minimum or maximum is recorded or until manually reset.
- Page 17 Features and Operations To cancel the temperature alarm when it sounds, press any key to mute it. The temperature will flash as long as the value is above the set value. The alarm will reactivate automatically once the value has fallen below the set value or if a new value is entered.
- Page 18 Features and Operations Adjusting Forecast Sensitivity The sensitivity of the change in forecast icon is set by the user. Following the pro- gramming mode, press SET 15 times until two arrows and the sensitivity value flash. Press + or - to adjust the sensitivity value between 0.06 inHg to 0.12 inHg (.09 inHg default).
- Page 19 Features and Operations Barometric Air Pressure Reading The actual barometric air pressure is displayed directly under the weather forecast icon. The relative air pressure is calibrated by the user through the programming mode. 1. Press SET 13 times to set the measuring unit of air pressure (inHg or hPa). Press + or - to select either inHg (default) or hPa.
-
Page 20: Mounting
Mounting Before permanently mounting, ensure that the Weather Center is able to receive signals from the transmitters and WWVB signal at the desired location. To achieve a true temperature reading, avoid mounting remote transmitters in direct sunlight. We recommend that you mount the transmitter on a north-facing wall or under an eave. -
Page 21: Maintenance And Care
Mounting To mount with tape: 1. Clean and dry the back of the mounting bracket and the mounting surface with a nonabrasive solution to ensure a secure hold. The mounting surface should be smooth and flat. 2. Remove the protective strip from one side of the tape. Press firmly onto the designated area on the back of the mounting bracket. -
Page 22: Troubleshooting
Maintenance and Care • Do not submerge in water. • Immediately remove all low-powered batteries to avoid leakage and damage. Replace with new batteries only. • Opening the casings invalidates the warranty. Do not try to repair the units. Contact a qualified expert. Troubleshooting Problem: LCD is faint. - Page 23 Troubleshooting Problem: WWVB time and date will not set or update. Solution: 1. Wait overnight for signal to be received. 2. Move Weather Center away from sources of electricity. 3. Place Weather Center in window facing Colorado. 4. The first reception is the most difficult, as the Weather Center needs five con- tinuous minutes of clear signal reception.
-
Page 24: Specifications
Specifications Radio-controlled time signal WWVB, 60 kHz from Boulder, CO Recommended operating temperature 32°F to 122°F (0°C to 50°C) LCD contrast 8 levels (1-8) Sunrise/set, moonrise/set and January 1, 2000 through December 31, 2099 moon phase dates available Temperature measuring range Indoor 14°F to 140°F with 0.2°F resolution. -
Page 25: Statement Of Fcc/Dhhs Compliance
Statement of FCC/DHHS Compliance WARNING: Changes or modifications to this unit not expressly approved by the party respon- sible for compliance could void the user’s authority to operate the equipment. Note: This product complies with DHHS Rule 21 subchapter J at date of manufacture. This equipment has been tested and found to comply with the limits for a Class B digital device, pursuant to Part 15 of the FCC Rules. -
Page 27: Warranty
What The Sharper Image Will Do The Sharper Image will repair any defects in materials or workmanship. In the event repair is not possible, The Sharper Image will either replace this product with one of similar features and price, or refund the full purchase price of the product, whichever you prefer.
Need help?
Do you have a question about the LM516 and is the answer not in the manual?
Questions and answers