
Related Manuals for Coleman CDB1145EQ1


Summary of Contents for Coleman CDB1145EQ1
- Page 1 CDB1145EQ1 Please retain the packaging and instructions for further reference, as they contain important information.
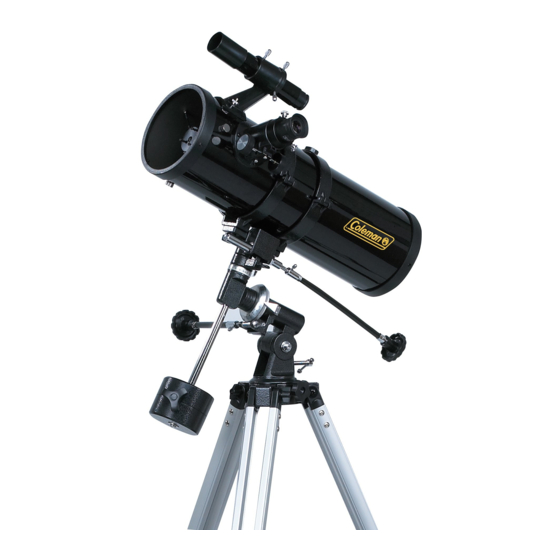
- Page 2 With the proper care and handling of your telescope, you will enjoy years of viewing pleasure. As an astronomical device, the CDB1145EQ1 telescope has been designed for both a beginner and advanced star gazer. It provides views of the moon and planets, as well as dozens of galaxies, star clusters, and nebulae.
- Page 3 PARTS LIST FOR CDB1145EQ1 Telescope: Secondary Mirror Position Dust Cap / Mask (Remove before Viewing) Focus Tube Fonderscope Bracket 6x30 Finderscope Finderscope Alignment Screws Eyepieces (K10, K25), Eyepiece cases (2) Focus Knob Piggyback Bracket Telescope Main Tube Primary Mirror Position Dec.
- Page 4 TRIPOD and EQ1 MOUNT ASSEMBLY: 1) Carefully remove all parts from the cardboard cartons and lay them on a table, floor or other flat surface in order to take an inventory of all the pieces. Keep your box for storage or in case you ever need to ship your telescope. 2) Tripod Set Up: A.
- Page 5 3) Preparing the EQ1 Mount for Assembly Reposition the Mount Head (See Figures 3.1 through 3.5). Follow the diagrams to place the mount into an upright position. 4) Attaching the EQ1 Mount to the Tripod Legs Position the EQ1 mount assembly collar in between the tripod legs as shown in Figure 4. Secure in place with the included bolts and wing nuts.
- Page 6 5) Installing the Counterweight (see Figure 5) A. Slide counterweight halfway onto rod. Hold the counterweight with one hand and insert the counterweight rod into threaded hole on mount with the other hand. Tighten the counterweight rod onto the EQ1 mount. B.
-
Page 7: Telescope Assembly
TELESCOPE ASSEMBLY 1) Attaching the Tube Rings to the EQ1 Mount (See Figures 6) A. Remove the tube rings from telescope by releasing their thumb nuts and opening their hinges. B. Place the tube rings on top of the tube ring mounting plate and bolt the tube rings to the mount by tightening the thumbscrews. -
Page 8: Eyepiece Assembly
2) ALIGNING THE FINDERSCOPE (see Figure 9.1 to 9.4) Fixed magnification scopes mounted on the telescope optical tube are very useful accessories. When they are correctly aligned with the telescope, objects can be quickly located and brought to the center of the field. Alignment is best done outdoors in daylight when it is easier to locate objects. - Page 9 TELESCOPE BALANCING The telescope should be balanced before each observing session. Balancing reduces stress on the mount and allows precise micro-adjustment control. A balanced telescope is especially critical when using the optional clock drive for astrophotography. The telescope should be balanced after all accessories (eyepiece, camera, etc.) have been attached. Before balancing your telescope, make sure that your tripod is in a balanced level and on a stable surface.
- Page 10 OPERATING THE EQ1 MOUNT The EQ1 mount has controls for both conventional altitude (up-down) and azimuth (left-right) directions of motion. These two adjustments are suggested for large direction changes and for terrestrial viewing. Use the large knurled knob located underneath for azimuth adjustments. Loosen the knob and rotate the mount head around the azimuth axis.
-
Page 11: Using The Optional Barlow Lens
USING THE OPTIONAL BARLOW LENS A Barlow is a negative lens which increases the magnifying power of an eyepiece, while reducing the field of view. It expands the cone of the focused light before it reaches the focal point, so that the telescope's focal length appears longer to the eyepiece. The Barlow is inserted between the focuser and the eyepiece in a reflector, and usually between the diagonal and the eyepiece in a refractor or a catadioptric (Fig. -
Page 12: Polar Alignment
POLAR ALIGNMENT In order for your telescope to track objects in the sky you have to align your mount. This means tilting the head over so that it points to the North (or South) celestial pole. For people in the Northern Hemisphere this is rather easy as there is a bright star very near the spot Polaris. - Page 13 Unlock the DEC lock knob and rotate the telescope tube until the pointer on the setting circle reads 90°. Retighten the DEC lock knob. Loosen the azimuth lock knob and rotate the mount horizontally until the R.A. axis points roughly at Polaris. Retighten the azimuth lock knob.
-
Page 14: Using The Setting Circles
USING THE SETTING CIRCLES The quickest way to find objects is to learn the Constellations and use the Red Dot Finder, but if the object is too faint you may want to use setting circles on your mount. Setting circles enable you to locate celestial objects whose celestial co-ordinates have been determined from star charts. -
Page 15: Pointing Your Telescope
Finding objects using the setting circles Example: Finding the faint planetary nebula M57; "The Ring" From a star chart, we know the coordinates of the Rings are Dec. 33º and R.A. 18h52m. Unlock the DEC lock knob and rotate your telescope in DEC until the pointer on the DEC setting circle reads 33º. - Page 16 Pointing to the NCP For the following examples, it is assumed that the observing site is in the Northern Hemisphere. In the first case (Fig.20.2), the optical tube is pointing to the NCP. This is its probable position following the polar-alignment step. Since the telescope is pointing parallel to the polar axis, it still points to the NCP as it is rotated around that axis counter-clockwise, (Fig.20.1) or clockwise (Fig.20.3).
- Page 17 Pointing to directions other than due North Pointing in any direction other than due North requires a combination of R.A. and Dec positions (Fig.22). This can be visualized as a series of Dec arcs, each resulting from the position of rotation of the R.A. axis. In practice however, the telescope is usually pointed, with the aid of a finderscope, by loosening both the R.A.
- Page 18 Pointing at an object Pointing at an object, for example to the South (Fig.23), can often be achieved with the optical tube positioned on either side of the mount. When there is a choice of sides, particularly when there could be a long observing period, the East side (Fig.23.2) should be chosen in the Northern Hemisphere because tracking in R.A.
- Page 19 Finally, there are a few things to consider to ensure that you are comfortable during the viewing session. First is setting the height of the mount above the ground by adjusting the tripod legs. You must consider the height that you want your eyepiece to be, and if possible plan on sitting on a comfortable chair or stool.
-
Page 20: Observing The Sky
7) Calculating the exit pupil The Exit Pupil is the diameter (in mm) of the narrowest point of the cone of light leaving your telescope. Knowing this value for a telescope-eyepiece combination tells you whether your eye is receiving all of the light that your primary lens or mirror is providing. The average person has a fully dilated pupil diameter of about 7mm. - Page 21 Observing through a window is not recommended because the window glass will distort images considerably. And an open window can be even worse, because warmer indoor air will escape out the window, causing turbulence which also affects images. Astronomy is an outdoor activity. 3) Choosing the best time to observe The best conditions will have still air, and obviously, a clear view of the sky.
- Page 22 magazine will give you the locations of the planets as they change position from month to month. The Internet is also an excellent source of information, offering star charts, maps, and more! The popular and more familiar constellations often provide the easiest landmarks to help find the planet’s locations and paths of orbit.
-
Page 23: Using Your Telescope
When viewing through a standard telescope, you may notice that when you observe a terrestrial object on land or water, it appears upside down. To correct this, the COLEMAN CDB1145EQ1is equipped with an Erecting Image Diagonal Prism (I). This accessory is inserted in the eyepiece holder of the telescope between the eyepiece and the telescope. -
Page 24: Proper Care For Your Telescope
PROPER CARE FOR YOUR TELESCOPE CollimatIng a Newtonian Collimation is the process of aligning the mirrors of your telescope so that they work in concert with each other to deliver properly focused light to your eyepiece. By observing out-of-focus star images, you can test whether your telescope's optics are aligned. Place a star in the center of the field of view and move the focuser so that the image is slightly out of focus. - Page 25 Aligning the secondary mirror Point the telescope at a lit wall and insert the collimating cap into the focuser in place of a regular eyepiece. Look into the focuser through your collimating cap. You may have to twist the focus knob a few turns until the reflected image of the focuser is out of your view. Note: keep your eye against the back of the focus tube if collimating without a collimating cap.
-
Page 26: Care And Cleaning Of The Optics
Now run your hand around the front of your telescope keeping your eye to the focuser, you will see the reflected image of your hand. The idea is to see which way the primary mirror is defected. You do this by stopping at the point where the reflected image of the secondary mirror is closest to the primary mirror’s edge (see Figure 33). -
Page 27: Frequently Asked Questions
DO NOT HOLD THE TRIGGER OF THE COMPRESSED AIR CAN FOR EXTENDED PERIODS. PROPELLANT MAY ESCAPE AND DAMAGE THE OPTICAL SURFACES. If, after several attempts, you cannot remove the particles, take the telescope to an optical professional for cleaning. If you keep the dust caps on your telescope when it is not in use and avoid handling the lenses or mirrors, only minimal optical maintenance of your telescope should be required. - Page 28 Made in China...
Need help?
Do you have a question about the CDB1145EQ1 and is the answer not in the manual?
Questions and answers