Table of Contents
Advertisement
Advertisement
Table of Contents

Related Manuals for Lahoux Optics Spotter Series

Summary of Contents for Lahoux Optics Spotter Series
- Page 1 Lahoux Spotter series Thermal imagers User manual...
- Page 2 Remarks The user manual describes the use of the devices in the Lahoux Spotter series and the precautions for use. In order to ensure the safety of the user, the reasonable and effective maintenance and use of the Lahoux Spotter, as well as to ensure the normal life of...
-
Page 3: Table Of Contents
Contents 1 Button functions ............... 5 Switch on ................5 Switch off ................5 Standby-mode ..............5 Dioptre adjustment ...............6 Switch the image mode ............6 E-Zoom .................6 Photo and video ..............6 Hot spot tracking ..............6 Rangefinder ................6 2 Menus ................7 2.1 Main menu ..............7 Ultra clear mode ............7 Wifi functions .............7 Screen brightness ............8... - Page 4 Precautions • Do not clean non-optical surfaces of the thermal imager with a chemical solvent, but wipe with a soft cloth. • The lens has a special coating to enhance the optical performance. Cleaning is only necessary if the lens is clearly dirty.
- Page 5 • The Lahoux Spotter contains advanced optical and electronic components. Prevent unnecessary shock, drops and vibrations to prevent damage. • Do not disassemble the thermal imager yourself. In case of malfunction, contact the supplier in time. Unauthorized disassembly of the Lahoux Optics will irrevocably void the warranty.
-
Page 7: Button Functions
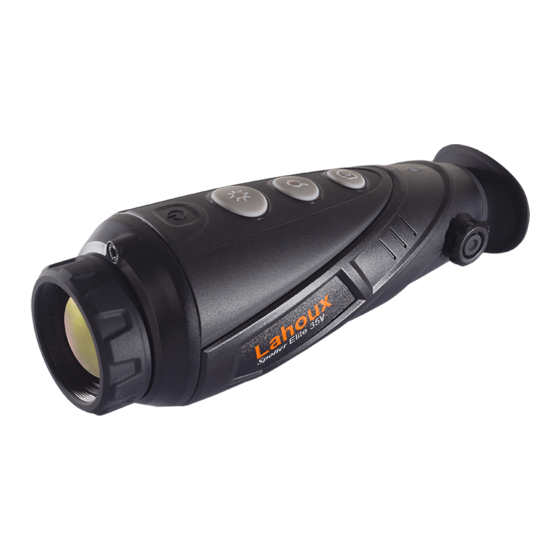
1 Button functions Power Image mode E-Zoom Photo/video Indicator Focusable lens Diopter knob Heat sink Carrying strap attachment USB/MCX port Eyeshade Switch on The camera will be switched on by pressing the power button for 3 seconds when the camera is off, the indicator light will be turned on, and the start-up screen will be shown. -
Page 8: Dioptre Adjustment
Dioptre adjustment The dioptre knob can help the user to have the clearest image, set for the users eye. Adjust the knob to sharply focus on the start-up screen, the symbols or the menu. Switch the image mode Short click the Image Mode button to switch the image mode. There are 5 different modes: White hot , Black hot , Red... -
Page 9: Menus
2 Menus 2.1 Main menu Long press the E-zoom button to enter the main menu, then short press the Image mode button or the Photo button to toggle up and down. And short press the E-zoom button to adjust/ select the following settings: ultra clear mode, WiFi, screen brightness, video output, hue selection, image calibration and picture in picture. -
Page 10: Screen Brightness
Screen brightness Switch screen brightness levels 1–4. Default brightness is level 2. Video out When you turn on the analogue video in the menu, and a video output symbol appears in the lower-right corner of the image. The camera is ready to send video with the video cable via the MCX connector. -
Page 11: Secundary Menu
2.2 Secundary menu In the Main menu select the icon. Short press the E-zoom button to enter the secondary menu. Short press the Image mode button or the Photo button to toggle up and down. And short press the E-zoom button to adjust/select following settings: digital compass, motion sensor, auto standby, cursor calibration, system information, factory reset. -
Page 12: Charging
2.3 Charging When the indicator in the left bottom of the screen is red ( the battery had insufficient capacity left. Please charge in time. You can charge with the USB power adapter or any other power supply like a USB power bank. The LED indicator is orange/red when charging and turns green when fully charged. -
Page 13: Technical Specifications
3 Technical specifications Spotter Spotter Spotter Spotter Elite 35V Elite 50V Detector Resolution 384 × 288 640 × 480 uncooled FPA Pixel pitch 12 µm Spectral range 8-14 µm Sensitivity (NETD) < 50 mK Frame Rate 50 Hz Optics Lens 25 mm 35 mm 50 mm... -
Page 14: Customer Support
If the problem remains, please contact your dealer for questions or service. Alternative- ly you can contact the Service-centre of Lahoux Optics for tech- nical and service related questions: services@lahouxoptics.nl To return products, please first request an RMA number from the service department of your supplier. - Page 16 © Lahoux Optics B.V. Stephensonstraat 47, 2014 KC Haarlem, The Netherlands www.lahouxoptics.com - info@lahouxoptics.nl...
Need help?
Do you have a question about the Spotter Series and is the answer not in the manual?
Questions and answers