
Subscribe to Our Youtube Channel
Related Manuals for SEWOO SLK-TE12 Series


Summary of Contents for SEWOO SLK-TE12 Series
- Page 1 MODEL : SLK-TE12X Series Receipt Printer User’s Manual TE12X Series Rev. E 03/16 All specifications are subject to change without notice...
- Page 2 Disposal of Old Electrical&Electronic Equipment(Applicable in the European Union and other European countries with separate collection systems) 본 제품을 분류되지 않은 자치단체 쓰레기로 처리하지 마십시오, 본 제품은 재활용이 가능하며, 해당 지역의 기준에 따라 재활용해야 합니다.
-
Page 3: Table Of Contents
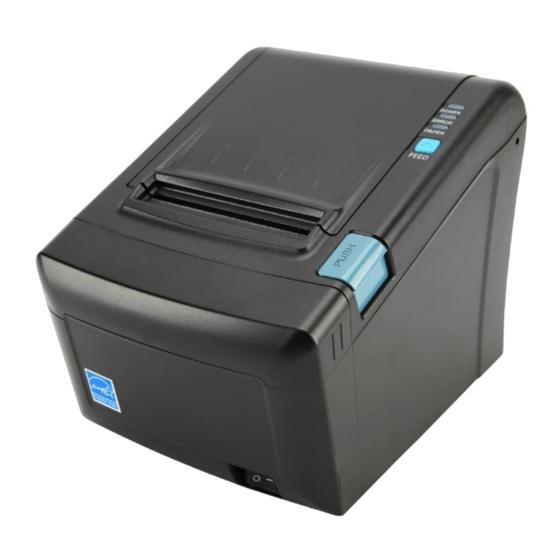
Table of Contents 1. Parts Identifications PRINTER COVER 1. Parts Identifications Open this cover to load or replace a paper. 2. Setting up the printer 2.1 Unpacking 2.2 Connecting the cables 2.3 Loading the roll paper CONTROL PANEL 2.4 Adjustment of paper width Features LED indicators 3. -
Page 4: Setting Up The Printer
2. Setting Up the Printer 2-1. Unpacking 2-2. Connecting the Cables Your printer box should include these items. If any items are damaged or missing, please contact your All cables connect to the connector panel on the back of the printer which is shown below: dealer for assistance. - Page 5 2-2-1. Interface Connector Centronics Parallel Interface SIGNAL DESCRIPTION STROBE- Input Synchronize signal Data received DATA 0~7 Input/Output Data bit Transmitted 0~7 ACK- Output Data receiving completed. BUSY Output Impossible to print of data receiving. Output Paper empty SELECT Output Printer status for ON/OFF line AUTO FEED- Input Paper auto feed signal...
-
Page 6: Loading The Roll Paper
2-3. Loading the Roll Paper 2-2-2. Cash Drawer Connector The printer can operate two cash drawers with a 6 pin RJ-11 modular connector. Notes: Be sure to use paper rolls that meet the specifications. Do not use paper rolls that have the The driver is capable of supplying a maximum current of 1.0A for 510ms or less when not printing. - Page 7 5. Note the correct direction that the paper comes off the roll: ♣CAUTION: When the paper cutter is jammed, the top cover might be stuck closed. In this case, repeat power on and off several times. If the top cover is still stuck, please follow the steps to release the paper jam. 1.
-
Page 8: Adjustment Of Paper Width
3. Control panel and other functions 2-4. Adjustment of paper width 3-1. Control panel You can control the basic paper feeding operations of the printer with the button on the control panel. 1. Please adjust the Paper Guide to fit to the paper width as the direction of arrow. The indicator lights let you to monitor the printer’... -
Page 9: Self Test
5. ASCII Print 4. Self Test The self-test result indicated whether the printer is operating properly. Also with this, user can check ASCII PRINT is printing a test page constructed ASCII code. You can able to check the printer works following options or status of the printer. -
Page 10: Hexadecimal Dump
7. Hexadecimal Dump 8. Printer cleaning This feature allows experienced users to see exactly what data is coming to the printer. This can be If the interior of the printer is dusty, printing quality can be lowered. useful in finding software problems. In this case, follow the instructions below to clean the printer. When you go into the hex dump function, the printer prints all commands and other data in hexadecimal format along with a guide section to help you find specific commands. -
Page 11: Specifications
9. Specifications Important! ♣ (8) Overall dimension When connecting or disconnecting the power supply from the printer, be sure that the following cautions are observed. Use a power supply (Limited Power Supply) of DC 24V±10% and more than 1.75A. Be careful about installing the printer in an area where there is electrical noise. Take the appropriate measure to protect against electrostatic AC line noise, etc. -
Page 12: Auto Cutter Specifications
9-2. Auto Cutter Specifications 9-5. Environmental Requirements (1) Cutting Frequency Max. 30 cuts per minute (1) Operating Temperature 0°C to 45°C (2) Thickness of paper 0.06 ~ 0.09 mm Humidity 10% to 90% RH (without condensation) (3) Cutter Life (if the paper thickness is between 65 and 80µm) (2) Transport/Storage (except paper) Temperature -20°C to 60°C... -
Page 13: Command List
10. Command List Command Function REMARKS Command Function REMARKS Horizontal tab ESC t Select character code table Print and line feed ESC { Turn upside-down printing mode on/off FS p Print NV bit image Print and carriage return Print and return to standard mode(in page mode) FS q Define NV bit image GS !
Need help?
Do you have a question about the SLK-TE12 Series and is the answer not in the manual?
Questions and answers