
Subscribe to Our Youtube Channel
Related Manuals for Bully Dog BIG RIG HEAVY DUTY GT

Summary of Contents for Bully Dog BIG RIG HEAVY DUTY GT
- Page 1 SECTION HEADER HERE HEAVY DUTY GT INSTALLATION MANUAL CATERPILLAR | CUMMINS | DETROIT | MERCEDES | PACCAR ® ® ® ®...
-
Page 2: Table Of Contents
TABLE OF CONTENTS INTRODUCTION ............3-9 Preview of Basic Steps ....................3 Vehicle Application Chart ...................3 Parts List and Description ..................4-9 UPDATING THE HDGT..........9-19 Overview ........................9-11 Installing the Heavy Duty Update Agent ..............12 Updating the HDGT .....................13-19 PHYSICAL INSTALLATION ..........20 Locating the data port ..................26-48 Connecting the Data Plug .................. -
Page 3: Introduction
INTRODUCTION PREVIEW OF BASIC INSTALLATION STEPS • Physically install the HDGT. For more information, see page 20. • Install the tune. For more information, see page 26. SPECIAL NOTE: You MUST uninstall the tune from your engine before taking your vehicle in for ANY type of service. - Page 4 PARTS LIST HEAD UNIT HEAD UNIT RIGHT-ANGLE HDMI ADAPTER 9-PIN DATA PLUG MINI-USB CABLE 9 pin 6-PIN DATA PLUG SD CARD & READER HDMI CABLE MOUNTING SYSTEM ®...
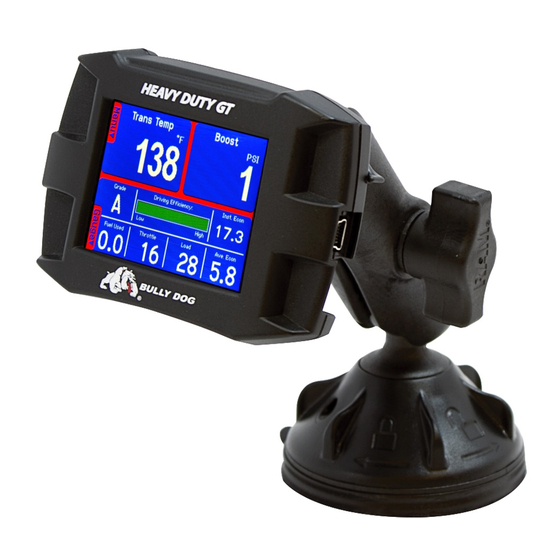
- Page 5 PARTS DESCRIPTION The Head Unit is the interface through which all operating functions are performed. FRONT SIDE: The Heavy Duty Gauge Tuner (HDGT) features a 2.4″ LCD screen and four capacitive touch buttons. Capacitive touch buttons are a button style that is sensitive to the presence of your finger. They do not need to be pushed “in”...
- Page 6 PARTS DESCRIPTION 6 & 9-PIN DATA PLUGS The 6 and 9-pin data plugs connect the HDGT to the vehicle. Count the number of pins in the vehicle data port and use the matching plug. (If both plug types are present, use the 9-pin connection). The diagram below shows the important parts of each Data Plug: 1.
- Page 7 PARTS DESCRIPTION HDMI CABLE The 10 foot HDMI cable connects the HDGT to the Data Plug. HDMI RIGHT ANGLE ADAPTERS These adapters are included for your convenience and can be used to redirect the HDMI cable coming out of the Data Plug. 90º...
- Page 8 PARTS DESCRIPTION MINI-USB CABLE The Mini-USB cable is a standard, off-the-shelf Mini-USB cable. It can be used to connect the HDGT to a computer. MicroSD MEMORY CARD The MicroSD memory card holds all of the electronic files for the HDGT; the HDGT will not function if the card is not installed. The card can also be removed from the HDGT and connected to a computer via the included card reader.
- Page 9 PARTS DESCRIPTION MOUNTING SYSTEM ® The RAM Suction Cup Mounting System is the best suction cup ® mount on the market. It is designed with amazing holding power and will mount the HDGT to multiple kinds of surface materials, providing the adaptability needed to mount the HDGT in a safe and accessible place.
-
Page 10: Updating The Hdgt
Updating is quite often an immediate fix for most problems. 3. Bully Dog engineers are constantly working to expand the features and vehicles that the HDGT is able to support. Once a new vehicle or option is unlocked, they make sure it is available to everyone by including it in the updated software version. - Page 11 Updates include new part numbers and other information from vehicle manufacturers, tested fixes for problems customers may encounter, and any additional features or vehicles that Bully Dog engineers have developed. How can I tell which software version is currently loaded on my HDGT? 1.
-
Page 12: Installing The Heavy Duty Update Agent
UPDATING THE HDGT INSTALLING THE HEAVY DUTY UPDATE AGENT 1. Open a browser window. 2. Use the browser you are most familiar with, like Mozilla Firefox , Google Chrome or Microsoft Internet Explorer ® ® ® 3. Go to https://bigrig.bullydog.com/support 4. -
Page 13: Updating The Hdgt
1. Start the Heavy Duty Update Agent (if not already running). • You can check to see if it is already running by looking for the Bully Dog icon in the System Tray in the bottom right corner of your screen. - Page 14 UPDATING THE HDGT 3. Plug the card reader (with the microSD memory card) into a computer USB port. It is possible to update by keeping the memory card installed and connecting the HDGT to a computer via Mini-USB cable; however, this method is slower and not recommended.
- Page 15 UPDATING THE HDGT 5. The Heavy Duty Update Agent will prompt you to register the HDGT if it has not already been done. This step is REQUIRED for Cat engines. To register, fill out the fields and click Submit. To register at a later time, click Cancel. To register at a later date, open the Heavy Duty Update Agent and open the Tools menu;...
- Page 16 UPDATING THE HDGT 9. Once the update is complete, a pop-up will appear with instructions to finish the update (steps 7-13 in this manual). • Click OK. 10. The dialogue box will disappear and the HDGT will display the following message: •...
- Page 17 UPDATING THE HDGT 11. Connect the HDGT to a power source by using one of the methods listed below. • Method #1 Use the Mini-USB cable to connect the HDGT to your computer, then press the top left button to exit USB mode. •...
- Page 18 UPDATING THE HDGT 15. If you chose Update Device Software: • Confirm that the correct engine/vehicle application is listed. • Press the top right button (Yes) to continue and load the updated files to the HDGT.If you chose Change Vehicle/Engine. UPDATE DEVICE Go Back Application:...
- Page 19 UPDATING THE HDGT VEHICLES Go Back CATERPILLAR CUMMINS DETROIT DOWN Select PACCAR To choose a different Vehicle/Engine or Engine/Vehicle application, press either the bottom right button (No) or the top left button. 17. Once you have confirmed the vehicle/engine application, the HDGT will load the new files and restart.
-
Page 20: Physical Installation
TION PHYSICAL INSTALLA LOCATE THE DATA PORT & CONNECT THE PLUG The vehicle data port is typically located in one of thee different locations: • Underneath the dash on the driver’s side of the cab or on the lower front part of the dash. •... - Page 21 Volvo trucks with Cummins engines, some Cat engines and the Detroit ® ® DDEC IV require a direct connection to the engine computer. Bully Dog has 90º HDMI Adapter 270º HDMI Adapter 90º HDMI Adapter 270º HDMI Adapter created wiring harnesses to address this need.
-
Page 22: Final Location Of The Hdgt
PHYSICAL INSTALLATION CHOOSE THE FINAL LOCATION OF THE HDGT Take some time to consider the final placement of the HDGT. Make sure that you have chosen a location which: • Will not obstruct the driver’s line of vision. • Will not distract the driver. •... - Page 23 A-pillar. Use the zip ties included with the HDGT to secure any loose wiring. Bully Dog recommends temporarily removing the vehicle weather stripping and/or dash panel to hide the HDMI cable. This will provide both a more attractive installation and help to prevent unintended damage by accidentally snagging the HDMI cable.
- Page 24 TION PHYSICAL INSTALLA MOUNT AND CONNECT THE HDGT 1. Confirm that the HDGT (with the RAM Mount) can connect to ® the data plug with a reasonable amount of slack on the cable in the chosen final position. 2. Assemble the RAM Mount and mount the HDGT: •...
- Page 25 TION PHYSICAL INSTALLA YOU HAVE COMPLETED THE PHYSICAL INSTALLATION OF THE HDGT...
-
Page 26: Tuning The Vehcile
TUNING THE VEHICLE In order to enjoy the advantages of tuning your engine, like additional horsepower and/or fuel economy, you need to use the Install Tuning feature. The process is basically the same when you are installing the tune, changing certain settings or uninstalling. CAUTION! This option actively reprograms the engine computer –... - Page 27 TUNING THE VEHICLE IMPORTANT PREPARATION ITEMS (FOR ALL ENGINE TYPES) • Choose an appropriate time and place to install; Do NOT install if you will need to use the vehicle to get somewhere soon. • Set aside three to six hours to install the tune. (older Cummins engines will need about six hours.
- Page 28 TUNING THE VEHICLE PREPARATION: MANAGING OTHER ELECTRONICS Make sure that electrical devices are turned off or disconnected as described below while you are installing the HDGT tune to your vehicle. Once the tune is installed, you can reconnect them and turn on all of the electronics that you normally use.
- Page 29 TUNING THE VEHICLE PREPARATION: MAKE SURE THE BATTERY IS CHARGED Make sure that your batteries are fully charged before beginning any download. It is a good idea to have a battery charger ready to connect to your vehicle if the batteries begin to lose their charge while you are installing the tune.
- Page 30 TUNING THE VEHICLE CHECKING HDGT STATUS The information is displayed at the top of the first screen in the Show Settings option. GT SYSTEM INFO Go Back GT status: Unlocked from Vehicle Serial #: ################# HW version: Memory: ###### SWa version: 1.0.5.0 SWb version: Tuning Version:...
- Page 31 TUNING THE VEHICLE TUNING DETROIT/MERCEDES, CUMMINS AND PACCAR 1. Physically install the HDGT. 2. Prepare to install the tune. 3. Turn the key to the RUN (or ON) position. 4. Do NOT start the engine. 5. Read the disclaimer on the welcome screen. •...
- Page 32 TUNING THE VEHICLE 6. If it is the first time the HDGT has been connected to a vehicle, you may need to select an engine type. • If you are not prompted to select a VEHICLES Go Back vehicle, skip to step 11 . CATERPILLAR •...
- Page 33 TUNING THE VEHICLE 9. The HDGT will update files (load the graphics file from the memory card to the device). UPDATING FILES • This process if fast and may take one minute or less. Loading graphics le from SD card. •...
- Page 34 TUNING THE VEHICLE 15. Verify that the correct vehicle type is selected and press YES to continue (top right button). If the vehicle type is not correct, restart the HDGT by cycling the key (to the OFF and then ON or RUN positions; do NOT start the engine).
- Page 35 TUNING THE VEHICLE 18. The HDGT will prepare to install the tune. • This process is fast, it should take a minute or less. • The HDGT will show a percentage counter to track its progress. • Do NOT interrupt the HDGT. Preparing Device Please wait Do Not Unplug...
- Page 36 TUNING THE VEHICLE 20. When the HDGT is finished reading the SELECT TUNE file, it will prompt you to select a tune. Power/Economy NOTE: If installing on a Cat, see page 38. Economy • Choose between Power/Economy, Stock DOWN Economy, and Stock tunes. SELECT •...
- Page 37 TUNING THE VEHICLE 25. When the HDGT has finished writing the KEY OFF tune to the engine computer, it will prompt you to turn the key to the OFF position. PLEASE VERIFY KEY Continue IS IN THE • Turn the key to the OFF position. POSITION •...
- Page 38 TUNING THE VEHICLE TUNING CAT ENGINES: PHASE 1 ® NOTE: In order to provide a basic understanding of the install process, this simplified preview has been provided. It is very important that you have completed the physical installation, you have completed the preparation steps and you are familiar with the detailed instructions before you attempt to install the HDGT.
- Page 39 TUNING THE VEHICLE 5. Confirm that you have selected the correct vehicle. • If the vehicle is not correct, you can choose NO (bottom right button) or Go Back (top left button) to change to the correct vehicle type. • Press YES (top right button) to continue.
- Page 40 TUNING THE VEHICLE 8. The HDGT will restart and show the Main Gauge screen in Demo Mode. 9. Go to the Main Menu (top left button). MAIN MENU 10. Highlight Install Tuning (right buttons). Go Back 11. SELECT the highlighted option. Sleep Mode Install Tuning 12.
- Page 41 TUNING THE VEHICLE 14. Read the disclaimer and press the top right button to continue. • If you Disagree, press the top left button; this will end the DISCLAIMER vehicle tuning. Go Back Are you the owner of this agree vehicle, have you read the •...
- Page 42 Windows computer that has Internet access. If you do not have access ® to a suitable computer, contact your Bully Dog dealer for help. Remove the microSD memory card from the HDGT. 2. Run the Heavy Duty Update Agent on a computer with Internet access.
- Page 43 TUNING THE VEHICLE 5. The Update Agent should automatically recognize the memory card. • The Update Agent may prompt you to complete registration; this is required to continue with Phase 2 of the tune installation. • If the HDGT is already registered, no registration prompt should appear.
- Page 44 • Download tuning files: The Update Agent will retrieve the correct tuning files from the Bully Dog website. • Files correct, Uploading to Device: The Update Agent is transferring the tuning files to the memory card.
- Page 45 TUNING THE VEHICLE TUNING CAT ENGINES: PHASE 3 1. Turn the key to the RUN (or ON) position. Do NOT start the engine. 2. Go to the Main Menu by pressing MAIN MENU Go Back the top left button. 3. Use the buttons on the right to Sleep Mode highlight Install Tuning.
- Page 46 TUNING THE VEHICLE 6. The HDGT will display the Phase 3 initiation screen. Press the top right button to Continue. DOWNLOADING GT status: UNLOCKED Continue Phase 3: GT is Ready to Download to Truck ...Press Continue... 8. The HDGT will provide a list of available engine tunes. Select the tune you prefer: •...
- Page 47 TUNING THE VEHICLE IMPORTANT NOTE: After the tune is selected, do not unplug or disturb the HDGT. If the process is interrupted, the engine computer may need to be recovered. 9. The HDGT will build the file. BUILDING FILE • This process is fast;...
- Page 48 TUNING THE VEHICLE 15. Once the download has been successfully completed, press Continue (bottom left button). DOWNLOADING CAUTION Before driving, please reconnect Download completed the trailer and insert any fuses that were removed. succesfully! Continue CONTINUE 16. Reconnect the trailer wire and replace the ABS/brake fuse(s). •...
- Page 49 TUNING THE VEHICLE UNINSTALLING THE TUNE The process of uninstalling the tune or “returning to stock” is very similar to the original process of installing the tune because the HDGT actively reprograms the engine computer. This means that the same important preparation steps must be taken to ensure that the engine computer does not need to be recovered.
- Page 50 TUNING THE VEHICLE The HDGT will build the file. BUILDING FILE • This process if fast; is should take Setting... about one minute. Power/Econ Tune • The HDGT will show a percentage Please wait Do Not Unplug counter to track its progress. •...
- Page 51 TUNING THE VEHICLE 12. After the countdown, the HDGT will prompt KEY RUN you to turn the key to the RUN position. PLEASE VERIFY KEY Continue • Turn the key to the RUN (or ON) position. IS IN THE • Do NOT start the engine.
-
Page 52: Operating The Hdgt
OPERATING THE HDGT NAVIGATING AND USING BUTTONS NOTE: The buttons on the HDGT are Capacitive Touch. This means that a light touch is all that is needed to choose different options. The buttons are also dynamic and will have different functions on each screen. - Page 53 OPERATING THE HDGT A list of the available vehicle parameters that the HDGT may be able to display is provided below. NOTE: The HDGT can only display vehicle parameters that the engine computer broadcasts; therefore, some parameters may not be available for certain vehicles.
-
Page 54: The Driving Coach Interface
OPERATING THE HDGT THE DRIVING COACH INTERFACE To effectively benefit the driver and the truck, the Driving Coach must be set up properly. The illustration below shows the Driving Coach Interface that is shown on the Main Gauge screen. All of the parameters displayed on the driving coach are derived from the vehicle sensors and driver behavior. -
Page 55: Driving Coach Options
OPERATING THE HDGT MAIN MENU & FEATURE SETUP This section is a comprehensive explanation of the options available on the Main Menu. It includes detailed instructions for features that require setup. All of the subsections in this part of the manual will appear in the order in which they are displayed on HDGT Main Menu. - Page 56 OPERATING THE HDGT MAIN MENU>> SLEEP MODE The HDGT features a power-saving Sleep Mode; the screen will turn off and the HDGT will not monitor or record any vehicle parameters. The HDGT will enter Sleep Mode if that option is selected from the Main Menu.
- Page 57 OPERATING THE HDGT MAIN MENU>> SPECIAL FEATURES The special features described in this section are not available for every vehicle. If a feature is available for a vehicle, then it will appear in the Special Features menu on the HDGT. In order to access the Special Features, the correct vehicle application must be selected on the HDGT;...
- Page 58 OPERATING THE HDGT MAIN MENU>> SPECIAL FEATURES>>SPEED LIMITER Adjust top speed available on the vehicle. Fuel Economy Tip: Limiting the top speed can dramatically reduce fuel consumption; dropping down by 1-2 mph will have an effect. MAIN MENU>> SPECIAL FEATURES>> CRUISE LOW Set the lowest speed at which the cruise control can be set.
- Page 59 OPERATING THE HDGT MAIN MENU>> SPECIAL FEATURES>>DRIVING COACH OPTIONS All functions of the Driving Coach can be controlled, saved and exported from the Driving Coach Options menu. User Tip: If fuel economy and driving stats are important to you as a driver, then the information provided in this section will also be very valuable to you.
- Page 60 OPERATING THE HDGT MAIN MENU>> SPECIAL FEATURES>>DRIVING COACH OPTIONS Driving Coach Parameter Definitions Throttle % The position of the fuel pedal shown as a percent scaled from 0-100%. Load %: The amount of load on the engine shown as a percent scaled from 0-100%.
- Page 61 OPERATING THE HDGT MAIN MENU>> SPECIAL FEATURES>>DRIVING COACH OPTIONS Changing Driving Coach Levels 1. Highlight Driving Coach Options on the MAIN MENU Go Back Main Menu (right buttons). Special Features 2. SELECT the highlighted option (bottom Driving Coach Options left button). User Options 3.
- Page 62 OPERATING THE HDGT MAIN MENU>> SPECIAL FEATURES>>DRIVING COACH OPTIONS Driving Stats View a display of all recorded limit breaches, COACH STATS Go Back reset the driving coach economy status and Parameter Stat export all driving statistics into an Over Throttle Total Over Load Total Excel spreadsheet.
- Page 63 OPERATING THE HDGT MAIN MENU>> SPECIAL FEATURES>>DRIVING COACH OPTIONS Option #2 From the Coach Setup Menu: 1. Highlight Clear/Reset Driving Stats (right buttons). 2. SELECT the highlighted option (bottom left button). 3. Confirm that you want to delete the statistics by pressing YES (top right button).
- Page 64 OPERATING THE HDGT MAIN MENU>> SPECIAL FEATURES>>DRIVING COACH OPTIONS Copy Stats to SD Card Export a report of the driving statistics to the SD card; the information will be saved in a .CSV file format. You can use the SD card and card reader to move the file to your computer and open it with a spreadsheet program like Microsoft Excel ®...
- Page 65 OPERATING THE HDGT MAIN MENU>> SPECIAL FEATURES>>DRIVING COACH OPTIONS Driving Coach Stats Report Card The screen shot below is an example of the .CSV driving statistics report exported by the HDGT.
- Page 66 OPERATING THE HDGT MAIN MENU>> SPECIAL FEATURES>>DRIVING COACH OPTIONS Clear/Reset Driving Stats Erase all of the information recorded by the Driving Coach application. This option can be password protected. There are two different places to access this option: Option #1: From the Coach Setup Menu: 1.
- Page 67 OPERATING THE HDGT MAIN MENU>> SPECIAL FEATURES>>DRIVING COACH OPTIONS Calibrate MPGs This option will allow you to adjust the fuel efficiency calculation on the HDGT so that it is as accurate as possible. Checking Average Fuel Economy It is important to check the average fuel economy on your vehicle and on the HDGT at least once every changing season.
- Page 68 OPERATING THE HDGT MAIN MENU>> SPECIAL FEATURES>>DRIVING COACH OPTIONS Change the MPG calibration setting on the HDGT (see below). Example: GT MPGs = 24 Calculated MPGs = 21 24 - 21 Step 1: Percent Di erence = Step 2: Percent Di erence = Step 3: Percent Di erence = 0.142...
- Page 69 OPERATING THE HDGT MAIN MENU>> SPECIAL FEATURES>>DRIVING COACH OPTIONS Driving Coach Sound Turn the Driving Coach sounds on or off. The current setting is listed at the top of the screen. Highlight the desired setting (right buttons). 2. SELECT the highlighted setting (bottom left button). 3.
-
Page 70: User Options
OPERATING THE HDGT MAIN MENU>> SPECIAL FEATURES>>USER OPTIONS Adjust Backlight Adjust the brightness of the screen; separate settings are available for day and night modes. MAIN MENU Go Back Go to the Main Menu (top left button). User Options 2. Highlight User Options (right buttons). Vehicle Settings 3. - Page 71 OPERATING THE HDGT MAIN MENU>> SPECIAL FEATURES>>USER OPTIONS Set Background Theme Change the color theme; separate settings are available for day and night modes. Choose from eight preset color themes or create your own customized color theme. USER OPTIONS Go Back Go to the Main Menu (top left button).
- Page 72 OPERATING THE HDGT MAIN MENU>> SPECIAL FEATURES>>USER OPTIONS 9. SELECT the highlighted theme (bottom left button). • If a preset color theme is selected, the HDGT will automatically return to the previous screen. • Additional steps are required to set a customized theme, see the next section.
- Page 73 OPERATING THE HDGT MAIN MENU>> SPECIAL FEATURES>>USER OPTIONS Creating a Custom Color Theme Follow the steps listed in the previous section to select a custom background color theme. 2. Change the background color (right buttons). • The screen with display a preview of each color option. 3.
- Page 74 OPERATING THE HDGT MAIN MENU>> SPECIAL FEATURES>>USER OPTIONS 6. Change the border color. • The screen will display a preview of each color option. To set the currently displayed color and advance to the next screen, press SELECT (bottom left button). •...
-
Page 75: Vehicle Settings
OPERATING THE HDGT MAIN MENU>> SPECIAL FEATURES>>USER OPTIONS US/Metric Units Choose between U.S. Standard and metric unit systems; every vehicle parameter and all other information displayed by the HDGT will be affected by this setting Go to the Main Menu (top left button). MAIN MENU Go Back 2. - Page 76 OPERATING THE HDGT MAIN MENU>> SPECIAL FEATURES>>USER OPTIONS Administrator Password The HDGT Administrator Password is a four digit code that can consist of numbers, spaces and letters. Password protect the following HDGT functions: • Reset to System Defaults • Change Driving Coach Levels •...
- Page 77 OPERATING THE HDGT MAIN MENU>> SPECIAL FEATURES>>USER OPTIONS Enter the Administrator Password. • To change the digit currently highlighted by the cursor, use the buttons on the right. • To move the cursor to the right, press MOVE CURSOR (bottom left button).
- Page 78 OPERATING THE HDGT MAIN MENU>> SPECIAL FEATURES>>USER OPTIONS 13. Disabling Password Protection 1. Go to the Main Menu (top left button). MAIN MENU Go Back 2. Highlight User Options (right buttons). User Options Vehicle Settings 3. SELECT the highlighted option. 4.
- Page 79 OPERATING THE HDGT MAIN MENU>> SPECIAL FEATURES>>USER OPTIONS Reseting to System Default IMPORTANT NOTE: The HDGT will remain locked to a vehicle if the Install Tuning or Special Features options have been used, even if the defaults are reset. To unlock the HDGT, you must go through the Uninstall Device process.
- Page 80 OPERATING THE HDGT MAIN MENU>> SPECIAL FEATURES>>VEHICLE SETTINGS Vehicle Settings allow you to change temperature warning and communication protocol settings. Set Warning Levels Configure the HDGT to provide visual and/or audio warnings for the following parameters. Refer to OEM vehicle specifications to determine the values to use when setting safety levels.
- Page 81 OPERATING THE HDGT MAIN MENU>> SPECIAL FEATURES>>VEHICLE SETTINGS Changing Warning Levels 1. Go to the Main Menu (top left button). MAIN MENU Go Back 2. Highlight Vehicle Settings (right buttons). User Options 3. SELECT the highlighted option. Vehicle Settings Vehicle Diagnostics 4.
- Page 82 OPERATING THE HDGT MAIN MENU>> SPECIAL FEATURES>>VEHICLE SETTINGS Pyrometer Calibration Determine the best temperatures to set for warning levels to help prevent engine heat damage. 1. Make sure the vehicle is running at stock horsepower. • For instructions on checking to see if the HDGT tune is installed, (see page 26).
- Page 83 SELECT Check ECM Status Designed specifically for the EGR Cummins® engine, this option should only be accessed under the direction of Bully Dog tech. Retrieve ECM Password Designed specifically for the EGR Cummins® engine, this option should only be accessed under the direction of technical support.
- Page 84 OPERATING THE HDGT MAIN MENU>> SPECIAL FEATURES>>VEHICLE SETTINGS Vehicle Diagnostics Read and erase Diagnostic Trouble Codes (DTCs) from the engine computer. (The tune does not have to be installed to use this function). To Read DTCs: MAIN MENU Go Back 1.
- Page 85 3. Reinstall the tune. Drive the vehicle for about one week. If the DTC comes back while the tune is reinstalled, contact Bully Dog technical support. Show Settings View HDGT and vehicle information. See page 87 for more information about checking the HDGT status to determine if the unit has been locked to a vehicle.
- Page 86 OPERATING THE HDGT MAIN MENU>> SPECIAL FEATURES>>VEHICLE SETTINGS Change Vehicle/Engine IMPORTANT NOTE: The correct vehicle MUST be selected, or none of the HDGT functions will work properly. 1. Go to the Main Menu (top left button). MAIN MENU Go Back 2.
-
Page 87: Usb Mode
OPERATING THE HDGT USB Mode Connecting the HDGT to a computer via USB cable enters it into the USB mode. In order to use the Update Agent, keep the HDGT in USB Mode. If you want to use your computer to power the HDGT and access some of the functions without connecting it to a vehicle, you can exit USB mode by pressing the top left button as shown in the illustration below:... -
Page 88: Troubleshooting
MORE INFORMATION To Check HDGT Status: 1. Go to the Main Menu (top left button). GT SYSTEM INFO Go Back GT status: Unlocked from Vehicle 2. Highlight Show Settings Serial #: ################# HW version: Memory: (right buttons). ###### SWa version: 1.0.5.0 SWb version: Tuning Version:... - Page 89 MORE INFORMATION Monitoring Gauges Do Not Work Go to the Main Menu (top left button). 1. Highlight Vehicle Settings (right buttons). 2. SELECT the highlighted option (bottom left button). 3. Highlight Change Monitoring Type (right buttons). 4. SELECT the highlighted option (bottom left button). 5.
- Page 90 SECTION HEADER HERE BIGRIG.BULLYDOG.COM 46500-99_V3.3...
Need help?
Do you have a question about the BIG RIG HEAVY DUTY GT and is the answer not in the manual?
Questions and answers