HTC Shift User Manual
Mobile office
Hide thumbs
Also See for Shift:
- User manual (294 pages) ,
- Read me first (2 pages) ,
- User manual (10 pages)
Table of Contents
Advertisement
Quick Links
Advertisement
Table of Contents

Subscribe to Our Youtube Channel
Related Manuals for HTC Shift


Summary of Contents for HTC Shift
-
Page 1: Mobile Office
Mobile Office User Manual www.htc.com... -
Page 2: Please Read Before Proceeding
Macrovision. Reverse engineering or disassembly is prohibited. All other company, product and service names mentioned herein are trademarks, registered trademarks or service marks of their respective owners. , ExtUSB, HTC Care, HTC Shift, and SnapVUE are trademarks 5,056,109 5,504,773 5,511,073... -
Page 3: Important Health Information And Safety Precautions
HTC shall not be liable for technical or editorial errors or omissions contained herein, nor for incidental or consequential damages resulting from furnishing this material. The information is provided “as is” without warranty of any kind and is subject to change without notice. - Page 4 • Do not connect the supplied adapter to other devices Use the adapter only as instructed by the user manual. • Do not step on the power cord or place objects on top of it Carefully route the power cord away from foot traffic. •...
- Page 5 • Take extra precautions to keep a leaking battery away from fire as there is a danger of ignition or explosion. • Communicate the appropriate steps immediately in case a hazard occurs SAFETY PRECAUTIONS FOR DIRECT SUNLIGHT Keep this device away from excessive moisture and extreme temperatures. Do not leave the device or its battery inside a vehicle or in places where the temperature may exceed 60°C (140°F), such as on a car dashboard, window sill, or behind a glass that is exposed to direct sunlight or strong ultraviolet light for extended periods of time.
- Page 6 SAFETY PRECAUTIONS FOR RF EXPOSURE • Avoid using your device near metal structures (for example, the steel frame of a building). • Avoid using your device near strong electromagnetic sources, such as microwave ovens, sound speakers, TV and radio. • Use only original manufacturer-approved accessories, or accessories that do not contain any metal.
-
Page 7: General Precautions
General Precautions • Heed service markings Except as explained elsewhere in the Operating or Service documentation, do not service any product yourself. Service needed on components inside these compartments should be done by an authorized service technician or provider. • Damage requiring service Unplug the device from the electrical outlet and refer servicing to an authorized service technician or provider under the following conditions:... - Page 8 • Avoid pushing objects into device Never push objects of any kind into cabinet slots or other openings in the device. Slots and openings are provided for ventilation. These openings must not be blocked or covered. • Take care when closing the device display Do not slam or twist the display when closing it.
-
Page 9: Table Of Contents
Contents Chapter 1 Getting Started 1.1 Getting to Know Your Mobile Computer ... 16 Top side ... 16 Left side ... 17 Right side ... 17 Back side ... 17 Bottom side ... 18 Status indicators ... 19 Accessories ... 20 1.2 Installing the USIM/SIM Card and Battery ... - Page 10 Chapter 2 Operating in Windows Vista® 2.1 Basic Settings ... 34 Check battery status ... 34 Change the screen resolution ... 34 2.2 Navigation and Input Methods ... 35 Keyboard ... 35 Mouse buttons and the microPad ... 36 Touch screen ... 37 2.3 Using Pen Flicks and Touch Flicks ...
- Page 11 2.8 Connecting Peripherals ... 53 External audio ... 53 USB device ... 53 External monitor ... 53 Extension kit ... 54 2.9 Using the Web Camera ... 55 Chapter 3 Operating in SnapVUE™ 3.1 First-time Use ... 58 Set up the data connection ... 58 Protect your USIM/SIM card with a PIN ...
- Page 12 3.7 Contacts ... 72 Create new contacts ... 72 View, search and send ... 73 Synchronize contacts with the Exchange Server ... 74 3.8 SMS ... 75 View and reply to SMS messages ... 75 Compose and send text messages ... 75 Copy text messages to the SIM card ...
- Page 13 E-mail flags ... 96 Search for e-mails on the Exchange Server ... 97 Out-of-office auto-reply ... 97 Send meeting requests ... 97 Find contacts in the Company Directory ... 99 Chapter 5 Securing and Managing the Mobile Computer 5.1 Setting a BIOS Password ... 102 5.2 Hard Disk Recovery ...
-
Page 15: Chapter 1 Getting Started
Chapter 1 Getting Started 1.1 Getting to Know Your Mobile Computer 1.2 Installing the USIM/SIM Card and Battery 1.3 Connecting Power and Charging the Battery 1.4 Using the Screen Protection Sheet 1.5 Adjusting the Touch Panel 1.6 Inserting a Memory Card 1.7 Powering On the Mobile Computer for the First Time 1.8 Switching Between Windows Vista®... -
Page 16: Getting To Know Your Mobile Computer
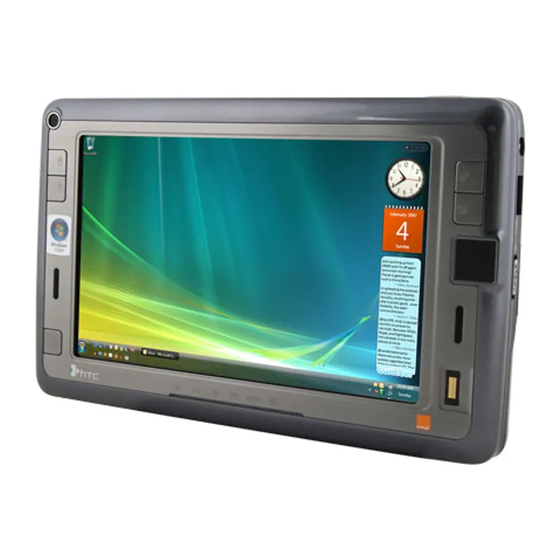
1.1 Getting to Know Your Mobile Computer Top side Left/Right Mouse Buttons Web Camera Microphone SnapVUE™ (See Chapter 3 and 4 for details.) microPad (See Chapter 2 for details.) LCD Touch Screen Left/Right Speaker Keyboard Slide up the LCD panel to reveal the keyboard. -
Page 17: Left Side
Left side Headset/MIC Connect stereo headphones, speakers, or a microphone. Right side POWER/HOLD Switch Slide to the right and release to: • Power on the Mobile Computer. • Put Windows to sleep mode; wake Windows from sleep mode. Sliding the switch to the left puts it in hold. (You will see an orange dot.) This prevents accidental keyboard or touch screen actions when the Mobile Computer is in the carrying case. -
Page 18: Bottom Side
Bottom side Warning! Do not obstruct or cover the air vents to avoid overheating the Mobile Computer. Air Vents Battery Cover Remove to access the battery compartment and USIM/SIM card slot. -
Page 19: Status Indicators
Status indicators Status LED Power Battery CAPS Lock Hard Disk Activity Bluetooth/Wi-Fi Data Connection E-mail/SMS Meaning • Lights green when the AC adapter is connected. • Flashes green when the device is in sleep mode. • Lights amber when the battery is charging. •... -
Page 20: Accessories
Accessories No. Accessory Function AC adapter with Connect the AC adapter to the Mobile Computer to power power cable the device and charge the battery. Stereo headset Connect to the Headset/MIC jack to listen to audio. Battery Provides mobile power for your Mobile Computer. Extension kit The combo USB hub and RJ-45 LAN port allows you to connect your Mobile Computer with more USB devices... -
Page 21: Installing The Usim/Sim Card And Battery
1.2 Installing the USIM/SIM Card and Battery Always turn off your Mobile Computer before installing or removing the USIM/SIM card and battery. The SIM card slot is located in the battery compartment. Install a USIM or SIM card to connect your Mobile Computer to the Internet using a 3.5G/3G connection such as HSDPA/UMTS or using GPRS/EDGE. -
Page 22: Insert The Battery Pack
Note To remove the USIM/SIM card, press the card to pop it out of the slot. Insert the battery pack Turn the Mobile Computer so that the battery compartment faces toward you. With the label facing up, insert the bottom end of the battery pack first and then press down the battery. - Page 23 There are battery latches on the left and right side of the battery compartment. Slide the latches inward to lock the battery in place. Replace the battery cover. To remove the battery pack Remove the battery cover. Slide the battery latches outward to release the battery.
-
Page 24: Connecting Power And Charging The Battery
Remove the battery by lifting it up from the protruding grip that is located beside the battery contacts. 1.3 Connecting Power and Charging the Battery The Mobile Computer can be powered by the AC adapter or by the installed battery pack. Connect the AC adapter The AC adapter that comes with your Mobile Computer is a universal adapter that converts AC power to DC power. -
Page 25: Charge The Battery
Charge the battery If you haven’t installed the battery yet, see “Installing the SIM Card and Battery” in this chapter for instructions on installing the battery. New batteries are shipped partially charged. Use the AC adapter to fully charge the battery pack before using your Mobile Computer for the first time. -
Page 26: Using The Screen Protection Sheet
1.4 Using the Screen Protection Sheet Use the supplied screen protection sheet to protect the touch screen from scratches, moisture, or smudges. To attach the screen protection sheet to the touch screen Peel off a small part of the screen protection sheet from its left and right corners. -
Page 27: Adjusting The Touch Panel
1.5 Adjusting the Touch Panel You can slide out and tilt the touch panel to an angle to use the Mobile Computer as a notebook PC, or fold down the touch panel into a tablet. To slide out and tilt the touch panel Hold the left and right sides of the Mobile Computer with both hands. - Page 28 To fold down the touch panel into a tablet Hold the Mobile Computer with both hands. Fold down the touch panel by pressing down on the left and right sides of the panel. From the upper left and right edges of the touch panel, push and slide the touch panel towards you until the panel is aligned with the base of the keyboard.
-
Page 29: Inserting A Memory Card
1.6 Inserting a Memory Card On the right side of the Mobile Computer, there is an SDIO slot that mainly serves as an SD memory card reader. If you have a digital camera’s SD card, you can view and copy photos and other media from your SD card onto the Mobile Computer. -
Page 30: Set Up Windows Vista® Business Edition
During startup, press the DEL key if you need to enter the BIOS and change BIOS settings. To protect your Mobile Computer from unauthorized use, it is recommended that you set a supervisor password in the BIOS. See Chapter 5 for details. After the POST finishes, you will be prompted to set up Windows Vista®. -
Page 31: Switching Between Windows Vista® And Snapvue
After the extraction process is complete, a shortcut icon to the installer will be added to the Windows Desktop. Double-click or double-tap this icon to run the installer. Click or tap Install Program to begin installing the anti-virus software. Follow the on-screen instructions to complete the installation. When done, tap Finish. - Page 32 To switch back to Windows Vista® Press the SnapVUE button. If there is no display on the screen, it means that Windows Vista® has been idle for some time and has entered sleep mode. To wake Windows Vista® from sleep mode, slide and release the POWER/HOLD switch that is located on the right side of your Mobile Computer.
-
Page 33: Chapter 2 Operating In Windows Vista
Chapter 2 Operating in Windows Vista® 2.1 Basic Settings 2.2 Navigation and Input Methods 2.3 Using Pen Flicks and Touch Flicks 2.4 Using the Tablet PC Input Panel 2.5 Using the Control Center 2.6 Connecting to the Internet 2.7 Using Bluetooth 2.8 Connecting Peripherals 2.9 Using the Web Camera... -
Page 34: Basic Settings
2.1 Basic Settings You can quickly check battery status from the Windows Vista® taskbar. Your Mobile Computer also has a button for quickly switching the screen resolution. Check battery status To check the battery status, tap the Battery icon in the notification area of the taskbar. -
Page 35: Navigation And Input Methods
Additional screen resolution options are available in the Graphics Properties dialog box. To access these options, tap the Graphics icon in the taskbar’s notification area, tap Graphic Properties, and then tap Display Settings. 2.2 Navigation and Input Methods You can use one of the following ways to navigate Windows Vista® and enter information: •... -
Page 36: Mouse Buttons And The Micropad
Toggle the display between the external monitor, Mobile Computer’s LCD, and dual display (on both the LCD and external monitor). Lower the screen brightness. Increase the screen brightness. Lower the volume. Increase the volume. Toggle between muting and unmuting the volume. Pressing FN + F1 opens the Windows Help and Support window, while pressing FN + F3 opens the Search window. -
Page 37: Touch Screen
To use the mouse buttons and microPad • Press the left mouse button to single-click. • Press the left mouse button twice to double-click. • Press the right mouse button to right-click. • The following table describes some of the ways on how to navigate using the microPad. - Page 38 The following table describes touch screen actions and the analogous mouse functions. Do this: Select an icon, window Single-tap or any object; press a button on the screen Open a program, Double-tap folder or file Open a pop-up Tap and hold with the stylus, or context menu press and hold with your finger Move an icon, window...
-
Page 39: Using Pen Flicks And Touch Flicks
2.3 Using Pen Flicks and Touch Flicks To flick means to make gestures on the touch screen by sliding the stylus or your finger in quick strokes. Pen flicks are stylus gestures that allow you to do simple navigational and editing functions on the touch screen. Actions like scrolling, moving forward and backward, copying and pasting, and more, can be done using pen flicks. -
Page 40: Using The Tablet Pc Input Panel
For more information about configuring pen and touch flicks, see “Configuring Touch Screen Input” in Chapter 5. 2.4 Using the Tablet PC Input Panel The Tablet PC Input Panel enables you to enter text by writing on the touch screen with your finger or stylus, or by using the on-screen keyboard. To open the Input Panel Check if the Input Panel is accessible from the Windows desktop or the taskbar. -
Page 41: Writing Pad
To select an input pad • In the input panel, there are three different input pads available for use: writing pad, character pad and on-screen keyboard. Tap the pad icons at the top of the input panel to select the preferred input pad. Writing pad Use the writing pad to write sentences as if you were writing on paper. -
Page 42: Character Pad
• Replace with the correct word. • Write the correct character on top of the incorrect character. • Point the stylus below the dotted line that’s right under the incorrect character to open a pop-up menu with more editing options. Character pad Use the character pad to write one character at a time, such as a letter, number or symbol. -
Page 43: Using The Control Center
To use the on-screen keyboard In a document, e-mail or any program that you opened, tap the area where you want to insert text. Open the Tablet PC Input Panel and then tap Tap the keys to input letters, numbers, etc. 2.5 Using the Control Center The Control Center provides a central location for you to quickly turn on and off the Bluetooth, Wi-Fi and 3G mobile connections, adjust volume and... -
Page 44: Volume And Brightness
Volume and brightness Under Volume, tap the “+” or “-” icon to increase or decrease the sound volume. Tap Mute to toggle between turning the sound on and off. Under Brightness, tap the “+” or “-” icon to increase or decrease the display brightness. -
Page 45: Bluetooth
Bluetooth Bluetooth allows you to exchange files and data with other Bluetooth- enabled devices. It also allows you to use peripherals such as Bluetooth mice and keyboards with the Mobile Computer. To toggle Bluetooth on or off This icon indicates that Bluetooth is off. -
Page 46: Shutdown Options
To switch the modem, Wi-Fi and Bluetooth functions back on, tap their respective icons in the Control Center. Note The Flight Mode status in Windows Vista® and SnapVUE is in sync. Enabling Flight Mode in the Control Center also enables Flight Mode in SnapVUE’s Comm Manager. - Page 47 To enter sleep mode To save battery power while you’re not using the Mobile Computer, you can switch it to sleep mode. Sleep mode saves the operating system state (which includes all open documents, running programs and window position, etc.) to memory and suspends the Mobile Computer to a lower power state.
-
Page 48: Advanced Settings
Advanced Settings Tapping the Advanced Settings button opens a dialog box which allows you to reset SnapVUE, install e-mail certificates, and configure certain settings. The following table describes the various options that you will find in the Advanced Settings dialog box. Option/Button General Show Control Center... -
Page 49: Connecting To The Internet
2.6 Connecting to the Internet Your Mobile Computer allows you to connect to the Internet in the following ways: • Use your USIM/SIM card • Use Wi-Fi • Use the Ethernet LAN port of the Extension kit to connect to a wired network Use USIM/SIM card You can use your USIM/SIM card to connect your Mobile Computer to the... -
Page 50: Use Wi-Fi
You can begin sending and receiving e-mails by using Windows Mail which is the e-mail (POP3/IMAP) application of Windows Vista®, or by using web mail. You may also install and use Microsoft® Office Outlook® to send and receive e-mails. Use Wi-Fi Wi-Fi allows wireless Internet access over distances of up to 100 meters. -
Page 51: Using Bluetooth
To manually connect to the wireless network, tap Start > Connect To, tap the name of the wireless network, and then tap Connect. You can begin sending and receiving e-mails by using Windows Mail which is the e-mail (POP3/IMAP) application of Windows Vista®, or by using web mail. -
Page 52: Pair With Other Bluetooth Devices
Pair with other Bluetooth devices Follow the steps below to connect the Mobile Computer with other Bluetooth-enabled devices and peripherals. Make sure that the Bluetooth function on both your Mobile Computer and the Bluetooth device are turned on, and that they are both set to discoverable (or visible) mode. -
Page 53: Connecting Peripherals
2.8 Connecting Peripherals You can connect external peripherals to the Mobile Computer for added functionality. External audio Connect the supplied stereo headset to the Headset/MIC jack found at the left side of the Mobile Computer. You may also connect external speakers or a microphone. -
Page 54: Extension Kit
Press Fn+ to toggle the display to the external monitor, the Mobile Computer’s LCD, or simultaneous view on both the external monitor and Mobile Computer. Extension kit You can use the Extension kit as a USB hub to connect up to 3 USB devices. The Extension kit also provides an RJ-45 connector that allows you to connect the Mobile Computer to a wired local network. -
Page 55: Using The Web Camera
There is a mini-USB port at the back of the Extension kit that allows you to connect a 5V mini-USB power adapter. If you connected a USB device to the Extension kit and your Mobile Computer is unable to detect it, this means that you need to use a mini-USB power adapter with the Extension kit to provide sufficient power to your USB device. - Page 56 56 Operating in Windows Vista®...
-
Page 57: Chapter 3 Operating In Snapvue
Chapter 3 Operating in SnapVUE™ 3.1 First-time Use 3.2 Introducing the SnapVUE Interface 3.3 Date, Time and Alarm 3.4 Weather 3.5 Input Methods 3.6 Calendar 3.7 Contacts 3.8 SMS 3.9 Comm Manager 3.10 Using Connection Setup 3.11 Adding Data Connections 3.12 Tasks 3.13 Settings... -
Page 58: First-Time Use
3.1 First-time Use SnapVUE™ is not accessible the first time you install the battery to the Mobile Computer. You need to power on the Mobile Computer first before SnapVUE starts to operate in instant-on mode. After that, SnapVUE is always accessible even when the power is turned off. -
Page 59: Protect Your Usim/Sim Card With A Pin
If your USIM/SIM card supports multiple network operator profiles, the next message that appears will display network profile choices. Select the profile you want to use and tap OK. The wizard then starts configuring the network settings. After configuration is complete, tap Restart. Protect your USIM/SIM card with a PIN To protect your USIM/SIM card from unauthorized use, you can set up SnapVUE to prompt for the PIN (personal identification number). -
Page 60: Set Up A Device Password
Set up a device password You can keep your data more secure by requiring a password when SnapVUE is started or reset. To set a device password Tap Settings on the Home screen and then tap Lock. On the Password tab, select the Prompt if device unused for check box, and select how long your device must be idle before a password is required in the time selection box. -
Page 61: Introducing The Snapvue Interface
3.2 Introducing the SnapVUE Interface SnapVUE has a Home screen that shows the current date and time, upcoming appointments, and most recent SMS messages. From the Home screen, you can also check your local weather, add e-mail accounts, access settings, and more. You can tap certain items on the Home screen, such as an appointment, SMS message, or an icon, to view, edit or add more information for that item. -
Page 62: Status Icons
Status icons The following are the status icons that you will see in the Status area on the upper right corner of the Home screen. Icons that appear in this area Connection Setup Tap to view all notifications New text messages Alarm Icons that appear in this area HSDPA available... -
Page 63: Date, Time And Alarm
3.3 Date, Time and Alarm The Home screen displays the current day, date and time. If you have enabled the alarm for the current day, the Home screen also displays an Alarm icon right beside the time display. The date and time are synchronized with Windows Vista® and cannot be changed in SnapVUE mode. -
Page 64: Weather
If you selected to play sound, choose a sound from the drop-down list to assign it as the alarm. Repeat the same process to enable other alarms. When done, tap OK. 3.4 Weather Weather displays the current weather condition and weather information for the next 5 days of the week. -
Page 65: Customize Weather Options
Tap this item if you want to select another city. Tap to download the latest weather data. Note If you have not connected to the Internet and downloaded weather information for six days or your Mobile Computer failed to connect during the first download, the following error message will be displayed: "Unable to retrieve data for selected city. -
Page 66: Input Methods
• Temperature Scale. Choose whether to display temperature in Celsius or Fahrenheit. The AccuWeather web site (http://www.accuweather.com) provides more detailed weather information. You can switch to Windows Vista® and use Internet Explorer® to access this web site. 3.5 Input Methods When you are on a screen that requires text or number entry, the Input Panel icon becomes available at the bottom of the screen. -
Page 67: On-Screen Keyboard
On-screen Keyboard The On-screen Keyboard is selected by default whenever text entry is possible. Enter text by simply tapping the keys on the On-screen Keyboard. To enlarge the keys of the On-screen Keyboard By default, the On-screen Keyboard displays small keys. You can set it to display larger keys by following these steps: Tap the Input Selector arrow and then tap Options. -
Page 68: Letter Recognizer
Letter Recognizer With Letter Recognizer, you can write individual letters, numbers, and punctuation, which are then converted into typed text. To use Letter Recognizer Tap the Input Selector arrow and then tap Letter Recognizer. Write characters, numbers, and symbols in the designated writing area. -
Page 69: Calendar
3.6 Calendar Use Calendar to create appointments, including meeting requests and other events. You can set reminders so that you will be notified of your appointments. Note For more information about creating and responding to meeting requests, see “Working With Company E-mails and Meeting Requests in SnapVUE” in Chapter 4. -
Page 70: View Appointments
Do one of the following: • If there is a time frame for the appointment, select the start and end dates and time. • If it is a special occasion such as a birthday or a whole-day event, set the All Day option to Yes. Specify the type of category for your appointment, so that it can be grouped with other related appointments. - Page 71 • In the month calendar, days that have appointments are marked with a white triangle. On the Calendar screen To access all your appointments, go to the Calendar screen. By default, the Calendar screen displays appointments in Agenda view. Tap the lower left of the screen to switch between Day, Week, Month, Year, and Agenda views.
-
Page 72: Synchronize Appointments With The Exchange Server
• When in Month view, you will see the following indicators: Synchronize appointments with the Exchange Server If you want to view the same calendar appointments in both Windows Vista® and SnapVUE, synchronize your appointments with your company’s Exchange Server. To do so, make sure you select Calendar as one of your sync items when you set up your Outlook E-mail account in SnapVUE. -
Page 73: View, Search And Send
When finished, tap OK. To edit contact information, tap the contact name and then tap Menu > Edit. To create and store a contact on your USIM/SIM card On the Home screen, tap the Contacts icon. Tap New then select SIM Contact. Enter a contact name and phone number. -
Page 74: Synchronize Contacts With The Exchange Server
• Begin entering a contact name in the provided text box until the contact you want is displayed. • Use the alphabetical index displayed at the top of the contact list. • Filter the list by categories. In the contact list, tap Menu > Filter, then tap a category you’ve assigned to a contact. -
Page 75: Sms
3.8 SMS You can send and receive SMS text messages in SnapVUE. View and reply to SMS messages On the Home screen When you have new incoming text messages, you will see the two most recently received messages on the Home screen: Tap a text message to read it or send a reply. -
Page 76: Copy Text Messages To The Sim Card
Enter your message. • To quickly add common messages, tap Menu > My Text and tap a desired message. • To check the spelling, tap Menu > Spell Check. Tap Send. Tips • Use the Symbol Pad to enter symbols. See “Symbol Pad” earlier in this chapter for details. -
Page 77: Using Connection Setup
Tap to turn on Flight Mode. This disconnects the Mobile Computer from the network of your wireless service provider in both SnapVUE’s Comm Manager and the Control Center in Windows Vista®. To reconnect to your service provider’s network, tap the Modem button in the Comm Manager or the Control Center. -
Page 78: Manually Select The Network Operator
Manually select the network operator You can also manually select your network operator from the Connection Setup’s settings screen. Connection Setup will then reconfigure your data connection settings based on the operator that you selected. Tap the Settings icon on the Home screen and then tap Connection Setup. -
Page 79: Adding Data Connections
3.11 Adding Data Connections If you will be using more than one USIM/SIM card, you can add several data connections and manually enter the network settings of each USIM/SIM card’s wireless service provider. To add a new GPRS, EDGE or 3G connection To add another GPRS, EDGE or 3G connection, make sure to obtain first the Access point name from your wireless service provider. -
Page 80: Tasks
On the Make New Connection screen, enter a name for the connection. In the Select a modem list, select Cellular Line, then tap Next. Enter the ISP server phone number and then tap Next. Enter your user name, password, and any other information required by your ISP. -
Page 81: Locate A Task
Tips • You can easily create a short, to-do type task. Simply tap the Tap here to add a new task box, enter a subject, and press the ENTER key. If the task entry box is not available, tap Menu > Options and select the Show Tasks entry bar check box. -
Page 82: Settings
3.13 Settings To see all available settings in SnapVUE, tap Settings on the Home screen. The table below describes about what you can do with SnapVUE settings. Icon Description Alarm Set alarm(s) at specified days and times of a week. Backlight Set the backlight timeout and adjust brightness. - Page 83 Icon Description HSDPA Turn High Speed Data Packet Access (HSDPA) on or off. HSDPA is a 3.5G digital data service that provides high-speed downstream data rates. In order for your device to attain the high connection speed of HSDPA, your wireless service provider must support this feature and you must be within the coverage area of your service provider’s HSDPA network.
- Page 84 84 Operating in SnapVUE™...
-
Page 85: Chapter 4 Working With E-Mail In Snapvue
Chapter 4 Working With E-mail in SnapVUE™ 4.1 Types of E-mail Accounts 4.2 Adding E-mail Accounts 4.3 Using E-mail 4.4 Working With Company E-mails and Meeting Requests... -
Page 86: Types Of E-Mail Accounts
4.1 Types of E-mail Accounts You can set up the following types of e-mail accounts in SnapVUE: • Outlook e-mail that you sync with your company’s Exchange Server. • E-mail account that you have from an Internet Service Provider (ISP). •... - Page 87 Tap Next. Auto Setup attempts to automatically configure your e-mail account. Note If Auto Setup is unsuccessful, select Internet e-mail from the Your e- mail provider list on the next screen. You will be asked to enter e-mail server settings during the setup process. See “To specify e-mail server settings”...
- Page 88 Tap Finish. To specify e-mail server settings If Auto Setup is unsuccessful, contact your ISP or e-mail provider for the Incoming mail server and outgoing mail server settings so you can enter them on your device. Other options that you can select include the following: •...
-
Page 89: Set Up Your Outlook E-Mail Account
To customize download and format settings Before you tap Finish when setting up your POP3 or IMAP4 e-mail account, you can tap Review all download settings to choose download options, message format, and other settings. Options Automatic Send/Receive Download messages Send/receive when I click Send Use automatic send/... -
Page 90: Manage E-Mail Accounts
To set up an Exchange Server connection Tap Add Account on the Home screen. Enter your e-mail address. Clear the Try to get e-mail settings automatically from the Internet check box, then tap Next. Select Exchange server in the Your e-mail provider list, then tap Next. - Page 91 Select the check boxes of three e-mail accounts that you want to appear on the Home screen, and clear the check boxes of the other e-mail accounts. Tap Done. To use an e-mail account that is not on the Home screen Open the Account Picker screen to access other e-mail accounts that are not shown on the Home screen.
- Page 92 To delete an e-mail account • On the Account Picker screen, navigate to a personal e-mail account you want to delete and then tap Menu > Delete. Note Text message (SMS) account cannot be deleted. To configure account settings Open the Messaging Options screen to change e-mail account settings. •...
-
Page 93: Using E-Mail
4.3 Using E-mail After setting up e-mail accounts in SnapVUE, you can start sending and receiving e-mail messages. Create and send e-mails Follow these steps to compose a new e-mail and send it: Do one of the following: • Tap an e-mail account on the Home screen; or •... -
Page 94: View And Reply To E-Mails
View and reply to e-mails From the Home screen and the Account Picker screen, you will be able to see that you have new incoming e-mails. Tap the e-mail account that shows you have new e-mails, and then follow these steps to view and reply to a received message: In the message list, tap to open a new message. -
Page 95: Working With Company E-Mails And Meeting Requests
4.4 Working With Company E-mails and Meeting Requests To keep SnapVUE always up-to-date with your company e-mails while you’re out of the office, you can synchronize Outlook E-mail over-the-air with your company’s Exchange Server. Before you can synchronize with the Exchange Server, make sure to set up Outlook E-mail in SnapVUE with the appropriate Exchange Server settings. -
Page 96: E-Mail Flags
Requirement The Direct Push feature works only if your company is using Microsoft Exchange Server 2003 Service Pack 2 (SP2) with Exchange ActiveSync or higher version. To turn on Direct Push Tap Settings on the Home screen. Tap Comm Manager. Tap the Direct Push icon to activate the push e-mail feature. -
Page 97: Search For E-Mails On The Exchange Server
Search for e-mails on the Exchange Server You can search for e-mails that are stored in your Microsoft Exchange Server mailbox. The search results will be downloaded and displayed in a Search Results folder. Requirement Your company must be using Microsoft Exchange Server 2007 or higher. - Page 98 Note You can specify if an attendee is required or optional only if your company is using Microsoft Exchange Server 2007. Otherwise, all attendees are designated as required. When you have finished adding attendees, tap Done. Tap OK to send. To choose the e-mail account to use for sending meeting requests, tap Calendar on the Home screen and then tap Menu >...
-
Page 99: Find Contacts In The Company Directory
Find contacts in the Company Directory You can search and access contact information from your Company Directory. By having over-the-air access to the Company Directory, you can easily send e-mail messages and meeting requests to anyone in your company. Requirement Access to the Company Directory is available only if your company is using Microsoft Exchange Server 2003 SP2 or higher, and you have completed your first synchronization with the Exchange... - Page 100 100 Working With E-mail in SnapVUE™...
-
Page 101: Chapter 5 Securing And Managing The Mobile Computer
Chapter 5 Securing and Managing the Mobile Computer 5.1 Setting a BIOS Password 5.2 Hard Disk Recovery 5.3 Using the Fingerprint Sensor and VITAKEY™ 5.4 Configuring Touch Screen Input 5.5 Configuring Input Panel Settings... -
Page 102: Setting A Bios Password
5.1 Setting a BIOS Password System Setup (BIOS) enables you to change system settings such as the date and time or set boot device priority. You can set a supervisor password to prevent unauthorized access to your Mobile Computer’s BIOS. When the Supervisor Password is set, users must enter the password to start the Mobile Computer or enter System Setup. -
Page 103: Hard Disk Recovery
In the BIOS SETUP UTILITY, select the Exit menu, select Save Changes and Exit, and then press ENTER. When prompted to save the configuration changes and exit the setup, select OK and then press ENTER. Note If your system behaves abnormally after changing BIOS settings, enter the BIOS, select the Exit menu, and then select Load BIOS default settings. -
Page 104: Using The Fingerprint Sensor And Vitakey
Press N to continue with the hard disk recovery process. If you press Y, the hard disk recovery utility is terminated. The next message prompts you whether or not to rebuild the MBR (Master Boot Record) data: Recovery process is starting ... The process will delete all data on the hard drive. -
Page 105: Enroll Your Fingerprint
Enroll your fingerprint The first time you use the VITAKEY software, the System Wizard will guide you through enrolling your fingerprints and setting up data protection. To run the System Wizard Tap the VITAKEY icon The System Wizard opens. Tap Next. Tap Create new User Data File and tap Next. -
Page 106: Authentication
Authentication After enrolling one or more of your fingerprints, VITAKEY will prompt for fingerprint authentication whenever you log onto Windows in your Mobile Computer. Swipe a finger that has an enrolled fingerprint on the fingerprint sensor to log onto Windows. Fingerprint authentication is also required before you are allowed to change VITAKEY settings, protect/unprotect files or use certain functions. -
Page 107: Protect Files With Fingerprint Security
To use an enrolled username and password Open the web page or program where you have already enrolled account information into the Password Bank. Tap the username field. VITAKEY’s Authentication window opens. Swipe a finger that has an enrolled fingerprint over the fingerprint sensor. -
Page 108: Vitakey Settings
To easily search for VITAKEY protected files in your Mobile Computer, tap and hold the VITAKEY system tray icon and then tap Search Protected Files. To remove protection Select the file or files you want to unprotect and right tap the selection. -
Page 109: Back Up Security Data
Icon Meaning Tap to enable sound effects, enable the Password Bank and auto-login for registered web sites, display enrolled fingers during authentication, and more. Back up security data You can back up the User Data File that contains your enrolled fingerprints and Password Bank. -
Page 110: Pen And Input Devices
Note: If the Control Panel is in Classic View mode, double-tap Tablet PC Settings in the Control Panel window. In the General tab, select Right-handed or Left-handed to set where pop-up menus appear on screen. Tap Calibrate to calibrate the screen based on the current orientation. Follow screen instructions to complete calibration, then repeat the process for all orientations that you will be using. - Page 111 Tap the Flicks tab. Pen flicks are stylus gestures that allow you to do simple navigational and editing functions on the touch screen. You can make the following selections: • Select Use flicks to perform common actions quickly and easily to enable the flicks function.
-
Page 112: Configuring Input Panel Settings
5.5 Configuring Input Panel Settings Before using the Tablet PC Input Panel for handwriting text on the touch screen, you can customize it first to better recognize your handwriting. Customize handwriting recognition Provide writing samples to the handwriting recognition engine so that it performs more accurately when you use your Mobile Computer as a tablet Open the Input Panel and then tap Tools >... - Page 113 Tap Sentences. An instruction screen explains the handwriting recognition exercises. Tap Next. You are prompted to write the first sentence. Write the sentence in the text area. When finished, tap Next to go on to the next sentence. You may also tap Save for later to save the samples you have written. Continue writing samples.
-
Page 114: Other Settings
Other settings To configure additional Input Panel settings, tap Tools > Options. Tap the different tabs in the Options window and choose your desired settings. Note For more information about configuring Tablet PC Input Panel options, see the Windows Vista® online help. -
Page 115: Appendix
Appendix A.1 Specifications A.2 Regulatory Notices... -
Page 116: Specifications
A.1 Specifications System Information Processor Memory Hard Disk Operating System Power Battery Charging Time Battery Life (estimate) AC Adapter Display LCD Type Resolution Orientation Intel® Processor A110, 800 MHz RAM: 1GB DDR2 microDIMM RAM 1.8” 40GB or 60GB hard disk (manufacturer's option) with G-Sensor shock protection Windows Vista®... - Page 117 UMTS/HSDPA/GSM/EDGE Data Function Network Quad-band GSM/GPRS/EDGE 850, 900, 1800, 1900 Tri-band HSDPA/UMTS: Europe/US: 850/1900/2100 HSDPA: Up to 3.6Mbps for download, 384kbps for upload UMTS: Up to 384kbps for download and upload (The device will operate depending on the frequency bands supported by the wireless service provider) Internal Antenna Global Roaming Auto Band...
- Page 118 Controls and Lights Device Control • SnapVUE™ button • Control Center button • microPad touchpad • Left/right mouse button • POWER/HOLD switch • Resolution button • QWERTY keyboard LEDs • Push e-mail/SMS notification • Data connection • Bluetooth/Wi-Fi • Hard disk activity •...
-
Page 119: Regulatory Notices
A.2 Regulatory Notices Regulatory Agency Identifications For regulatory identification purposes, your product is assigned a model number of CLIO110. To ensure continued reliable and safe operation of your device, use only the accessories listed below with your CLIO110. The Battery Pack has been assigned a model number of CLIO160. Note This product is intended for use with a certified Class 2 or Class 3 Limited Power Source, rated 12 Volts DC, maximum 3 Amp power supply unit. -
Page 120: Safety Precautions For Rf Exposure
• EN 301 489-24 Electromagnetic compatibility and radio spectrum matters (ERM); Electromagnetic compatibility (EMC) standard for radio equipment and services; Part 24: Specific conditions for IMT-2000 CDMA direct spread (UTRA) for mobile and portable (UE) radio and ancillary equipment. • EN 301 908 Electromagnetic compatibility and radio spectrum matters (ERM);... -
Page 121: Sar Information
SAR Information 1.91 W/kg @ 10g (CE) Telecommunications & Internet Association (TIA) safety information Pacemakers The Health Industry Manufacturers Association recommends that a minimum separation of six inches be maintained between a handheld wireless phone and a pacemaker to avoid potential interference with the pacemaker. These recommendations are consistent with the independent research by and recommendations of Wireless Technology Research. -
Page 122: Rohs Compliance
The WEEE logo (shown at the left) on the product or on its box indicates that this product must not be disposed of or dumped with your other household waste. You are liable to dispose of all your electronic or electrical waste equipment by relocating over to the specified collection point for recycling of such hazardous waste. -
Page 123: Index
Symbols 3G 21, 49, 77, 79 Accessories 20 ActiveSync 77 AC adapter 24 Alarm 63, 82 Anti-virus software 30 Backlight 82 Battery 19, 21, 24, 34 Block Recognizer 68 Bluetooth 45, 51 Brightness 44 Calendar 97 Calendar (SnapVUE) 69 Camera 55, 117 Certificate 82 Change screen resolution (Windows) 34 Charge battery 25... - Page 124 - POP3 86 - reply 94 - send 93 - settings (POP3/IMAP4) 89 - types of e-mail accounts 86 - view 94 E-mail Account Settings 82, 90 EDGE 21, 44, 49, 77, 79 Extension kit 54 External monitor 53 Find contact - in Company Directory 99 - in SnapVUE 73 Fingerprint sensor 104...
- Page 125 Password - device password (SnapVUE) 60 - SIM PIN code (SnapVUE) 59 - supervisor password 102 Pen flicks 39 Peripherals 53 PIN 59 POP3 86 Power 19, 24, 29, 46, 83 POWER/HOLD switch 17 Push mail 45, 77, 95 QWERTY keyboard 35 Regulatory notices 119 Resolution 34 Screen...
- Page 126 Tablet PC Input Panel 40 Tasks (SnapVUE) 80, 83 Text messages - copy from and to SIM card 76 - create and send 75 - overview 75 Touch flicks 39 Touch screen 37 Turn power on 29 USIM/SIM card 21, 49, 59, 83 VitaKey 104 Volume 44 Weather 64...
Need help?
Do you have a question about the Shift and is the answer not in the manual?
Questions and answers