Advertisement
Quick Links
Advertisement

Related Manuals for DIVERSIFIED WOODCRAFTS C2616


Summary of Contents for DIVERSIFIED WOODCRAFTS C2616
- Page 1 C2616 FOUR-STUDENT WORKSTATION ASSEMBLY INSTRUCTIONS...
- Page 2 TABLE OF CONTENTS PAGE REVISIONS TABLE …………………………………………………………………………………………………………………….…………………..……….………..……….…………………………………………..……………………………… ASSEMBLY COMPONENTS …………………………………………………………………………………………………………………….…………………..……….……….…………….………………………………………… ASSEMBLY …………………………………………………………………………………………………………………….…………………..……….……………………………..……….………………………………………………………………………………… APRON ASSEMBLY …………………………………………………………………………………………………………………….…………………..……….…..……….…………….………………………………………………………………… LEG ASSEMBLY …………………………………………………………………………………………………………………….…………………..……….…………………………..……….…………………………………………………………………… ROD SOCKET ASSEMBLY …………………………………………………………………………………………………………………….……………………...………………..……….………………………………………………… TOP ASSEMBLY …………………………………………………………………………………………………………………….…………………..……….…………………………………………………………………..………………………………… FIXTURE ASSEMBLY …………………………………………………………………………………………………………………….…………………..……….……………………………………..…………………..………………………… SINK ASSEMBLY …………………………………………………………………………………………………………………….…………………..……….…………………………………………………..……………….……………………………… BASE MOULDING ASSEMBLY ……………………………………………………………………………………………………………………….…………………..……….………………………………………………… PULL ASSEMBLY ……………………………………………………………………………………………….………….……………………………………………………….………….……………………………………………………….…………….
-
Page 3: Assembly Components
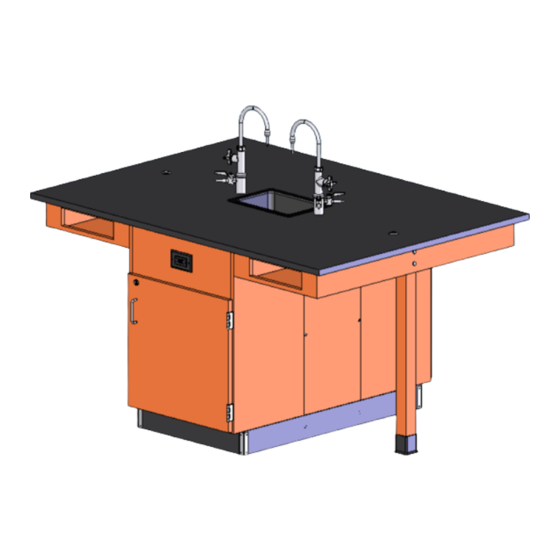
ASSEMBLY COMPONENTS Items Included In Hardware Box Part # Part # ASSEMBLY INSTRUCTIONS 1-HARDWARE BOX 16-SCREWS, 6X1/2” PTH SS 11FT-RUBBER BASE 100283 100064 4-NUT, HEX 5/16-18 STEEL 100044 1-SINK OUTLET/STAINER 100055 4-CARRIAGE BOLT 5/16X4-1/2 100447 1-SINK TRAP, PLASTIC ADJ 100056 4-WASHER, 5/16 FLAT 100451 1-SINK STOPPER 1 1/2 BLK... - Page 4 Assembly Instructions for C2616 4-Student Workstation Items not included but needed for assembly: 1. Phillips head screwdriver 4. Tape measure 2. ½”Wrench 5. Utility knife 3. Adjustable pliers 6. Contact cement 7. Liquid Nail or silicone adhesive (can be found in hardware stores) Instructions: 1.
- Page 5 Figure 3A Figure 3B 4. While one person is holding the wing in place, another person should be attaching the wing to the side of the cabinet. It is important that the wing is supported until the table leg is in place. Make sure the wing is flush with the top of the base cabinet.
- Page 6 5. Screw the leveler to the leg and attach leg boot. 6. Line up the holes in the wing and the leg and insert 4-1/2” x 5/16” carriage bolt and tighten washer and nut. Leg should be perpendicular to the wing. Use leveler on leg to level the wing with the cabinet.
- Page 7 Figure 9B 10. Outline all of the top edges of the base unit and wings with the silicone adhesive caulk and place top bottom side down on the unit. Be sure to center the top on all sides before the silicone dries. Let cure for 24 hours.
- Page 8 13. Put a bead of silicone seal along the sink cutout on the top. Lower sink in place. Remove any excess caulk that is displaced around the sink. 14. Cut the rubber base molding and attach using contact cement. After molding is in place, use the #6 x ½”...
Need help?
Do you have a question about the C2616 and is the answer not in the manual?
Questions and answers