Advertisement
Quick Links
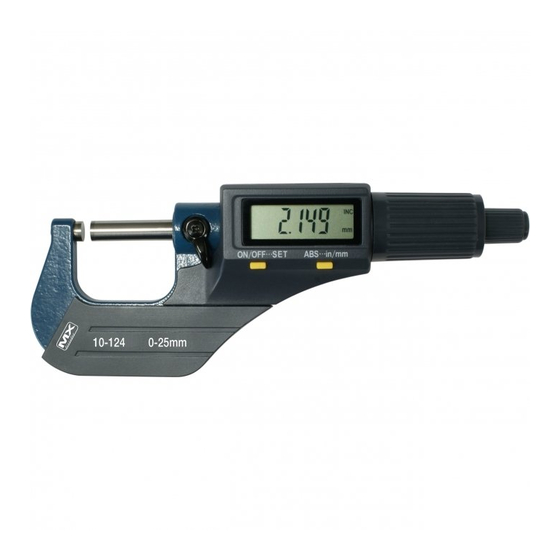
Electronic Micrometer Operation Manual
1. Functional elements: :
1
2
3
4
1. Functional elements
1. Frame
2. Anvil
3. Spindle
4. Locking device
5. Data output key
6. Friction drive
7. Quick drive
8. ON/OFF•••SET key
9. ABS/INC•••UNIT key
Front view
10.LCD display
11. Frame cover
12. RS232 data output
13.Battery cap
2. LCD Display: :
2. LCD Display
ABS
INC
3. Operation
Two ways of pressing the keys are used in the following illustration:
(1)Press and release.
3. Operation: :
(2)Press and hold (for more than 2 seconds).
Two ways of pressing the keys are used in the following illustration:
3.1 ON/OFF•••SET key:
• Press and release: Will switch the power on/off.
( ( 1) ) Press and release; ;
• Press and hold (2 sec. or more): Will set the origin data for absolute
( ( 2) ) Press and hold (for more than 2 seconds).
measurement, The "Set" sign will be displayed on LCD.
3.1 ON/OFF•••SET key:
• The origin data of metric measurement can be set to 0, 25, 50, 75 relative to
the size of the micrometer
Press and release: : Will switch the power on/off.
• The origin data of inch measurement can be set to 0, 1", 2", 3"relative to the
Press and hold (2 sec. or more) : : Will set the origin data for absolute measurement; ; The "Set" sign will be displayed on LCD.
size of the micrometer
The origin data of metric measurement can be set to 0, 25, 50, 75 relative to the size of the micrometer
• The origin data will automatically reset to the default setting after the battery
The origin data of inch measurement can be set to 0, 1" " , 2" " , 3" " relative to the size of the micrometer
has been replaced.
• Default origin data of the micrometer head is 0.
The origin data will automatically reset to the default setting after the battery has been replaced.
3.2 ABS/INC•••UNIT key:
Default origin data of the micrometer head is 0.
Absolute and incremental measuring conversion. Metric-inch conversion
3.2 ABS/INC•••UNIT key: Absolute and incremental measuring conversion. Metric-inch conversion when pressed for a prolonged time.
when pressed for a prolonged time.
Press and release: : Absolute and incremental measuring mode conversion; ;
• Press and release: Absolute and incremental measuring mode conversion:
"INC" sign will be displayed on the LCD in incremental measuring mode.
" " INC" " sign will be displayed on the LCD in incremental measuring mode. When the "INC" is not displayed then
When the "INC" is not displayed then the unit is in absolute measuring mode.
the unit is in absolute measuring mode.
• Press and hold (2 sec. or more). For Metric/Inch conversion. The"in" sign
Press and hold (2 sec. or more) : : For Metric/Inch conversion. The " " in" sign will be displayed on LCD when the unit is in imperial mode.
will be displayed on LCD when the unit is in imperial mode. If not displayed,
If not displayed, then the unit is in the metric measuring mode.
then the unit is in the metric measuring mode.
3.3 Output data key:
3.3 Output data key:
• Press and release: The micrometer will output the displayed data
Press and release: : The micrometer will output the displayed data and display "
and display "
" once.
Press and hold (2 sec. or more): The micrometer will output the data and display "
• Press and hold (2 sec. or more): The micrometer will output the data and
display "
" continually until the button is pressed
4. Power: :
WARNING!
If not used for five minutes, the power will auto shut off. The micrometer will power up when the
"ON/OFF •••SET" key is pressed, or the spindle is turned. The micrometer can be switched off by pressing the "ON/OFF•••SET"
• Button & coin batteries (new or used) are hazardous and are to be kept away
key to save the battery when not in use.
from children
• If a lithium button/coin battery is swallowed or placed inside the body can cause
fatal injuries in 2 hours or less
Use an CR2032 battery. Replace the battery when the display data is blurred or the "
• If a non-lithium button /coin battery is swallowed or placed inside the body can
cause serious injuries
Remove the battery cap by turning it counterclockwise with a coin or screwdriver.
• Medical attention should be sought immediately if suspected the battery has
The new battery must be placed with the positive (+) side up.
been swallowed or placed inside the body
• Phone 13 11 26 Australian Poisons Information Centre for 24/7 fast,
expert advice
4. Power
• If not used for five minutes, the power will auto shut off. The micrometer will
power up when the "ON/OFF •••SET" key is pressed, or the spindle is turned.
The micrometer can be switched off by pressing the "ON/OFF•••SET" key to
save the battery when not in use.
Operation Manual
Models 10-124, 10-1242
5
6
Models 10-124, 10-1242
Front View
8
9
10
11
Part of back view
Set
in : Inch measuring mode.
INC: Incremental measuring mode.
ABS: Absolute measuring mode.
www.measumax.com
7
12
13
Set
: Origin set.
:
: Battery voltage is low.
: Data output Transferring
• Use an CR2032 battery. Replace the battery when the display data is
blurred or the " " sign is displayed on the LCD.
• Remove the battery cap by turning it counterclockwise with a coin or screw-
driver.
•The new battery must be placed with the positive (+) side up.
5. Data output
• Data output interface is RS232C.
•The micrometer can be connected to a PC's serial port, or USB port, serial
port by using the correctly configured cables
•Remove the cap of the output connector and insert the cable. (Do not re-
move the cap of the cable plug as it is water resistant.
5.1 Serial port format
Baud rate
Start bit
Data bit
5.2 Data output format
order
1
2
Metric
S
N1
Inch
S
N1
S=Minus or Space
" once.
6. Precautions
" continually until the button is pressed
• Do not subject the instrument to blows or knocks.
• Do not drop it or apply excessive force.
• Do not disassemble the instrument.
• Do not press the keys with a pointed object. Only press the keys in the
direction intended to insure correct sensitivity.
• Do not use or store the instrument under direct sunlight, or in extreme
temperatures.
• Do not let the instrument near strong magnetic fields and high voltage.
• Use a soft dry cloth to wipe stains from the instrument. Do not use organic
solvents such as acetone and benzene. Wipe measuring faces of the instru-
ment before use it.
• Remove the battery if the instrument is not to be used for a long period of
time.
7. Specifications
Measuring force: 5~10N
Operating temperature: 0 ~ 40°C
. . Frame
1
2. . Anvil
3. . Spindle
4. . Locking device
Part Back View
5. . Data output key
6. . Friction drive
7. . Quick drive
8. . ON/OFF•••SET key
9. . ABS/INC•••UNIT key
10. . LCD display
11. . Frame cover
12. . RS232 data output
13. . Battery cap
1200KB/S
Stop bit
1
Parity
7
Data logic
3
4
5
6
7
N1
N
°
N
N
°
N
N
N
N
N1=Minus or Space or digit 0-9
" sign is displayed on the LCD.
Power consumption: <=35μA
Storage temperature: -20 ~ 60
2
none
reverse
8
9
10
N
CR
LX
N
CR
LX
N=Digit 0-9
Advertisement

Related Manuals for Measumax 10-124


Summary of Contents for Measumax 10-124
- Page 1 Operation Manual Models 10-124, 10-1242 Electronic Micrometer Operation Manual 1. Functional elements: : . . Frame 2. . Anvil Models 10-124, 10-1242 3. . Spindle 4. . Locking device Front View Part Back View 1. Functional elements 5. . Data output key 1.
- Page 2 Connection to the computers from the electronic micrometers through the 9 pin RS232 COM port on the computer, and a small jack plug on the micrometer. The data is then transferred to the computer every time the “Data” button is presses Measumax can also supply interface units that can connect with 4 or 8 micrometers www.measumax.com...
Need help?
Do you have a question about the 10-124 and is the answer not in the manual?
Questions and answers