
Summary of Contents for Halma Crowcon CellarSafe
- Page 1 CellarSafe Carbon Dioxide and Oxygen Safety Monitor Installation and operating instructions for the CellarSafe Monitor and the CellarSafe Calibration Unit M07234 May 2008 Issue 6...
- Page 2 Warning Please take care that CellarSafe is installed and operated in accordance with these instructions. The product may not be able to warn of gas hazards if used in any other way. Crowcon Detection Instruments Ltd 2 Blacklands Way, Abingdon OX14 1DY UK Tel.
-
Page 3: Table Of Contents
CellarSafe Carbon Dioxide and Oxygen Safety Monitor Contents I. Introduction ..............1 1.1 Product overview ........... 1 1.2 Product description ..........1 1.3 Normal and fault states of LEDs ......2 1.4 Alarm conditions for CellarSafe base and repeater units ................2 1.5 Options for the CellarSafe ........ -
Page 5: Introduction
CellarSafe Introduction I. Introduction 1.1 Product overview CellarSafe is a carbon dioxide and oxygen fixed monitoring system designed to monitor gas levels in a confined space, such as a beer cellar. The system consists of one base unit housing the gas monitoring system and is supplied with one repeater unit to be located in a safe position outside the confined area. -
Page 6: Normal And Fault States Of Leds
Introduction CellarSafe 1.3 Normal and fault states of LEDs The illuminating LEDs on the base unit and all repeater units indicate conditions as below. Flashes when the system is running: POWER If this LED is extinguished the system is not running, green LED if the LED is on continuously a fault condition is present. - Page 7 CellarSafe Introduction Gas levels RELAY SOUNDER INDICATION INDICATION INDICATION Decreasing gas levels of oxygen Gas level > Low Low Alarm Low Alarm LED Long beep once Alarm flashing per second followed by one short beep Gas level > High Low and High Low and High Long beep once Alarm...
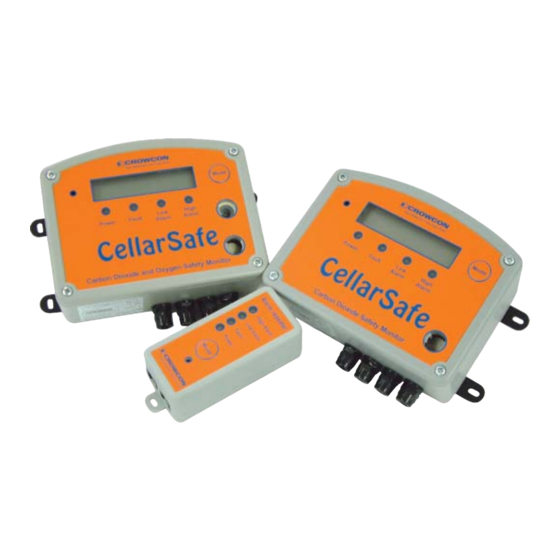
- Page 8 Introduction CellarSafe Figure 1.1 The CellarSafe with carbon dioxide and optional oxygen monitors. Figure 1.2 The CellarSafe Repeater Unit.
-
Page 9: Options For The Cellarsafe
CellarSafe Introduction 1.5 Options for the CellarSafe Oxygen monitor CellarSafe can be fitted with an oxygen monitor to provide dual monitoring of safe gas levels of carbon dioxide and oxygen. Backup battery The CellarSafe can be fitted with a backup battery providing 2 hours of backup in the event of mains power failure. -
Page 10: Installation
Installation CellarSafe II. Installation When carrying out any installation work, ensure that local regulations and site procedures are followed. 2.1 General This manual contains instructions for installing the CellarSafe base unit and repeater unit. Before beginning installation of the CellarSafe please follow the mounting, cabling and installation instructions, paying close attention to the location of the base unit. -
Page 11: Cabling Requirements
CellarSafe Installation 2.3 Cabling requirements CellarSafe is fitted with an AC plug for convenience. If, however, permanent installation is required, it should be wired to a dedicated AC spur led from a circuit breaker. The spur or mains plug should be fitted with a 3A fuse. The circuit breaker should be marked as the disconnecting device for the CellarSafe. - Page 12 Installation CellarSafe Figure 2.2 Alarm relay electrical connections.
-
Page 13: Operation And Set Up
CellarSafe Operation and set up III. Operation and set up 3.1 Mode button The CellarSafe base unit and repeater unit provide a MODE button to commu- nicate with the CellarSafe. The MODE button is used in the event of an alarm or fault occurring, and during the self-testing procedure. 3.2 Operator display panel The operator display panel provides a reading of the concentration of gas levels being monitored. -
Page 14: Alarm Levels
Operation and set up CellarSafe The operator display panel will illuminate and test all display segments. The unit will enter alarm condition for a period of 10 seconds illuminating the alarm LEDS, activating the sounder and additional ancillary alarm equipment con- nected to the CellarSafe relays. 3.5 Alarm levels Alarm levels vary depending on CellarSafe configuration. -
Page 15: Specification
CellarSafe Specification IV. Specification CellarSafe specification Dimensions 210 x 150 x 75 mm Weight 1.3 kg Operating voltage 230 V, 50/60 Hz ac, 16 VA, double insulated 115 V ac option available Operating temperature +3ºC to +50ºC (37ºF to 122ºF) Warm up time 40 seconds IP rating... -
Page 16: Troubleshooting Guide
Troubleshooting guide CellarSafe V. Troubleshooting guide Problem Cause Solution Power LED off Power not reaching Check base unit processor is plugged in and electrical supply is switched on; check mains fuse Power LED on Processor not working Call service engineer continuously correctly Fault light on and Sensor fault... -
Page 17: Calibration, Testing And Routine Maintenance
CellarSafe Calibration, testing and routine maintenance VI Calibration, testing and routine maintenance 6.1 Functional Testing For optimum performance, it is recommended that Cellarsafe is calibrated every six months using the Cellarsafe calibration unit. A minimum requirement is that units are functionally tested as described below. However, it should be noted that full re-calibration may be required after 3 - 4 years of use. -
Page 18: Calibrating The Cellarsafe Gas Monitor
Calibration, testing and routine maintenance CellarSafe requires calibration gases and a pair of bayonet calibration adapters. In calibra- tion mode all alarms and relays are inhibited. Calibration gases Zero calibration is performed using 100% nitrogen. Span calibration is per- formed using a gas mixture comprising 4.0% carbon dioxide and 20.75% oxygen with a balance of nitrogen. - Page 19 CellarSafe Calibration, testing and routine maintenance Step 1: Connecting the Calibration Unit 1 Switch off the mains supply to the CellarSafe base unit and any ancillary equipment connected to the alarm relays. 2 Remove the front cover and disconnect the battery if fitted. 3 Plug the lead from the calibration unit into the connector marked “PL2”...
- Page 20 Calibration, testing and routine maintenance CellarSafe The base unit is now in calibration mode, the operator display panel will display alternately the internal temperature of the instrument and the gas reading. 2 If the Zero Calibration LED is not lit, press the Scroll/Power button. 3 Apply zero calibration gas as described in step 2 above, and wait for the gas reading in the operator display panel to stabilise.
- Page 21 CellarSafe Calibration, testing and routine maintenance 6 Switch off the calibration unit by pressing the Scroll/Power button once, and then press and hold Scroll/Power button 3 seconds. Both LEDs will extinguish. Step 5: Calibration Unit disconnection 1 Press and hold Scroll/Power button for 3 seconds to switch off the mains electrical supply to the base unit.
- Page 24 UK Office USA Office Crowcon Detection Instruments Ltd Crowcon Detection Instruments Ltd 2 Blacklands Way, 21 Kenton Lands Road Abingdon Business Park Erlanger Abingdon Kentucky 41018-1845 Oxfordshire OX14 1DY United Kingdom Tel: +1 859 957 1039 or Tel: +44 (0)1235 557700 1-800-527 6926 Fax: +44 (0)1235 557749 1-800-5-CROWCON...
Need help?
Do you have a question about the Crowcon CellarSafe and is the answer not in the manual?
Questions and answers