Table of Contents
Advertisement
Advertisement
Table of Contents

Subscribe to Our Youtube Channel
Summary of Contents for Voyager Radius Pro
- Page 1 R a d i u s P r o E l e c t r i c B i k e User’s Manual BIKE4050RP...
-
Page 2: Table Of Contents
CONTENTS SAFETY PRECAUTIONS _________________________________ MAINTENANCE _______________________________________ INTRODUCTION _______________________________________ PACKAGE CONTENTS __________________________________ SPECIFICATIONS ______________________________________ A QUICK LOOK _______________________________________ ASSEMBLY VIDEO GUIDE _______________________________ ASSEMBLY ___________________________________________ CHARGING THE BATTERY ______________________________ POWERING ON/DISPLAY SCREEN ______________________ BIKE FEATURES ________________________________________ BEFORE YOU RIDE _____________________________________ RIDING YOUR BIKE ____________________________________ CARE &... -
Page 3: Safety Precautions
SAFETY PRECAUTIONS... -
Page 4: Maintenance
INSTRUCTIONS PERTAINING TO THE RISK OF FIRE OR ELECTRIC SHOCK 1. Do not put fingers or hands into the product. 2. Do not use this product if the flexible power cord or output cable is frayed, has broken insulation, or any other signs of damage. 3. -
Page 5: Introduction
Thank you for purchasing your new Voyager Radius Electric Bike and welcome to the Voyager family. We hope that you’ll do plenty of exploring on your new bike. Please enjoy your new bike responsibly and be sure to read the entire instruction manual before your first use. -
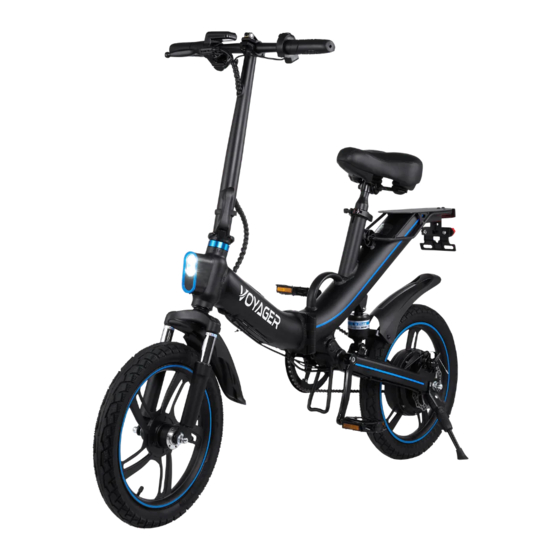
Page 6: A Quick Look
A QUICK LOOK Stand Foot Pedal Front Tire Headlight Reflector Front Fender Stem Quick Release Charging Port Kick Stand Handlebar Rear Fender Frame Shock Absorber Handbrake Seat Clamp Seat Chain Display Screen Light Switch Twist Throttle Power Button Horn... -
Page 7: Assembly Video Guide
ASSEMBLY GUIDE VIDEO For more information on assembling and using your bike, scan the QR code below for additional video tutorial content. -
Page 8: Assembly
ASSEMBLY 1. UNFOLDING THE BIKE Unfold the Radius Pro E-Bike and lock the latch in the center of the bike frame. Make sure the connecting wires are recessed into the pass-through holes to ensure that the wires don’t get pinched when locking the Frame in the unfolded position. - Page 9 ASSEMBLY (continued) Seat Angle Bolt Seat Clamp 3. ATTACHING THE SEAT Loosen the seat angle bolt using the provided wrench tool and adjust the seat to a comfortable upright position. Then tighten the seat angle bolt, locking the seat position securely. When the seat clamp is loosened, you can attach the seat to the body of the bike, or remove it.
-
Page 10: Charging The Battery
CHARGING THE BATTERY Before riding your bike, be sure to charge the battery. To do so, follow the steps below: 1. Remove the rubber gasket covering the charging port, and then connect the charger. 2. Plug your charger into a suitable power outlet. -
Page 11: Powering On/Display Screen
POWERING ON/DISPLAY SCREEN Display Screen Power Button POWERING ON Before powering on your bike, make sure that the battery is fully charged, and make sure that the tires are properly inflated. Press and hold the power button to power on or power off your bike. DISPLAY SCREEN The display screen will show you a power meter which will let you know how much power remains in the battery. -
Page 12: Bike Features
BIKE FEATURES Once your bike is powered on, you can access the below features: Light Switch Horn LIGHT SWITCH Slide the light switch to the ON position to turn on the front headlight, helping you see more clearly, and also making your bike easier to be seen. Slide the light switch to the off position to turn off your headlight. -
Page 13: Before You Ride
BEFORE YOU RIDE Before riding, it is important to check that your bike fits properly. Riding a bike that does not fit properly can endanger the rider and increase the possibility of a serious accident or injury. If your bike does not fit properly, please contact the place of purchase to replace your bike with a model that fits. -
Page 14: Riding Your Bike
RIDING YOUR BIKE MANUAL Power off your bike to use it in manual mode. To accelerate, simply pedal the bike with your legs and feet. Squeeze the hand brake on the left handlebar to decelerate or come to a complete stop. PEDAL ASSIST Power on your bike to access pedal assist mode. -
Page 15: Care & Maintenance
Prior to purchasing any motorized vehicle, we highly recommend that you research your local regulations and country-specific laws. Ultimately, you are responsible for complying with all applicable laws and regulations. Voyager waives all liability relating to your use of Voyager products. -
Page 16: Notes
NOTES... - Page 17 NOTES...
-
Page 18: Fcc Statement
FCC COMPLIANCE Changes or modifications not expressly approved by the party responsible for compliance could void the user’s authority to operate the equipment. This device complies with Part 15 of the FCC Rules. Operation is subject to the following two conditions: (1) this device may not cause harmful interference, and (2) this device must accept any interference received, including interference that may cause undesired operation. -
Page 19: Warranty
WARRANTY This warranty covers the original consumer purchaser only and is not transferable. This warranty covers products that fail to function properly UNDER NORMAL USAGE, due to defects in material or workmanship. Your product will be repaired or replaced at no charge for parts or labor for a period of one year. What Is Not Covered by Warranty Damages or malfunctions not resulting from defects in material or workmanship and damages or malfunctions from other than normal use, including but limited... - Page 20 © 2022 Sakar International Inc 195 Carter Drive, Edison NJ 08817 USA...
Need help?
Do you have a question about the Radius Pro and is the answer not in the manual?
Questions and answers