Advertisement
Available languages
Available languages
Quick Links
INfca089_US_CA
312-062
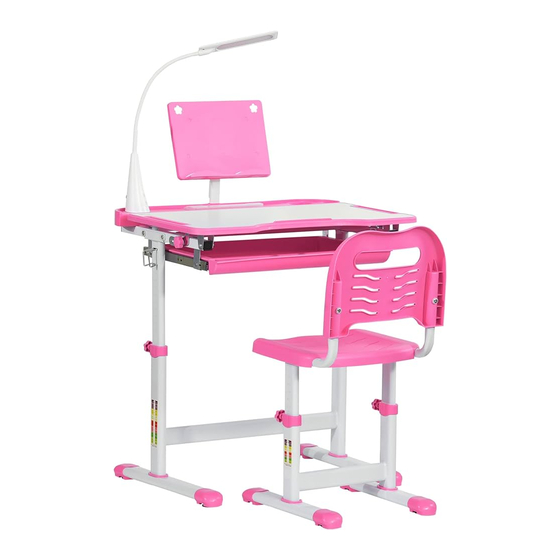
*L'image est à titre indicatif seulement, le produit en nature
prévaut.
*The picture is only for reference, goods in kind prevail.
IMPORTANT, RETAIN FOR FUTURE REFERENCE: READ CAREFULLY
ASSEMBLY INSTRUCTION
Advertisement

Related Manuals for QABA 312-062


Summary of Contents for QABA 312-062
- Page 1 INfca089_US_CA 312-062 *L'image est à titre indicatif seulement, le produit en nature prévaut. *The picture is only for reference, goods in kind prevail. IMPORTANT, RETAIN FOR FUTURE REFERENCE: READ CAREFULLY ASSEMBLY INSTRUCTION...
- Page 2 1.Instructions d'utilisation ● Relever: Tenez les deux côtés du bureau ou de la chaise et tirez-les équitablement vers le haut à la hauteur désirée jusqu'à ce que vous entendiez le son "KA". ● Abaisser:Tenez les deux côtés du bureau ou de la chaise et tirez-les équitablement vers le haut jusqu'au point le plus haut, puis abaissez-les jusqu'au point le plus bas.
- Page 3 A1. Jeu de planche de A2. Pied de bureau*1 bureau*1 A4. Porte-livres*1 A3. Tiroir*1 A6. Glissière droite*1 A5. Glissière gauche*1 A10. Pied de chaise*1 A7. Base du bureau*2 A12. Tube renforcé*1 A9. Porte-crayon* 1 A14. Coussin de siège*1 A11. Tube baguette A15.
- Page 4 B2. Tournevis à double usage B3. Clé hexagonale interne B4. Crochet*1 B6. Patin à vis M6 *22 (préinstallé) B7. Vis à tête hexagonale interne (M5*12)*10(Préinstallée) B8. Vis à tête hexagonale interne (M6*14 )12 (préinstallée) B10. Vis à empreinte cruciforme (M5*20 )*4 B11.
- Page 5 2.Assembler les deux glissières (A5&A6) sur la planche du bureau, et serrer les boulons (B7) et les vis (B6) avec la clé hexagonale interne (B3). 3.Ajuster le tiroir avec la glissière sous la planche (en visant les trous d'installation) et serrer le boulon (B12) avec la clé...
- Page 6 4.Fixer les pieds du bureau (A2) et les bases du bureau (A7) avec les boulons (B7+B6) et les visser avec la clé hexagonale interne. Ajustez les vis des pieds de façon à ce qu'ils puissent rester sur le sol de façon stable. 5.Posez l'ensemble de la planche du bureau sur les pieds.
- Page 7 6.Assemblez le porte-livres (A4), fixez les crochets aux deux pieds. Vous avez maintenant terminé l'assemblage du bureau! Assemblage de la chaise: 1. Fixez les pieds de la chaise (A10) et les tubes des pieds (A15) avec (B8+B6) et vissez-les avec la clé hexagonale interne.
- Page 8 2.Fixer les tubes de pliage de la chaise (A11) et les tubes de renfort (A12) avec les boulons (B8) et les vis (B6), sans avoir à les serrer. 3.Placer le coussin de siège sur les tubes de la baguette, en visant les trous, et les fixer avec les boulons (B10), à...
- Page 9 4.Insérez dans le dossier les tubes baguette, au niveau des trous, et utilisez la molette rotative de verrouillage (B5) pour serrer. Ajustez tous les trous d'installation, puis vissez tous les boulons à l'aide de la clé hexagonale interne. Vous avez maintenant terminé...
- Page 10 1.Using Instruction ● Lift up: Hold the both sides of the desk or the chair and pull it up equably to the height you need until you hear the sound "KA". ● Lower down: Hold the both sides of the desk or the chair and pull it up equably to the highest point, then lower it down to the lowest point, when you hear the sound "KA".pull it up to the height you need.(Note: If you pull it up before it...
- Page 11 A1.Desk board set*1 A2. Desk leg*1 A3. Drawer*1 A4.Book rack*1 A5.Left Sliding Rail*1 A6. Right Sliding Rail*1 A7.Desk Base*2 A10.Chair leg*1 A9.Stationery Case* 1 A12.Strenghtened Tube*1 A11.Wand Tube*2 A14..Seat pad*1 A13.Backrest*1 A15.Feet tube*2 Please check the below two pictures carefully before assembling and make sure every components in the pictures are included in the package.
- Page 12 B2.Dual purpose screw driver B3.Internal hexagon wrench B4.Hook*1 B6.M6 screw pad *22 (Pre installed) B7.Internal hexagon head screw (M5*12)*10(Pre installed) B8.Internal hexagon head screw (M6*14 )12 (Pre installed) B10.Cross recessed screw (M5*20 )*4 B11.Cross recessed screw ( M4*35 )*4 B12.Cross recessed screw (M4*8 )*4 Desk Assembly: 1.As shown in the picture, put the stationary case on the board (aiming at the installation holes) and tighten up the bolt...
- Page 13 2.Assemble the two sliding rails (A5&A6) to the desk board set, and tighten the bolts (B7) and screw pads (B6) with the internal hexagon wrench (B3). 3.Adjust the drawer with the sliding rail under the board,(aimingat the installation holes) and tighten up the bolt (B12) with the internal hexagon wrench.
- Page 14 4.Fix the desk legs (A2) and desk bases (A7) with bolts (B7+B6)and screw them with the internal hexagon wrench. Adjust the foot screws so that it can stay on the ground stably. 5.Put the whole desk board set on the legs. Aiming at the installation holes, rotate the board, use screws pads (B7) to fix them, tighten the bolts with the internal hexagon wrench.
- Page 15 6.Assemble the book rack (A4), Hang the hooks to the both legs. Now you have finished all the assembly of the desk! Chair Assembly: 1.Fix the chair legs (A10) and the feet tubes (A15) with,(B8+B6)and screw them with the internal hexagon wrench.
- Page 16 2.Fix the chair bend tubes (A11) and the strengthen tubes (A12)with bolts (B8) and screw pad (B6).At this step, you don't need to tighten them up. 3.Put the seat pad on the wand tubes, aiming at the holes, and fix them with bolts (B10), at this step, you don't need to tighten them up.
- Page 17 4.Insert the backrest into the wand tubes, aiming at the holes, and use the locking rotary knob (B5) to tighten. Adjust all installation holes and then screw all the bolts with the internal hexagon-wrench.Now you have finished all the assembly of the chair!
Need help?
Do you have a question about the 312-062 and is the answer not in the manual?
Questions and answers