Table of Contents
Advertisement
Quick Links
Advertisement
Table of Contents
Troubleshooting

Subscribe to Our Youtube Channel
Summary of Contents for Phoenix Contact PLOTMARK
- Page 1 Operating the plotter PLOTMARK User manual...
- Page 2 User manual Operating the plotter PLOTMARK UM EN PLOTMARK, revision 00 2017-04-04 This user manual is valid for: Designation Revision Order No. PLOTMARK 0804499 PHOENIX CONTACT GmbH & Co. KG • Flachsmarktstraße 8 • 32825 Blomberg • Germany phoenixcontact.com...
-
Page 3: Table Of Contents
Blocking access to the pen magazine..............16 Maintenance and troubleshooting ....................17 Cleaning ......................17 Troubleshooting....................18 Repairs ........................18 Replacing the seal insert on the pen magazine............19 Transporting the device ..................20 Storage........................21 Disposal.......................21 Firmware update....................21 Appendix ..........................22 Ordering data.......................22 Technical data .....................25 3 / 28 107753_en_00 PHOENIX CONTACT... -
Page 4: For Your Safety
PLOTMARK For your safety Read this user manual carefully and keep it to hand for future reference. Designating the warning instructions This is the safety alert symbol. It is used to alert you to potential personal injury hazards. There are three key words for the severity of the potential injuries. -
Page 5: Field Of Application
For your safety Field of application The PLOTMARK is a marking device for designating materials with a height of up to 10.5 mm. Marking is implemented with special marker pens which are available in a range of stroke widths from Phoenix Contact. The materials are fixed into replaceable magazines. -
Page 6: Starting Up The Plotter
PLOTMARK Starting up the plotter Unpacking and setup Scope of supply – Plotters – Power supply unit with Euro plug (EN 50075) – USB cable – 10 marking preparation plates – Marker pen, stroke width 0.25 mm (CMS-PEN 0,25, 5067815) –... -
Page 7: Overview Of The Device
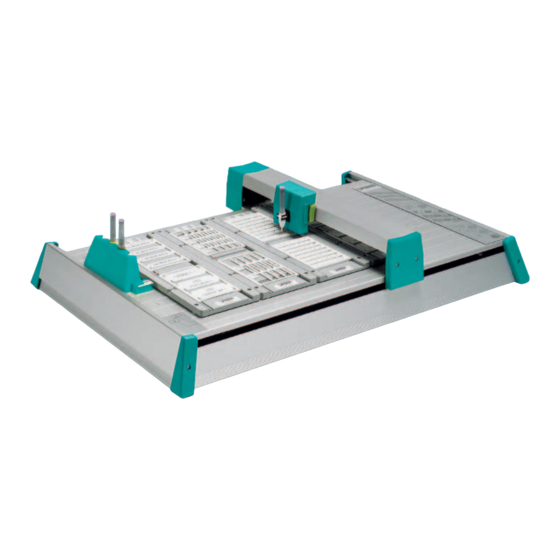
Connections on the rear: USB connection, control connection for an optional engrav- ing unit, mains connection Writing arm Control panel For the optional engraving unit: cover for contact bolts for zero setting Marking preparation plates 7 / 28 107753_en_00 PHOENIX CONTACT... -
Page 8: Control Panel
PLOTMARK Control panel Table 2-1 Description of the control panel Type Printing Meaning Green Engraving mode Engraving mode activated (only with the optional en- graving unit) Yellow Penstation open Pen magazine open Plotter out of order ERROR Green ON/OFF Plotter ready for operation... -
Page 9: Connecting The Plotter
2.4.1 Connecting the power supply unit Connect the power supply unit The PLOTMARK is designed for power grids from 100 to 240 V AC. Only use the supplied wide range power supply unit. • Slide the Euro plug onto the power supply unit. - Page 10 Setting up the plotter in CLIP PROJECT • Open “File, Print setup”. • Via “Plotter, PLOTMARK”, create a new device or edit the ones that are already there. Figure 2-2 Pen settings tab Table 2-2 File, Print setup, Plotter, PLOTMARK...
-
Page 11: Operating The Plotter
Page 19). • At the end of the working day, remove the marker pens from the pen magazine. Close them with the supplied pen stations. Store the marker pens horizontally. 11 / 28 107753_en_00 PHOENIX CONTACT... - Page 12 CLIP PROJECT for “Use pen magazine”. This ensures that the marker pen is not stored in the pen magazine. You can find “Use pen magazine” under “File, Print setup, Plotter, PLOTMARK, Pen as- signment” (refer to Figure 3-3 on Page 13).
-
Page 13: Setting Up The Marker Pens In Clip Project
For your safety Setting up the marker pens in CLIP PROJECT Figure 3-3 File, Print setup, Plotter, PLOTMARK, Pen assignment • Via the “Manage pens” button, you can adjust new pens and parameters such as the plot speed. • Indicate where the marker pens are located in the pen magazine (Penstation). -
Page 14: Creating Print Jobs
CLIP PROJECT marking can be used to create markings on a computer, which are tailored to the Phoenix Contact marking material. There, select the PLOTMARK as the output device. You will be provided with a list of mate- rials that are suitable for this device. -
Page 15: Setting Up The Writing Function
“Penstation open / close” LED = illuminates Writing function is switched off • To confirm the selection, press the “STOP” button. If you switch off the plotter and then switch it back on again, the writing function is activated. 15 / 28 107753_en_00 PHOENIX CONTACT... -
Page 16: Blocking Access To The Pen Magazine
PLOTMARK Blocking access to the pen magazine If you insert the marker pens directly into the writing arm, they can deactivate access to the pen magazine. This prevents the marker pens from being stored in the pen magazine. This function can be set up via the CLIP PROJECT marking software (refer to Page 10). -
Page 17: Maintenance And Troubleshooting
Clean the marker pens with the cleaning set (CMS-R-SET-TR, 5146751). • Alternatively, you can carefully clean the tips of the pens with a lint-free cloth. Soak the cloth with special cleaning fluid (CMS-R-FLUID-TR, 5146750). 17 / 28 107753_en_00 PHOENIX CONTACT... -
Page 18: Troubleshooting
Replace the data cable – Incorrect interface selected in CLIP Select “USB” interface (under “File, PROJECT marking Print setup, Plotter, PLOTMARK, In- terface”) CLIP PROJECT is waiting for confir- Switch to the spooler. Acknowledge – mation that the appropriate magazine... -
Page 19: Replacing The Seal Insert On The Pen Magazine
Now use the key to align seal insert in such a way that the key is parallel to the writing surface. The lateral opening of the seal insert must be aligned in the center. 19 / 28 107753_en_00 PHOENIX CONTACT... -
Page 20: Transporting The Device
PLOTMARK Transporting the device • Package the device in the original packing for shipping. Figure 4-3 Packaging 20 / 28 PHOENIX CONTACT 107753_en_00... -
Page 21: Storage
• Click on the “Send update” button. After approx. 15 seconds, all PLOTMARK LEDs briefly light up. An acoustic signal sounds. The PLOTMARK switches itself off automatically. • Switch the PLOTMARK back on. The firmware is now downloaded. -
Page 22: Appendix
PLOTMARK Appendix Ordering data Plotters Description Type Order No. Pcs./Pkt. Plotter, weight: 8 kg, width: 480 mm, height: 155 mm, color: PLOTMARK 0804499 silver-colored Replacement seals, for the pen magazine (Penstation) CMS-P1-PENDEPOT 5144835 and 10 marking preparation plates Marking preparation plate, for the pen magazine... - Page 23 Marker pen, incl. plotter adapter, ink tank and storage sta- CMS-PEN 0,50 5067831 tion, stroke width 0.50 mm Ink cartridge, special black ink, 5 cartridges of 1 ml each, for CMS-INK-TR-C5 5146684 high demands 23 / 28 107753_en_00 PHOENIX CONTACT...
- Page 24 10 ml each with cover cap for CMS-PEN... Engraving unit Description Type Order No. Pcs./Pkt. Engraving unit, by replacing the plotter head with the en- ENGRAVING UNIT 0804500 graving unit, the PLOTMARK is converted into an engraving unit 24 / 28 PHOENIX CONTACT 107753_en_00...
-
Page 25: Technical Data
Power supply unit output voltage 24 V DC Power supply unit output current Maximum 1.25 A Ambient conditions Relative humidity Operation 35% ... 75% Storage 10% ... 90% Ambient temperature Operation +10°C ... +35°C Storage -10°C ... +50°C 25 / 28 107753_en_00 PHOENIX CONTACT... - Page 26 PLOTMARK 26 / 28 PHOENIX CONTACT 107753_en_00...
- Page 27 The receipt of technical documentation (in particular user documentation) does not constitute any further duty on the part of Phoenix Contact to furnish information on modifications to products and/or technical documentation. You are responsible to verify the suitability and intended use of the products in your specific application, in particular with regard to observing the applicable standards and regulations.
- Page 28 Should you have any suggestions or recommendations for improvement of the contents and layout of our manuals, please send your comments to: tecdoc@phoenixcontact.com 28 / 28 PHOENIX CONTACT GmbH & Co. KG • Flachsmarktstraße 8 • 32825 Blomberg • Germany phoenixcontact.com...
Need help?
Do you have a question about the PLOTMARK and is the answer not in the manual?
Questions and answers