
Subscribe to Our Youtube Channel
Related Manuals for Furukawa Unic URW376C4U -T Series

Summary of Contents for Furukawa Unic URW376C4U -T Series
- Page 1 MINI-CRAWLER CRANE MODEL SERIES OPERATION & MAINTENANCE MANUAL HEAD OFFICE : Nihonbashi nishikawa Bldg, 5-3, Nihonbashi 1-chome, Chuo-ku, Tokyo 103-0027, Japan OMURW376C4U-T201505A PRINTED IN JAPAN...
- Page 3 INTRODUCTION Request to those who operate the crane The operator’s manual describes correct operation methods, simple inspection, and ser- vice for the UNIC crane. Be sure to read this manual carefully to carry out correct and safe operation of the crane. Operate the crane after you have understood the contents of this manual.
-
Page 4: Table Of Contents
TABLE OF CONTENTS SETUP OF THIS MANUAL 8. HOW TO REFER TO WORKING RANGE CHART AND RATED LOAD URW376C4U-T series …………………… 0- 4 CHART 1. FOR SAFETY OPERATION Working range chart ……………………… 8- 1 Request to customers ……………………… 1- 1 Rated load chart ……………………………... - Page 5 TABLE OF CONTENTS Lubrication ………………………………… 15- 4 How to store crane ………………………… 11-14 Procedures for storing hook ………………… 11-15 16. MAJOR SPECIFICATIONS How to store outriggers …………………… 11-17 URW376C4U-T(6-section boom) ………… 16- 1 12. MAINTENANCE AND INSPECTION OF CARRIER Inspection before operation ………………… 12- 2 Inspection and Maintenance which is to be carried out every 250 hours or 3 months ……………...
-
Page 6: Setup Of This Manual
SETUP OF THIS MANUAL SETUP OF THIS MANUAL Performance of the crane covered in this manual have some difference in accordance with the boom sections. If there is any difference in performance, the specifications are explained separately according to each boom section. URW376C4U-T series 1. -
Page 7: For Safety Operation
1. FOR SAFETY OPERATION Observe all the safety regulations ! ★ Read preventive measures against danger and cautions stated in this manual for proper understanding. ★ Most accidents related to the crane occur due to operation, maintenance, and inspection which have failed in observing basic safety regulations. Request to customers CAUTION Never failed to observe... - Page 8 MEMO...
-
Page 9: Safety Precautions On Carrier Operation
2. SAFETY PRECAUTIONS ON CARRIER OPERATION WARNING ★ Observe the cautions for securing safety. Failure to observe the cautions may cause trouble or serious accident. Before operation Dress neatly and wear protectors such as When starting the engine in a small lim- helmet, safety shoes, and gloves without ited area or indoors, open the windows fail. -
Page 10: During Operation
SAFETY PRECAUTIONS ON CARRIER OPERATION During operation The machine employs particularly small Do not make an abrupt stop and truck to facilitate working in a restrict- start, and change a course on a slope. ed space. Since high performance crane is mounted on When crawling up and down a the small truck, it has been built with a higher slope, operate the crane by standing... - Page 11 SAFETY PRECAUTIONS ON CARRIER OPERATION Do not run the crane over bumpy To avoid rubber crawler damage. area, lying rocks with sharp edges, rough solid rock, small broken stones, edges of steel plate, steel bars for reinforcement, scrap metals, and waste materials and on a Be sure to drive both sides road such as in riverside where covered with of crawler in the same...
-
Page 12: When Loading And Unloading
SAFETY PRECAUTIONS ON CARRIER OPERATION When loading and After operation unloading Return the crawling lever and run the engine at a low speed. When loading and unloading the crane, use a non-slip foot-board with a enough capacity of strength, width, and length Shift the crawling lever to “Crane”... -
Page 13: Safety Precautions On Crane Operation
3. SAFETY PRECAUTIONS ON CRANE OPERATION Before operation Be sure to make inspection before oper- ★ When the crane is to be operated close to ation and periodical inspection for sling- the power transmission or distribution line, ing implements. contact in advance with a local power com- pany to make arrangements concerning safety ★... -
Page 14: During Operation
SAFETY PRECAUTIONS ON CRANE OPERATION During operation Make sure that the ground on which Pay attention that the hook will not be outriggers are to be set up is solid and overwound. firm. Be sure to turn ON the “overwinding alarm switch”. - Page 15 SAFETY PRECAUTIONS ON CRANE OPERATION Pulling a cargo sideways, straight, or Pay attention that wire ropes will obliquely is strictly prohibited. not be paid out unnecessarily to prevent ropes from being wound around the ★ These operation may cause slewing mem- drum irregularly.
-
Page 16: After Operation
SAFETY PRECAUTIONS ON CRANE OPERATION After operation Make sure that the booms, the outrig- gers, and the hook have been stored before crawling the crane. Do not carry out maintenance and inspection while temperature of either hydraulic oil or gear oil is still high. ★... -
Page 17: Description Of Carrier Equipment
4. DESCRIPTION OF CARRIER EQUIPMENT... - Page 18 DESCRIPTION OF CARRIER EQUIPMENT . Rubber crawler Fuel meter Cored bar and steel fabric(cords) are integrally This indicates a residual quantity of the fuel. molded in the rubber which is of the same quality as automobile tire. Interlock for crane-crawl operation .
-
Page 19: Description Of Crane Equipment
5. DESCRIPTION OF CRANE EQUIPMENT... - Page 20 DESCRIPTION OF CRANE EQUIPMENT . Boom Overwinding alarm It extends and retracts by hydraulic cylinder When the hook comes close to the boom top, and the hook is suspended from its top. this makes an alarm to warn that wire ropes are to be overwound.
- Page 21 DESCRIPTION OF CRANE EQUIPMENT Automatic stop for overwinding reset switch When the crane cannot to be operated due to a fault in function of automatic stop for overwinding, turning the switch to reset side releases the automatic stop for overwinding device.
-
Page 22: Name Plates
6. NAME PLATES Description of name plates (Stickers) The machine is provided with stickers indicating caution (framed in box ) and specifications as shown in the figure below, and in addition to that there are stickers showing control levers, switches, and instructions for lubrication. Caution, Slewing boom Loading and unloading procedures Caution, High temperature... -
Page 23: Stickers In Detail
NAME PLATES Stickers in detail ★ Always keep the stickers clean so that they can be read easily. ★ If any of the stickers has come off, stick it again or replace it with new sticker. ★ When ordering stickers, specify the part number shown at the bottom- right of the sticker concerned. - Page 24 NAME PLATES Sticker [CAUTION] CAUTION Carry out operation after you have read the instruction manual carefully. Confirm safety around the crane before starting operation. Be sure to carry out inspection and maintenance before starting operation. Be sure to stop power (engine,power source)before inspection and maintenance. Carry out inspection and maintenance of engine after it has been cooled down. As the engine heats up, pay attention to prevent fire,always checking the surrounding area. Set up the crane flat and even by referring to a level. Load indicator reads the crane capacity when the crane has been set up on the level and solid ground. By referring to the reading of loadmeter,never try operating the crane overloaded. When lifting up a cargo exceeding the rated load, the crane may be in danger of overturn. Operate the crane by keeping to the rated load. Do not travel with a load lifted and operate the crane without outriggers extended which are very dangerous. Operate the crane with the outriggers extended and with the truck raised by approx. 2in above the ground. Operation without the truck raised may damage the truck and operation with truck raised too high is dangerous so that it is strictly prohibited. Keep an appropriate distance between the boom top and the hook while extending the booms. Simultaneous operation for extension and retraction of outriggers will not be possible. Store the hook securely before traveling. Be sure to turn OFF the key switch after crane operation has been completed. 09TV81060-W546C1UR Sticker [CAUTION SLEWING BOOM] CAUTION SLEWING BOOM B-524360...
- Page 25 NAME PLATES Sticker [CAUTION OUTRIGGER OPERATION] CAUTION OUTRIGGER OPERATION When operating the crane, be sure to use outriggers to keep the crane body to be level. Set up the outriggers on a flat and solid ground and in principle, operate the crane with the outriggers fully extended.
- Page 26 NAME PLATES Sticker [CAUTION, CRAWLING] CAUTION, TRAVELING The truck might fall off or fall down during traveling. Slow down the vehicle and direct your mind traveling when passing close to road shoulder or on the soft ground. 094383160 Sticker [LOADING AND UNLOADING PROCEDURES] LOADING AND UNLOADING PROCEDURES When foot-boards are used such as when loading or unloading the crane onto/out of vehicle or passing...
- Page 27 NAME PLATES Sticker [CHART OF RATED LOAD] RATED LOADS BOOM SECTION BOOM SECTION 1+2+3+4+5+6 WORKING RADIUS(ft) 8.0 10.0 11.0 13.0 15.0 17.0 18.6 WORKING RADIUS(ft) 16.0 18.0 20.0 23.0 26.0 30.0 33.0 36.0 39.0 43.0 47.3 6680 6680 5150 4570 3760 3180 2780 2420 720 660 MAXIMUM MAXIMUM...
- Page 28 NAME PLATES Sticker [ZERO-ADJUSTMENT] TURNOVER PREVENTION DEVICE (ZERO-ADJUSTMENT) Turnover prevention device is installed under a battery cover. ■ Make sure outriggers are stored properly. ■ Push the button, “ZERO RESET” and hold it for 1 second. When Zero-adjustment is ■ completed properly, all indicators should be lighted up and the buzzer sound should be stopped for 2 seconds.
- Page 29 NAME PLATES Sticker [Oil Level check] CAUTION Park the vehicle on a level ground and put the crane at the stored position to stop the engine. If hydraulic oil level is checked at the operating position of the crane,the oil may be over-supplied because hydraulic oil in each cylinder will not be returned to the oil tank. Therefore,be sure to check the oil level at the stored position. Since hydraulic oil temperature is too high and its volume is expanded immediately after the machine operation has been stopped, the oil level gauge will not indicate the correct oil quantity. Therefore, be sure to check the oil quantity when the oil temperature has returned to an ambient temperature of 20〜40℃. A proper oil level should be at the middle between Hi and Lo limits on the gauge. There is a risk that the hydraulic oil may be spurted out if the oil is supplied beyond the Hi level limit on the gauge. 09HA81221-URW375CDE Sticker [TAKE NOTICE WHEN STORING HOOK] TAKE NOTICE WHEN STORING HOOK Operate the lever for storing hook to wind up hook when storing hook.
- Page 30 MEMO...
-
Page 31: Definition Of Terms
7. DEFINITION OF TERMS Outrigger extension 40° 30° 30° 40° Bracket Vertical cylinder Outer box Approx. 2in(50mm) above the ground Flat and solid ground Inner box Mark (2nd) ● Mark (1st) ● The figure above shows that outriggers are extended to their extremes. Carry out operation by making the crane level on a flat and solid ground with the outriggers extended to their extremes, and with the crane body raised by approx. - Page 32 DEFINITION OF TERMS 1 URW376C4U-T . Since the rated load varies according to how the outriggers are extended, the rated load ◆ has been set for respective extended conditions. Figure below shows the cases where the outriggers are extended to “maximum”, “halfway”, and “minimum”.
-
Page 33: How Boom-Sections Are Extended
DEFINITION OF TERMS How boom-sections are extended 1 URW376C4U-T . Boom Boom Boom Boom Boom All booms are completely retracted. Boom Boom Boom Boom Boom Boom Boom section(2) only is extended. Boom Boom Boom Boom Boom Boom Boom 1+2+3 Boom sections(2) and (3) extended to a position where 1st mark on the boom section (3) is visible. -
Page 34: Net Rated Load
DEFINITION OF TERMS Net rated load Net load which can be lifted by hook deter- mined on the basis of stability of crane. Rated load Weight of hooking Maximum load including hook and hooking Net rated load Rated load implements implements which can be lifted according to such as the boom angle and/or the boom length deter-... -
Page 35: How To Refer To Working Range Chart And Rated Load Chart
8. HOW TO REFER TO WORKING RANGE CHART AND RATED LOAD CHART These charts are stuck in front of crane operation levers and how to refer to charts is illustrated as follows: Working range chart The chart shows the relation among boom length and working radius, boom angle, and lift above ground. -
Page 36: Rated Load Chart
HOW TO REFER TO WORKING RANGE CHART AND RATED LOAD CHART Rated load chart The chart shows maximum load which can be hoisted up for every combination of boom-sec- tions to be extended for each working radius. RATED LOAD CHART BOOM SECTION BOOM SECTION 1+2+3... -
Page 37: Description Of Each Control Device
9. DESCRIPTION OF EACH CONTROL DEVICE Overwinding alarm ◆ Function of overwinding alarm The device automatically makes an alarm Cord reel sound to warn that the wire ropes are being overwound when the hook comes close to the boom top. Overwinding detector Weight for over- winding alarm... -
Page 38: Automatic Stop For Overwinding
DESCRIPTION OF EACH CONTROL DEVICE Automatic stop for overwinding Stop Function of automatic stop for ◆ Restore (extending) overwinding (retraction) If the hook comes close to the boom top and it hits against the weight for overwinding alarm, alarm sounds and functions of wind- ing-up hook, extending boom, and raising Stop Stop... - Page 39 DESCRIPTION OF EACH CONTROL DEVICE ◆ How to reset when automatic stop for overwinding is found Reset to be out of order If crane cannot be operated due to failure in the automatic stop, reset the automatic stop and store the crane. Step 1 Turn the reset switch for the automatic stop Automatic stop for...
-
Page 40: Boom Angle Chart
DESCRIPTION OF EACH CONTROL DEVICE Boom angle chart The chart reads the working radius corre- (Side of boom) sponding to extended length of boom and its angle. Pointer Scale ◆ Working radius The value to which the pointer on the scale of feet is the boom radius in each combination of boom-sections being extended. - Page 41 DESCRIPTION OF EACH CONTROL DEVICE ★ The following is an example of how to use the load chart. 1. Extend boom completely. 2. Using the boom angle indicator as you guide, raise boom to 40° elevation. As can be seen, the boom radius is approximately 26 feet and the hook height is approximately 18 feet.
- Page 42 DESCRIPTION OF EACH CONTROL DEVICE CAUTION Working radius before hoisting cargo ★ When a boom is extended to halfway, use the rated load with the boom concerned fully extend- ed in order to secure safety. • When boom-section Working radius with extended from boom-section a cargo hoisted , take the rated load for...
- Page 43 DESCRIPTION OF EACH CONTROL DEVICE How to refer to hoisting capacity when outriggers are extended to minimum or to ◆ halfway. As a general rule, the outriggers are to be extended to their extremes. If it is forced to operate the crane with the outriggers extended to minimum or to halfway, oper- ate the crane in accordance with instructions shown below.
-
Page 44: Warning Horn
DESCRIPTION OF EACH CONTROL DEVICE Warning horn Before lifting up the cargo, depress the warn- ing horn switch on the crawler panel to give warning sound to those who have entered Warning horn switch within slewing range during crane operation, or to workers in charge of slinging work near the cargo or in a course where the cargo may pass along. -
Page 45: Load Meter
DESCRIPTION OF EACH CONTROL DEVICE Load meter The meter shows weight of a cargo being Load meter hoisted. Read the scale corresponding to the number of wire rope hooking. • Remarks Load meter is secured on the panel Dial of the load meter has: ◆... - Page 46 DESCRIPTION OF EACH CONTROL DEVICE Follow the steps below when measuring the weight of hoisted cargo with the load ◆ meter. Compare the reading on the load meter with the reading on the load meter. ①Lower the engine speed. ② ...
-
Page 47: Specifications On Turn Over Prevention Device
DESCRIPTION OF EACH CONTROL DEVICE Specifications on turn over prevention device WARNING ★ Observe the caution to secure safety. Failure to observe the cautions may invite trouble or serious accident. Be sure to carry out the inspection in particular before starting opera- tion. - Page 48 DESCRIPTION OF EACH CONTROL DEVICE If an alarm sounds intermittently due to decrease of ground reaction against out- riggers, operating the crane to safer side. If the ground reaction against the outrigger decreases further, the crane makes an auto- matic stop. In this case, faster operating speed can make the crane to be overturned to which must pay attention.
- Page 49 DESCRIPTION OF EACH CONTROL DEVICE ◆ Inspection before starting crane operation WARNING ★ Be sure to carry out inspection of turn over prevention device before starting the crane operation to check that the device functions normally. If found something wrong with the device, ask a UNIC authorized ser- vice shop for repair as soon as possible.
- Page 50 DESCRIPTION OF EACH CONTROL DEVICE Check the following before starting crane operation. If found something wrong with the turn over prevention device, contact with a UNIC authorized service shop as soon as possible because it will not function as a safety device. Check that the continuous alarm sound (bee••••ee) of the turn over prevention device is issued before setting up outriggers.
- Page 51 DESCRIPTION OF EACH CONTROL DEVICE After the outriggers have been set up Control box of turn over properly and the buzzer is making no prevention device alarm sound, check that the alarm buzzer starts to make an intermittent sound (beep, Lamps indicating beep) when the two adjacent outriggers are self-diagnosis...
- Page 52 DESCRIPTION OF EACH CONTROL DEVICE CAUTION ★ Do not carry out “zero point adjustment” for turn over prevention device after the outriggers have been set up. Depression of “ZERO RESET” switch in this condition, the “zero point adjustment” does not complete successfully which in turn the turn over prevention device will be in failure so that crane operation of winding- up hook, extension of boom, lowering boom, and slewing boom cannot be possible.
- Page 53 DESCRIPTION OF EACH CONTROL DEVICE ◆ Function of turn over prevention device Carry out normal crane operation after completion of inspection before starting crane operation. The turn over prevention device is a safety device that prevents the crane from being overturned by stopping crane functions automatically while issuing alarm sound when the average setting- up reaction force of the ground against two (2) adjacent outriggers on the opposite side of the boom reaches the specified set value.
- Page 54 DESCRIPTION OF EACH CONTROL DEVICE ◆ Self-diagnosis functions “Lamps indicating self-diagnosis” are mount- ed in the control box of turn over prevention device to show such as operation, detailed faults of the device. “RUN” lamp (green) Control box of turn over It lights when the turn over prevention device prevention device is functioning right.
- Page 55 DESCRIPTION OF EACH CONTROL DEVICE • Indication of lamps for self-diagnosis when turn over prevention device functions normally Lamps Indication State Lighting Turn over prevention device is functioning right. Lighting off It is in condition of overturn threshold as ground reaction force Quick blinking against outriggers has been decreased, or outriggers have been stored.
- Page 56 DESCRIPTION OF EACH CONTROL DEVICE ◆ How to release when turn over prevention device is found to be out of order If the crane cannot be operated due to trouble in the turn over prevention device, store the crane in accordance with steps as follows: ●Step 1 The release switch for turn over prevention device is located inside of the cover near the...
- Page 57 DESCRIPTION OF EACH CONTROL DEVICE CAUTION ★ When the reset switch is being pushed, the crane cannot be operated through radio remote control but it can only be operated manually. In addition, adjust acceleration of the engine manually as the automatic acceleration also becomes impossible when the reset switch is being pushed.
- Page 58 DESCRIPTION OF EACH CONTROL DEVICE ◆ Caution plates in detail CAUTION ★ Always keep the stickers clean so that they can be read easily. ★ If any of the stickers has come off, stick it again or replace it with new sticker.
-
Page 59: How To Operate Carrier
10. HOW TO OPERATE CARRIER Designation of each control lever and its location Crawling lever (Right) Crawling lever (Left) Monitor lamps Interlock for crane-crawl operation Starter switch Accelerator pedal Crawling speed change lever 10-1... -
Page 60: Preparation Before Operation
HOW TO OPERATE CARRIER Preparation before operation WARNING ★ Ventilate well when starting the engine in a small limited area or indoors. ★ Do not start the engine from the outside of the operator’s seat. ★ Confirm the safety around the crane working site before starting the engine. - Page 61 HOW TO OPERATE CARRIER Description of warning lamps • Warning lamp for engine lubricating oil pressure When engine lubricating oil pressure drops, the lamp lights to tell as it is the failure. In case where the lamp lights during opera- tion, stop the crane work immediately as it is possible that the engine may seize up and move the crane to a safe place, then stop the...
- Page 62 HOW TO OPERATE CARRIER • Warning lamp for alternator (for charging) The lamp lights when something is wrong with the charging system while the engine is running. In case where the lamp lights during opera- tion, stop the crane work immediately and move the crane to a safe place to stop the engine running.
-
Page 63: Precautions Before Operation
HOW TO OPERATE CARRIER Precautions before operation (air-bleeding procedures) WARNING ★ Do not feed fuel (for air breading) to the fuel system by starting the engine with the use of starter motor. Otherwise the coil, the pinion gear, and the starter gear may be dam- aged due to over-heat of the starter motor. -
Page 64: How To Operate
HOW TO OPERATE CARRIER How to operate WARNING ★ Do not start the engine by using a auxiliary ignition fluid as it may be in danger of explosion. ◆ Starting engine • Starting in normal condition Insert the key into the starter switch and turn it to ON position. - Page 65 HOW TO OPERATE CARRIER • Starting in a cold weather When it is hard to start the engine in lower outside air temperature, take steps as follows: Turn the starter switch key to HEAT position and wait until the pilot lamp indicating preheating engine goes out.
- Page 66 HOW TO OPERATE CARRIER ◆ Steps to be taken after engine has started CAUTION ★ Do not make engine to accelerate abruptly before it has been warmed After the engine has started, do not rush into crawling the crane but take the steps as fol- lows: Make sure that each warning lamp does not light after the engine has started.
-
Page 67: How To Crawl
HOW TO OPERATE CARRIER How to Crawl WARNING ★ Start the crane crawling after the safety around the crawler has been confirmed and make a sign when crawling the crane. ★ Keep anyone away from the crane. ★ Pay special attention when turning left because the left side of crawl- er will be in your blind spot. - Page 68 HOW TO OPERATE CARRIER ◆ Starting, crawling, stopping the crane Press the pedal to release the interlock Forward Forward for crane-crawl operation and hold it. Neutral Neutral While sitting on the operator’s seat, Backward Backward shift the crawling levers (left and right) to the other side to make the crane to crawl Crawling straight forward and shift the levers to this side...
- Page 69 HOW TO OPERATE CARRIER ◆ Making a turn • Making a turn while moving Pivot When traveling forward: It turns to the left (right) by shifting the right (left) traveling lever much further than the left (right) travel- ing lever. When traveling backward: It turns to the left (right) by shifting the right (left) traveling lever much further than the left (right) travel-...
- Page 70 HOW TO OPERATE CARRIER WARNING Do not operate the right (left) traveling lever with the left (right) traveling lever put at its neutral position. Otherwise, the rubber crawler damages and the machine bounc- es from which may invite a very dangerous situation. In case where the machine is forced to operate this way, be sure to stop the movement of the machine first, allow the engine to run at a low speed to operate it slowly and gently.
- Page 71 HOW TO OPERATE CARRIER ◆ How to park crane Release your foot from the accelera- tor pedal to make the engine run at low speed. Position to be locked Shift the crawling levers on both sided to neutral position and release your foot from the pedal to lock the interlock for crane- crawl operation.
-
Page 72: How To Fasten Carrier When In Transportation
HOW TO OPERATE CARRIER How to fasten carrier when in transportation WARNING ★ Be sure to fasten the carrier before transportation with a vehicle such as truck. ★ Be sure to allow the carrier to take its storing position when in trans- portation. -
Page 73: How To Operate Crane
11. HOW TO OPERATE CRANE Designation of each control lever and its location Outrigger Slewing Boom Hook Boom Extending C.C.W. Extending Lowering Lowering outrigger Slewing Boom Hook Boom Retracting C.W. Retracting Hoisting Raising Hook To store outrigger vertical/horizontal selector lever Control each outrigger lever according to illustration on the sticker Right Left... -
Page 74: Preparation Before Operation
HOW TO OPERATE CRANE Preparation before operation WARNING ★ Do not let anyone stand under or in front of the hook as it swings when it is released from the hook holder. Failure to do this may invite an accident. Make sure that each lever for controlling ①... -
Page 75: Procedures To Set Up Outriggers
HOW TO OPERATE CRANE Procedures to set up outriggers WARNING ★ Crane operation without setting up the outriggers is strictly prohib- ited. ★ Do not operate the crane and extend the vertical cylinders and inner boxes while outriggers have been stored. ★... - Page 76 HOW TO OPERATE CRANE Outrigger selection levers Vertical cylinders Vertical cylinder Right Left Right Left rear front front rear ① ④ ② ③ Inner box 30M081111-W376C2U-T Inner boxes There are five(5) levers for controlling outriggers and respective vertical cylinders and inner boxes can be controlled independently.
- Page 77 HOW TO OPERATE CRANE Turn the operation mode switch to “crane”. Unwind the hook by controlling the hook winding up/down lever to loosen it from its stored position. Do not stand under or in front of the hook as it may swing during this operation. Unwind the hook until the weight for over- winding alarm is detached from the hook and the alarm buzzer stops sounding.
- Page 78 HOW TO OPERATE CRANE Extension of outriggers and rated load ◆ Since the rated load varies according to how the outriggers are extended, the rated load has ◆ been set for respective extended conditions. Figure below shows the cases where the outriggers are extended to “maximum”, “halfway”, and “minimum”.
-
Page 79: How To Operate Boom For Derricking
HOW TO OPERATE CRANE How to operate boom for derricking (raising and lowering) WARNING ★ An abrupt crane operation while a cargo is being lifted up gives an excessive shock to the crane which may cause the crane to be damage or the crawler to be overturned. -
Page 80: How To Hoist And Lower The Hook
HOW TO OPERATE CRANE How to hoist and lower the hook WARNING ★ Pay attention that the hook will not be overwound. Be sure to turn ON the “overwinding alarm switch”. ★ If the hook hits against the boom top due to being overwound of the hook, it may cause damage to the wire rope and the sheaves at the boom top and may cause the lifted cargo to fall. - Page 81 HOW TO OPERATE CRANE CAUTION ★ Further paying out of the wire rope after the hook has reached the ground causes the rope to be wound around the drum irregularly. Lifting up a cargo with the rope irregularly wound on the drum damages the rope which results in remarkable shortening of its service life.
-
Page 82: How To Telescope Boom
HOW TO OPERATE CRANE How to telescope boom WARNING ★ If the boom is extended further with the hook come close to the boom top, the hook may hit against the boom top causing the wire rope and the sheaves at the boom top to be damaged, and the fall of lifted cargo may result. - Page 83 HOW TO OPERATE CRANE URW376C4U-T Sequence of boom extension The boom is to start extending from outer sec- tions of boom. Sequence of boom retraction The boom is to start retracting from top sec- tions of boom. • Remarks Sections of boom shown in the box indicate that they are telescoping simultaneously.
-
Page 84: How To Slew Boom
HOW TO OPERATE CRANE How to slew boom WARNING ★ Carry out slewing operation slowly without raising the engine speed. ★ Slewing without outriggers set up is strictly prohibited. ★ Control levers slowly to allow the boom to make a smooth start and stop for slewing. - Page 85 HOW TO OPERATE CRANE For slewing direction of boom, “slew to the right” means slewing in the direction in which the hands of a clock rotate (C.W.) and “slew to the left” means slewing in the oppo- site direction of clock hands (C.C.W.) when viewed from the top.
-
Page 86: How To Store Crane
HOW TO OPERATE CRANE How to store crane WARNING ★ Be sure to store the boom from the left hand side of the operator’s seat. Retract the boom and swing it to a posi- tion close to the sticker indicating stor- ing position. -
Page 87: Procedures For Storing Hook
HOW TO OPERATE CRANE Procedures for storing hook WARNING ★ Never try operating the crane by controlling the hook storage lever as this is dangerous. ★ Store the hook after all boom sections have been retracted and low- ered fully. Wind up the hook with the “hook wind- ing up/down”... - Page 88 HOW TO OPERATE CRANE The hook is to be stored in its position in such a way that the roller at the upper side of the hook touches the guide on the boom top which in return the hook is raised up by the roller along the guide for storage.
-
Page 89: How To Store Outriggers
HOW TO OPERATE CRANE How to store outriggers WARNING ★ Start storing outriggers after the boom has been stored. ★ When storing outriggers, be sure to retract the inner boxes to their extremes after the vertical cylinders have been fully retracted. (Do not retract the inner boxes without the vertical cylinders fully retracted.) ★... - Page 90 HOW TO OPERATE CRANE Store the outriggers as follows: Set pin Turn the operation mode switch to “out- rigger”. Retracting vertical cylinder The yellow lamp goes on. Retract the vertical cylinders fully first to retract the inner boxes to their extremes.
- Page 91 HOW TO OPERATE CRANE ◆ How to make an emergency stop In case of emergency such as that the crane does not stop operation or the engine will not return to idling speed even if no crane operation has been made, depress the “EMERGENCY” switch on the switch panel.
- Page 92 HOW TO OPERATE CRANE ◆ Operation in an emergency If the crane fails to be operated by manual control, operate the crane by taking proce- dures as follows: Procedure 1 Disconnect the power connector [CRANE ① POWER] located under the control valve. Power connector [CRANE POWER] Check that all manual control levers are at...
-
Page 93: Maintenance And Inspection Of Carrier
12. MAINTENANCE AND INSPECTION OF CARRIER WARNING ★ Caution signboard Be sure to hang a “caution signboard” such as on control levers while either maintenance or inspection is being carried out, and do not try operating the crane. ★ Be sure to replace consumable items according to the replace- ment criteria. -
Page 94: Inspection Before Operation
MAINTENANCE AND INSPECTION OF CARRIER Inspection before operation WARNING ★ Be sure to stop the engine, and store the boom and the outriggers before carrying out maintenance and inspection. ★ A fire source such as smoking cigarette in mouth is strictly prohib- ited. - Page 95 MAINTENANCE AND INSPECTION OF CARRIER ◆ Check for remaining fuel quantity / Draining water WARNING ★ Fuel (diesel fuel oil) is highly inflammable. Do not smoke and bring a fire source close to the fuel when refueling and draining sediment. ★...
- Page 96 MAINTENANCE AND INSPECTION OF CARRIER • Moisture mixed with the fuel can be removed by the water separator. • Draining moisture and sediment by water separator Water separator is built in the fuel filter and functions to separate moisture from the water mixed fuel to avoid trouble caused by water.
- Page 97 MAINTENANCE AND INSPECTION OF CARRIER ◆ Check for engine oil quantity / Filling up WARNING ★ Wipe up spilled oil thoroughly after filling it up as it may cause the fire. CAUTION ★ Replace engine oil and fuel filter element after 100 hours (1 month) of operation, then every 250-hour operation (3 months) thereafter.
- Page 98 MAINTENANCE AND INSPECTION OF CARRIER ◆ Check for cooling water quan- tity / Filling up WARNING ★ In normal case, do not open the radiator cap. Removal of the cap with the engine overheated allows steam and heat- ed water inside to blow out which may cause a skin burn. ★...
- Page 99 MAINTENANCE AND INSPECTION OF CARRIER ◆ Check for fan belt tension / Adjustment WARNING ★ Do not make an inspection and an adjustment of fan belt while engine is running. • Check the fan belt for tension and for dam- Fan pulley age.
- Page 100 MAINTENANCE AND INSPECTION OF CARRIER ◆ Check for battery electrolytic solution level / Filling up WARNING ★ Gas evaporated from the battery solution is inflammable. Do not bring a fire source close to the battery during a battery mainte- nance. And, be sure to disconnect the negative (-) side of battery cord.
- Page 101 MAINTENANCE AND INSPECTION OF CARRIER ◆ Check hydraulic oil tank for oil level / Filling up WARNING ★ Since temperature on the hydraulic oil tank surface is too high imme- diately after operation, remove the cap of the filling port after the tem- perature has gone down.
- Page 102 MAINTENANCE AND INSPECTION OF CARRIER ◆ Check for rubber crawler / Adjustment WARNING ★ Do not check rubber crawler tension with the crane body raised above the ground. It is very dangerous because an accidental fall of the crane may happen during inspection.
- Page 103 MAINTENANCE AND INSPECTION OF CARRIER WARNING ★ Pressurized grease is filled in the adjusting cylinder. Do not unfasten the plug by more than 1(one) turn because slackening of the plug too further or too quick allows the plug to pop out or the grease to spurt out which may invite an accident resulting in injury or death.
- Page 104 MAINTENANCE AND INSPECTION OF CARRIER CAUTION ★ Do not crawl over lying rocks or stones with sharp edges. ★ Do not change direction where there is a difference in ground level. ★ Do not make a quick change of direction as it may cause the wheels to go off the rubber crawler.
-
Page 105: Inspection And Maintenance Which Is To Be Carried Out Every 250 Hours Or 3 Months
MAINTENANCE AND INSPECTION OF CARRIER Inspection and Maintenance which is to be carried out every 250 hours or 3 months ◆ Replacement of engine oil in the oil pan and engine oil filter element WARNING ★ Do not rush to replace engine oil as it is heated to a high tempera- ture immediately after the engine has been stopped. - Page 106 MAINTENANCE AND INSPECTION OF CARRIER Apply oil sparingly to the packing of new oil filter. Clean the filter bed to mount the new oil filter by rotating it clockwise. Tighten it further by rotating approx. 2/3 turns from which the packing surface touch- es the seal surface on the filter bed.
- Page 107 MAINTENANCE AND INSPECTION OF CARRIER ◆ Check for air cleaner element / Cleaning WARNING ★ Do not make a cleaning and a replacement of air cleaner while engine is running. CAUTION ★ If the crane is operated in dusty environment, shorten accordingly the time when making inspection and cleaning.
- Page 108 MAINTENANCE AND INSPECTION OF CARRIER Wipe out inside of the body with a piece of clean cloth. Attach a new or the cleaned outside ele- ment. Fit the dust cup and clamp it. Clamp Dust cup Check the air piping for tightness of piping such as in hose clamps.
- Page 109 MAINTENANCE AND INSPECTION OF CARRIER ◆ Cleaning of element/Check CAUTION ★ Do not strike the air cleaner element or hit it against other object when cleaning the clean- ★ Do not use a cleaner which has been damaged in the folds or gasket.
- Page 110 MAINTENANCE AND INSPECTION OF CARRIER ◆ Cleaning of fuel filter element with water separator WARNING ★ Do not rush to start cleaning of fuel filter as it is heated to a high tem- perature immediately after the engine has been stopped. Clean the filter after the oil has cooled down.
- Page 111 MAINTENANCE AND INSPECTION OF CARRIER Throw the cock of fuel filter with water “CLOSE” separator upward to “CLOSE” position. Unfasten the retaining ring to remove the filter case and the element. Cock Wash the element with a diesel fuel and Retaining blow compressed air with a pressure ring...
- Page 112 MAINTENANCE AND INSPECTION OF CARRIER ◆ Check oil quantity in the reduction gears of crawling motor/Filling up WARNING ★ Do not rush to work as each section of crawling devices is heat- ed to a high temperature immediately after the crane operation. Work after temperature of crawling devices have gone down.
-
Page 113: Inspection And Maintenance Which Is To Be Carried Out Every 500 Hours Or 6 Months
MAINTENANCE AND INSPECTION OF CARRIER Inspection and Maintenance which is to be car- ried out every 500 hours or 6 months Carry out “Inspection and Maintenance which is to be carried out every 250 hours or 3 months”, illustrated in the previous section, together with this inspection and maintenance. - Page 114 MAINTENANCE AND INSPECTION OF CARRIER Throw the cock of fuel filter with water “CLOSE” separator upward to “CLOSE” position. Unfasten the retaining ring to remove the filter case and the element. Cock Wash the filter case with diesel fuel and Retaining fit the new element.
-
Page 115: Inspection And Maintenance Which Is To Be Carried Out Every 1000 Hours Or 12 Months
MAINTENANCE AND INSPECTION OF CARRIER Inspection and Maintenance which is to be carried out every 1000 hours or 12 months Carry out “Inspection and Maintenance which is to be carried out every 250/ 500 hours or 3/6 months”, illustrated in previous sections together with this inspection and maintenance. - Page 116 MAINTENANCE AND INSPECTION OF CARRIER Remove the cover to take out the suc- tion strainer after draining. Cover Remove dust stuck to the strainer and wash it with nonflammable wash oil. Replace the strainer if it is found damaged. Check if there is foreign object depos- ited in the tank and wash inside of the tank with a wash oil.
- Page 117 MAINTENANCE AND INSPECTION OF CARRIER ◆ Replacement of line filter element WARNING ★ Do not rush to start replacement of line filter element as it is heated to a high temperature immediately after the engine has been stopped. Replace the filter element after the oil has cooled down. ★...
- Page 118 MAINTENANCE AND INSPECTION OF CARRIER Pour the specified amount of speci- fied oil into the filling port. Capacity of hydraulic oil tank: 19.8gal(75 liters). Fit the filling port plug, then bleed the air in the hydraulic system. Idle the engine at low speed and repeat Filling port extending and retracting each cylinder between positions where it will not come to...
- Page 119 MAINTENANCE AND INSPECTION OF CARRIER ◆ Replacement of oil in the reduction gears of crawling motor WARNING ★ Do not rush to start replacement of oil as it is heated to a high tem- perature immediately after the engine has been stopped. Replace oil after the oil has cooled down.
- Page 120 MAINTENANCE AND INSPECTION OF CARRIER Tighten the drain plug and fill a speci- fied oil in the filling port. A proper oil quantity is to be confirmed when the oil is filled until it flows out of the oil quantity check port. Put the filling port plug and the oil quantity check port plug and tighten them.
-
Page 121: Non-Regular Maintenance
MAINTENANCE AND INSPECTION OF CARRIER Non-regular maintenance ◆ Check for cooling water quan- tity /Filling up WARNING ★ Removal of the cap with the engine overheated allows steam and heated water inside to blow out which may cause a skin burn. In order to carry out the ser- vice for cooling system, stop the engine and wait until water... - Page 122 MAINTENANCE AND INSPECTION OF CARRIER Unfasten the drain cock on the radiator to drain the cooling water. Close the drain cock. Drain cock Wash it with a detergent available on the market. Wash it by following the instructions attached to the detergent you bought. (Run the engine at a speed slightly higher than the idling to raise the water tempera- ture to a level of more than 176ºF(80ºC) and...
- Page 123 MAINTENANCE AND INSPECTION OF CARRIER Stop the engine to adjust the cooling Reservoir tank water quantity to a proper level. Fill the water until it comes to the neck of water supplying port and fill it to “FULL” mark on the reservoir tank. FULL 上限...
- Page 124 MAINTENANCE AND INSPECTION OF CARRIER ◆ Inspection and Maintenance of the inside of fuel tank and fuel strainer WARNING ★ Fuel is highly inflammable. Turn the starter switch OFF and avoid any fire source while the fuel sys- tem is being maintained. ★...
- Page 125 MAINTENANCE AND INSPECTION OF CARRIER ◆ Cleaning and Inspection of radiator fin WARNING ★ Wear safety goggles when cleaning it by blowing a compressed air and set the air pressure to a level less than 0.49MPa (71.1psi(5kgf/cm If the fin is clogged with something such as dust and leaves, it prevent the air from flow- ing through to decrease cooling efficiency remarkably which in turn causes the engine...
-
Page 126: Storage
MAINTENANCE AND INSPECTION OF CARRIER Storage WARNING ★ Stop the engine and thoroughly remove dirt and dust stuck on the carrier body. In particular, be sure to remove the dust stuck to the battery, electric wiring, and the members directly affected by engine heat such as muf- fler as it may cause a fire. -
Page 127: Fitting Safety Covers
MAINTENANCE AND INSPECTION OF CARRIER Fitting safety covers WARNING ★ Be sure to fit the safety covers removed during inspection and maintenance where they were fitted originally. It is very dangerous because uncovered rotating members and heated parts may cause injury. Maintenance and inspection of engine Carry out the maintenance and inspection of engine according to “Instruction manual for engine”. - Page 128 MEMO...
-
Page 129: Maintenance And Inspection Of Crane
13. MAINTENANCE AND INSPECTION OF CRANE WARNING ★ Caution signboard Be sure to hang a “caution signboard” such as on control levers while either maintenance or inspection is being carried out, and do not try operating the crane. ★ Be sure to replace consumable items according to the replacement criteria. -
Page 130: Inspection Before Operation
MAINTENANCE AND INSPECTION OF CRANE Inspection before operation In order to secure safe operation and improve working efficiency, be sure to inspect each part of the crane according to the table as follows: Device Servicing item Device Servicing item Device Servicing item Rotation of hook Automatic... -
Page 131: Cleaning
MAINTENANCE AND INSPECTION OF CRANE Cleaning Keep the crane clean at any time. Sands and fine dusts may cause an abnormal wear. Do not wash the crane by splashing highly pressurized water to prevent it from entering into the electric system which may cause malfunction of the crane. Inspection of bolts mounting slewing bearings When the slewing device makes an unusual noise while operating or crawling the crane,... -
Page 132: Replacement Of Wire Rope (For Winding-Up)
MAINTENANCE AND INSPECTION OF CRANE Replacement of wire rope (for winding-up) Wire rope is an expendable article and it will be damaged and its strand wires are broken to allow it to be thinner through a long period of operation. Replace the rope according to following cri- teria. - Page 133 MAINTENANCE AND INSPECTION OF CRANE ◆ How to replace wire ropes Refer to the figure in the left for how to hook the wire ropes for winding -up and Wire clip for where the weight for overwinding alarm is to be mounted. Overwinding alarm detector Ring...
- Page 134 MAINTENANCE AND INSPECTION OF CRANE How to fix wire rope end. When passing the wire rope end through ① Wire rope end the wire socket, be sure to pass it as indi- 1.57in. (40mm) cated by the arrow mark on the socket. Notch If it is passed from the opposite direction, service life of wire rope shortens as the...
- Page 135 MAINTENANCE AND INSPECTION OF CRANE ◆ How to correct twisted wire ropes Wire ropes tend to turn in untwisting direc- tion when they are under tension. If two or more wire ropes are hooked togeth- er, they tend to be twisted particularly while they are new.
-
Page 136: Replacement Of Expendable Parts
MAINTENANCE AND INSPECTION OF CRANE Replacement of expendable parts ◆ Replacement of gaskets and seals for each cylinder Although timing of replacement of a part var- ies according to how frequently the crane has been operated, replace gaskets and seals used in each cylinder after every 3 years of opera- tion (period during which crane has not been operated is included) in order to operate the... -
Page 137: Water Supply And Lubrication To Carrier
14. WATER SUPPLY AND LUBRICATION TO CARRIER WARNING ★ Be sure to stop the engine, and store the boom and the outriggers before carrying out filling/replacing lubricant and/or fuel. ★ A fire source such as smoking cigarette in mouth is strictly prohib- ited. -
Page 138: List Of Recommended Lubricant
WATER SUPPLY AND LUBRICATION TO CARRIER List of recommended lubricant 1.Use the engine oils as below: ◆ Depending on atmospheric temperature Classification - 30 - 20 - 10 Rating to be applied (- 22 SAE5W SAE30 Engine oil Diesel engine oil SAE10W of CD class SAE10W - 30... - Page 139 WATER SUPPLY AND LUBRICATION TO CARRIER 5.Hydraulic oil is the same as the oil used in the crane. ◆ 6. Use the gear oils for the reduction gears of crawling motor as below: ◆ Use the gear oils SAE#90 GL4 or equivalent. 14-3...
-
Page 140: Filling Water And Lubrication Chart
WATER SUPPLY AND LUBRICATION TO CARRIER Filling water and lubrication chart ④ Fuel ⑤ ② OUTRIGGER NOT MAX EXT. SELECT ご ③ ① No. of Service interval Where to lubricate Lubricant Tool part Initial: Replace after 100 hours Engine oil ①Engine 0.9gal(3.4 liters) After : Replace every 250 hours Initial : 30 hours, Whenever neces- ② ... -
Page 141: Lubrication To Crane
15. LUBRICATION TO CRANE WARNING ★ Do not carry out maintenance and inspection while temperature of hydraulic oil is still high. ★ Be sure to stop the engine to carry out lubrication. ★ Temperature if both hydraulic and gear oils is high immediately after crane operation so that accumulated high pressure still remains inside. -
Page 142: List Of Recommended Lubricant
LUBRICATION TO CRANE List of recommended lubricant ◆ List of recommended lubricants ★ Use the UNIC genuine hydraulic oils listed below as hydraulic oil for the crane. Use industrial-type hydraulic oil ISO VG 46 for temperatures above 32°F(0°C). ISO VG 32 for temperatures below 32°F(0°C). Brand Petroleum Maker ISO VG 32... -
Page 143: Lubrication Chart
LUBRICATION TO CRANE Lubrication chart ⑦ ⑧ ⑨ ⑪ ⑩ ③ ④ ⑥ ⑫ 6-section boom ⑫ ⑬ ⑮ ① ⑤ ⑯ ⑭ Service No. of Where to lubricate Lubricant Tool interval part Molybdenum grease Manual appli- ① Boom slide plate (Underside & side face of boom sec- tions ②, ③, ④, ⑤ and ⑥) For 6-section boom cation Chassis grease... - Page 144 LUBRICATION TO CRANE Lubrication ◆ Replacement of gear oil (Winch reduction gears and Slewing reduction gears) Winch reduction gears ★ Air enters in and out of the gear case so (Draining oil) that dirt and moisture are brought in the gear case.
- Page 145 LUBRICATION TO CRANE ◆ Lubrication to slewing bear- ◆ Lubrication to wire ropes for ings boom extension The crane employs ball bearings as the slew- Spray the rope grease sufficiently once a ing bearing. month to the wire ropes for boom extension Be sure to lubricate the bearings as insuffi- with the boom fully extended.
- Page 146 MEMO...
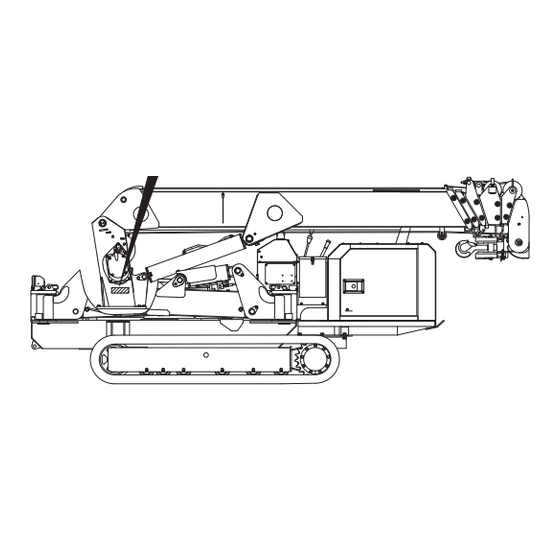
- Page 147 16. MAJOR SPECIFICATIONS URW376C4U-T(6-section boom) (Speed indicated in the table below is at oil temperature range of 113~131°F(45~55°C), operat- ing with no-load, and at rated pump discharge.) Major specifications Crane capacity 6680 lbs(3.03t) × 8.0ft(2.5m) (Net rated load) (With outriggers, extended fully) Maximum lift above ground (Hook) 48.9ft(14.9m) Boom to be extended to:...
- Page 148 MAJOR SPECIFICATIONS Equipment and construction Boom:6-section, Hexagonal box beam Telescoped by direct pushing of double acting hydraulic cylinder together with by wire rope Boom telescoping (With hydraulic automatic locking device) (2nd section : sequential actuation, 3rd, 4th, 5th & 6th sections: simul- taneous actuation) Direct pushing by hydraulic cylinder Boom derricking...
- Page 149 MAJOR SPECIFICATIONS Crawling device Crawling Endless rubber crawler Crawler 1ft.×2in.×88links(300mm×52.5mm×88links) Length of ground contact 5.74ft(1750mm) Pressure of ground contact 5.22psi (36.0kPa(0.37kgf/cm Crawling speed Forward/Backward: 0~1.8mph(0~3km/h) Hill-climbing ability 23° Rated output 20.4hp (15.2kW)/2500rpm (20.7PS/2500rpm) Model : 3TNV80F-SNFK (Yanmar Co,Ltd) Engine Displacement: 77.2cu.in. (1.266cm Fuel Type: Diesel Crawling Independently driven by hydraulic power...
- Page 150 MAJOR SPECIFICATIONS Chart of rated load(4-part line hook) RATED LOADS CHART BOOM SECTION WORKING RADIUS(ft) 8.0 10.0 11.0 13.0 15.0 17.0 18.6 6680 6680 5150 4570 3760 3180 2780 2420 MAXIMUM RATED OUTRIGGERS 6680 6680 5100 4520 3600 2750 2100 1760 HALFWAY EXTENDED...
- Page 151 MAJOR SPECIFICATIONS Points to notice, Rated load • Rated load showing on the chart is hoisting capacity with the crane set up level and the data are based on actual working radius by incorporating a shift due to deflection of the boom when loaded. In addition, they are based on strength and stability of the crane.
- Page 152 MAJOR SPECIFICATIONS Chart of rated load (Single line hook):OPTION Boom sections extended: ①,①+② Working radius(ft) 10.0 11.0 13.0 15.0 17.0 18.9 1630 1630 1630 1630 1630 1630 1630 1630 Outriggers extended to maximum Rated 1630 1630 1630 1630 1630 1630 1630 1630 Outriggers extended to halfway laod (lbs) 1630 1630 1630 1630 1630 1630 1500 1100...
- Page 153 MAJOR SPECIFICATIONS • Operating condition of booms; Boom Boom Boom Boom All booms are completely retracted. Boom Boom Boom Boom Boom Boom Boom Boom Boom is extended. Boom Boom Boom Boom Boom Boom Boom 1+2+3 Boom is extended to the mark the side plate of Boom Boom Boom...
- Page 156 HEAD OFFICE : Nihonbashi nishikawa Bldg, 5-3, Nihonbashi 1-chome, Chuo-ku, Tokyo 103-0027, Japan...
Need help?
Do you have a question about the URW376C4U -T Series and is the answer not in the manual?
Questions and answers