Advertisement
Quick Links
JS-8500
3 / RPT
2 / INT
1/
/ MODE
4 / RDM
5 / -10
6 / +10
MP3 PLAYER
/
/
USB
SD
INSTALLATION
INPUT THE SD CARD
The SD oblique angle keeps Rightward exposure
GENERAL OPERATIONS
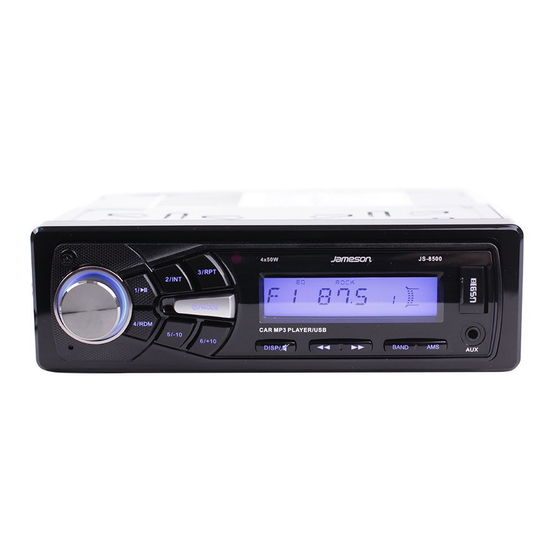
FRONT PANEL LAYOUT
1
4
16
2
11
12
17
3 / RPT
2 / INT
10
1/
/ MODE
13
4 / RDM
5 / -10
6 / +10
DISP/
BAND
AMS
15
3
8 7
14
18
6
9
5
20
21
03
DISP/
BAND
AMS
AUX
/
RECEIVER
/
MMC
AUX SLOT
put into the SD slot and press it again to eject.
,
3 / RPT
MODE
6 / +10
DISP/
BAND
AMS
AUX
1
Power
/
MOD Button
2
Volume/Sel Button
3
Display/Mute Button
LCD Display
4
5
Reset Button
Band switch/ID3 select
6
7
Tune Seek & Track forward Button
8
Tune Seek & Track reverse Button
19
9
Automatically memory storing
Play/pause & Preset Button 1
AUX
10
Intro & Preset Button 2
11
12
Repeat & Preset Button 3
18
Random & Preset Button 4
13
14
Preset Button 5
15
Preset Button 6
16
Release Button
Remote Control sensor
17
AUX IN JACK
18
USB connecter
19
20
SD/MMC slot
Flashing LED
21
INSTALLATION
PRECAUTIONS
Choose the mounting location where the unit will not interfere with the normal
the driver.
Before finally installing the unit, connect the wiring temporarily and make sure it is all connected up
properly and the unit and the system work properly.
Use only the parts included with the unit to ensure proper installation. The use of unauthorized
parts can cause malfunctions.
Consult with your nearest dealer if installation requires the drilling of holes or other modifications of
the vehicle.
Install the unit where it does not get in the driver's way and cannot injure the passenger if there is
a sudden stop. Like an emergency stop.
Avoid installing the unit where it would be subject to high temperature, such as from direct
sunlight, or from hot air, form the heater, or where it would be subject to dust, dirt or excessive
vibration.
DIN FRONT-MOUNT (Method A)
Removing the unit
1
2
1.Frame
2. Insert fingers into the groove in the front of frame and pull out to remove t he frame. (When
reattaching the frame,point the side with a groove downwards and attach It.)
3.Lever
Insert the levers supplied with the unit into the grooves at both sides of the unit and shown in
figure until they click. Pulling the levers makes possible to remove the unit from the dashboard.
2
Fastening the unit to the factory radio mounting bracket:
1. Select a position where the screw holes of the bracket and the screw holes of the main unit
become aligned (are fitted), and tighten the screws at 2 places on each side. Use either truss
screws (5 x 5mm) .
2. Screw
3. Dashboard or Console.
DIN REAR-MOUNT (Method B)
Installation using the screw holes on the sides of the unit.
GENERAL OPERATIONS
GENERAL OPERATIONS
POWER /MOD conversion
2.Under power off status,short press is power on,
Under power on status,short press is switching mode,long press is power off.
SOUND ADJUSTMENT
Turn on (2) can adjust the desired volume quality.
Press SEL button (2) will change in the following order.
Option:
VOL
BAS
TRE
BAL
(Volume)
( Bass)
( Treble) (Balance)
VOLUME
Adjust volume level by using
VOL/SEL
(2) knob. Turn the VOL knob to left to decrease
the sound level, turn the VOL knob to right to increase the sound level.
Note: The unit is initially set to volume mode.
BASS
Press VOL/SEL button(2) one time. Adjust bass level by using VOL/SEL(2) Knob.
TREBLE
Press VOL/SEL button(2) two times. Adjust treble level by using VOL/SEL(2) Knob .
BALANCE
Press VOL/SEL button(2) three times. Adjust sound balance between left and right
speakers by using VOL/SEL(2)Knob .
FADER (optional)
Press SEL button(2) four times. Adjust sound balance between front and rear speakers
by using VOL/SEL(2)Knob.
SELECT MENU
Press VOL/SEL button for several seconds, selecting menu is activated as cyclical mode
of following function for use's selection:
VOL
BAS
TRE BAL
FAD
LOUD OFF/ON
STEREO/MONO
DX/LOC
Press VOL/SEL button shortly and turn VOL button to right or left to select different
mode.
EQ OFF/ON
Select "EQ ON " POP
CLASS
ROCK
driving function of
3
2
3
02
FAD
LOUD
EQ
(Fader)
EQ
menu
EQ OFF menu male.
04
Advertisement

Related Manuals for Jameson JS-8500

Summary of Contents for Jameson JS-8500
- Page 1 Consult with your nearest dealer if installation requires the drilling of holes or other modifications of the vehicle. JS-8500 Install the unit where it does not get in the driver's way and cannot injure the passenger if there is a sudden stop. Like an emergency stop.
Need help?
Do you have a question about the JS-8500 and is the answer not in the manual?
Questions and answers