Table of Contents
Advertisement
Available languages
Available languages
Advertisement
Table of Contents

Related Manuals for Soozier A91-086

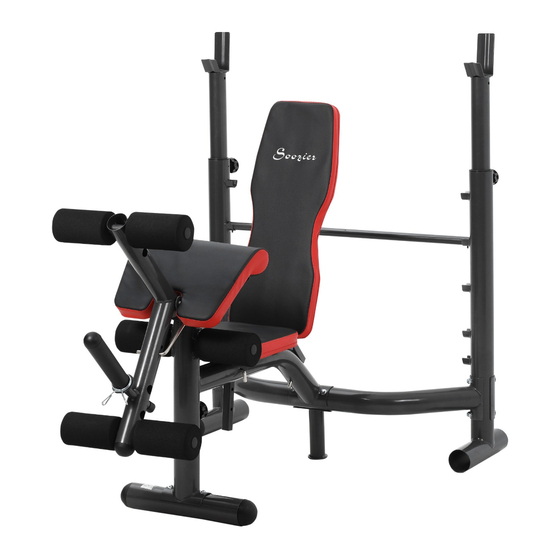
Summary of Contents for Soozier A91-086
- Page 1 WEIGHT BENCH A91-086 EN C000000 WARNING YOU MUST THOROUGHLY READ AND UNDERSTAND INSTRUCTION IN THIS MANUAL BEFORE ASSEMBLING AND USING THIS TRAMPOLINE. WARNING YOU MUST THOROUGHLY READ AND UNDERSTAND INSTRUCTION IN THIS MANUAL BEFORE ASSEMBLING AND USING THIS WEIGHT BENCH.
- Page 2 Please keep this manual in a safe place for reference. 1. It is important to read this entire manual before assembling and using the equipment. Safe and efficient use can only be achieved if the equipment is assembled, maintained and used properly. It is your responsibility to ensure that all users of the equipment are informed of all warnings and precautions.
-
Page 3: Exploded View
Exploded-View... -
Page 4: Part List
Part List DESCRIPTION DESCRIPTION Right upright pole Spring clamp Left upright pole Small spring clamp Connection beam Square end plug Main support frame Allen head screw M10*15 Front stabilizer Plastic stopper φ25 Bracket for barbell End cap φ25 Adjusting lever End plug Back rest post End plug φ60... -
Page 5: Assembly Step
Assembly Step 1 A) Connecting the connection beam (3) to the right upright pole (1) .Align their holes and make them joined with carriage bolt (41) connecting piece (16) curve washer (48) and nylon nut (47). Don’t fasten the nut immediately. Repeat the same procedure to connect the connection beam (3) with left upright pole (2). - Page 6 Assembly Step 2 A) Insert the rod of adjusting bracket (14) into the two seat post’s (13) bottom holes which is lower but horizontal. Holding the three parts, make the upper holes of the seat posts (13) into the front rod welded on the main support frame (4) ,then fasten them with two washers (46) and nylon nut (47).
-
Page 7: Exercise Instructions
Assembly Step 3 A) Align the holes both of elbow pad (21) and elbow pad post (10), tighten them with 2pcs allen head screws (40) and washers(49). B) Insert the elbow post (10) into the main support frame (4) . After align their holes on the back, fix them together with fixing knob (19) . -
Page 8: Weight Loss
minutes, then do a few stretching exercises as shown below. Each stretch should be held for approximately 30 seconds, do not force or jerk your muscles into a stretch - if it hurts, STOP. INNER THIGH FORWARD BENDS CALF / ACHILLES SIDE BENDS OUTER THIGH 2.The Exercise Phase... - Page 9 BANC DE MUSCULATION A91-086 FR C000000 AVERTISSEMENT VOUS DEVEZ BIEN LIRE ET COMPRENDRE L'INSTRUCTION DANS CE MANUEL AVANT D'ASSEMBLER ET D'UTILISER CE BANC DE MUSCULATION...
- Page 10 Informations importantes sur la sécurité Veuillez conserver ce manuel dans un endroit sûr pour référence. 1. Il est important de lire l'ensemble de ce manuel avant d'assembler et d'utiliser l'équipement. Une utilisation sûre et efficace ne peut être réalisée que si l'équipement est assemblé, maintenu et utilisé...
-
Page 11: Vue Éclatée
Vue éclatée... - Page 12 Liste des pièces Description Qté Description Qté Poteau droit Pince à ressort Poteau droit gauche Petite pince à ressort Poutre de connexion Bouchon carré Cadre de support Vis à tête Allen M10 * 15 principal Stabilisateur avant Bouchon en plastique φ25 Support pour barre Capuchon d'extrémité...
- Page 13 Étape d’assemblage 1 A. Connectez la poutre de connexion (3) au poteau droit (1). Alignez leurs trous et faites-les joints avec le boulon de carrosserie (41) et la pièce de raccordement (16), la rondelle courbe (48) et l’écrou en nylon (47). Ne fixez pas l'écrou immédiatement.
- Page 14 Étape d’assemblage 2 A. 1.Insérez la tige du support de réglage (14) dans les trous inférieurs du poteau de deux sièges (13) qui est inférieur mais horizontal. Tenant les trois parties, faire les trous supérieurs des poteaux de siège (13) dans la tige avant soudée sur le cadre de support principal (4), puis attachez-les avec deux rondelles (46) et l’écrou en nylon (47).
-
Page 15: Instructions D'exercice
Etape d’assemblage 3 A. Alignez les trous du coudière (21) et du poteau de coude (10), serrez-les avec 2 vis à tête alien (40) et des rondelles (49). B. Insérez le poteau de coude (10) dans le cadre de support principal (4) . Après avoir aligné... - Page 16 minutes, puis faites quelques exercices d'étirement comme indiqué ci-dessous. Chaque étirement doit être tenu pendant environ 30 secondes, ne forcez pas et ne secouez pas vos muscles dans un étirement - si ça fait mal, ARRÊTEZ. CUISSE FLEXION INTÉRIEURE AVANT VEAU/ACHILLE FLEXION LATERALE CUISSE EXTÉRIEURE...
Need help?
Do you have a question about the A91-086 and is the answer not in the manual?
Questions and answers