Table of Contents
Advertisement
Quick Links
Advertisement
Table of Contents

Subscribe to Our Youtube Channel
Related Manuals for Avermedia AVerDiGi

Summary of Contents for Avermedia AVerDiGi
- Page 1 AVerDiGi System Controller User Manual...
- Page 2 TECHNOLOGIES, Inc. All rights reserved. No part of this publication may be reproduced, transmitted, transcribed, stored in a retrieval system, or translated into any language in any form by any means without the written permission of AVerMedia TECHNOLOGIES, Inc.
-
Page 3: Table Of Contents
TABLE OF CONTENTS INTRODUCTION ........................1 Package Contents ........................... 1 Hardware Installation........................1 Using RS-232 Interface to Connect a DVR server ................1 Using RS485 Interface to Connect multiple DVRs ................1 Using the System Controller for the First Time................. 2 To Setup DVR ID in DVR Server.................... -
Page 4: Introduction
Introduction The AVerDiGi System Controller is an optional equipment that provideds user an easy way to operate DVR server. The AVerDiGi System Controller can support up to 99 DVR servers. Package Contents (1) System Controller unit (4) Terminal block (RS485) -
Page 5: Using The System Controller For The First Time
System Controller DVR Server 01 RS-232 RS-485 RS-485 to RS-232 Converter RJ-45 Cable (not supplied) RS-232 RS-485 DVR Server N RS-485 to RS-232 Converter Power (not supplied) Outlet RS-485 Terminal blolck Power Cord Power Adaptor Using the System Controller for the First Time For the first time using the System Controller, please setup DVR ID on DVR server and select DVR ID on System Controller in order to make correct connection between DVR server and System Controller. -
Page 6: To Select Dvr Id In System Controller
To Select DVR ID in System Controller When the System Controller is powered on, press DVR ID button Enter the DVR server ID number by pressing the Number button. For example: ID is 1, press number button 0 and 1. Press Enter button to confirm. If user wants to control another DVR server, just press DVR ID button and enter the DVR server ID. -
Page 7: System
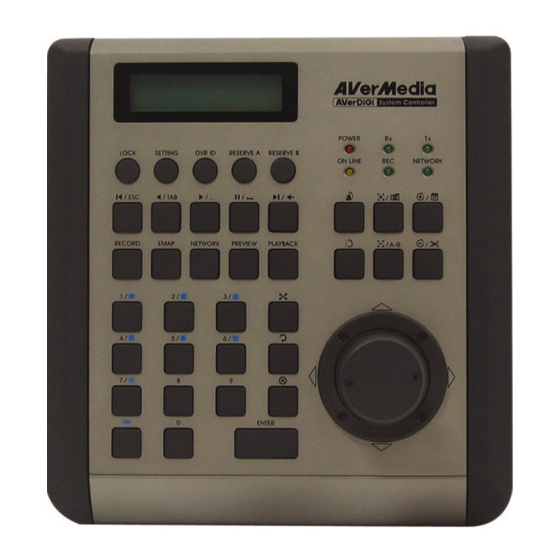
POWER LOCK SETTING DVR ID RESERVE A RESERVE B ON LINE NETWORK / ESC / TAB RECORD EMAP NETWORK PREVIEW PLAYBACK ENTER System Controller Panel figure System Function Description LOCK To lock panel buttons. Enter the password (default is 123456) and press Enter button to un-lock. -
Page 8: Preview Mode (Default Mode)
Function Description ENTER An enter key for confirming a action or saving setting POWER Light up when unit is on ON LINE Light on indicates communication between System Controller and DVR server Light up when unit is receiving the signal from DVR server Light up when unit is sending the signal to DVR server Light up when the DVR is recording The REC indicator only supports in RS-232 connection... -
Page 9: Playback Mode
Function Description channel 5 Switch to a 8-split screen mode channel 6 Switch to a 13-split screen mode channel 7 Switch to a 32-split screen mode channel 8 Channel 9 Number Button 0 - To select the channel 1~9, press 0 + channel number (1~9) or press channel (1~9) and wait about 1 second. - Page 10 Function Description Play the recorded video file Pause playing the recorded video file Go to the end of the recorded video file in Playback mode To enter function mode channel 1 Switch to a 1 channel view mode channel 2 Switch to a 4-split screen mode channel 3 Switch to a 9-split screen mode...
-
Page 11: E-Map Windows
Function Description Select the date on the calendar and the time from 00 to 23 to where to start playing the recorded video file in Playback. Move Joystick to left and right to select day and up and down to select hour. Keep a portion of the recorded video in Playback mode Save the segmented file in *.mpg, *.avi, or *.dvr format in Playback mode RIGHT: Play the recorded video file at the speed of 2x, 4x, 8x, 16x or 32x... -
Page 12: Ptz Control (Preview Mode Only)
Function Description Left / Right: To switch to different Camera view PTZ Control (Preview mode only) Function Description Adjust the focus in manually To speed up the movement of camera Adjust the focus out manually To speed down the movement of camera Move to PTZ preset position - Move to PTZ preset position 1~9, press + number button (1~9) and wait about 1... -
Page 13: Dialog Box
Function Description Keyboard Number button 7 Keyboard Number button 8 Keyboard Number button 9 Keyboard Number button 0 UP / DOWN Tilt up and down LEFT / RIGHT Pan left and right Turn Right: Zoom in the image Turn Left: Zoom out the image Dialog Box Function Description... -
Page 14: Cm3000 Application
Function Description Keyboard Number button 6 Keyboard Number button 7 Keyboard Number button 8 Keyboard Number button 0 ENTER An enter key for confirming a action or saving setting UP / DOWN / As arrow keys ↑↓← ↑↓← → → → → on keyboard ↑↓←... - Page 15 Function Description Number button 2 Number button 3 Number button 4 Number button 5 Number button 6 Number button 7 Number button 8 Number button 9 Number Button 0 PTZ Control Function Description Adjust the focus in manually To speed up the movement of camera Adjust the focus out manually To speed down the movement of camera Move to PTZ preset position...
- Page 16 Function Description - Please press button each time before press PTZ preset position number button. Keyboard Number button 1 Keyboard Number button 2 Keyboard Number button 3 Keyboard Number button 4 Keyboard Number button 5 Keyboard Number button 6 Keyboard Number button 7 Keyboard Number button 8 Keyboard Number button 9 Keyboard Number button 0...
Need help?
Do you have a question about the AVerDiGi and is the answer not in the manual?
Questions and answers