
Related Manuals for LeapFrog Interactive Learning Easel


Summary of Contents for LeapFrog Interactive Learning Easel
- Page 1 Interactive Learning Easel Interactive Learning Easel Interactive Learning Easel Interactive Learning Easel Instruction Manual This manual contains important information. Please save it for future reference.
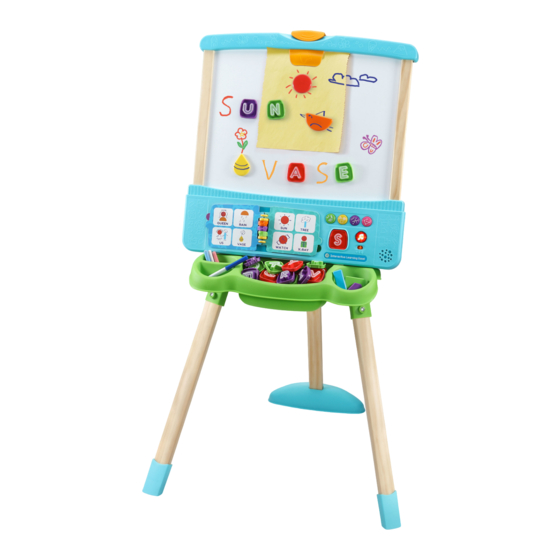
- Page 2 INTRODUCTION Thank you for purchasing the Interactive Learning Easel! This 2-in-1 blackboard/whiteboard easel comes with 26 letter tiles, six shape tiles, chalk and an erasable marker. The interactive learning panel teaches letters and encourages creative play through drawing. The touch-sensitive pictures in the book describe how to use the magnetic shape tiles to draw pictures.
- Page 3 INCLUDED IN THE PACKAGE Connector (1) Storage Tray (1/2) A-Frame (1/2) Connector (2) Learning Panel (3) Upper Rear Leg (4) Brace (5)
- Page 4 Lower Front Leg (7) Lower Rear Leg Lower Front Leg (6) 10 Screws 6 Bolts Rear Leg Base (8) 6 Nuts...
- Page 5 Whiteboard/ 26 Magnetic 6 Magnetic Shape Blackboard Letter Tiles Tiles 1 Erasable Marker 3 Chalk Pieces • Quick Start Guide...
- Page 6 WARNING All packing materials such as tape, plastic sheets, packaging locks, removable tags, cable ties, cords and packaging screws are not part of this toy and should be discarded for your child’s safety. NOTE Please save this Instruction Manual as it contains important information.
- Page 7 ASSEMBLY With the Interactive Learning Easel, safety comes first. To ensure your child’s safety, adult assembly is required. ADULT ASSEMBLY REQUIRED: Tool needed: Phillips-head screwdriver (not included). Note: Numbers referenced below refer to the moulded plastic numbers on assembly parts. See INCLUDED IN THE PACKAGE pages for reference.
- Page 8 3. Slide Connector 1 into the slot formed by the aligned pieces A-Frame 1 and Storage Tray 1 with the number 1 on Connector 1 facing up. 4. Use three Screws and your Phillips- head screwdriver to secure. 5. Slide Connector 2 into the slot f o r m e d by t h e a l i g n e d p i e ce s A-Frame 2 and Storage Tray 2 with the number 2 on Connector 2 facing...
- Page 9 7. Slide the four studs on the back of the Learning Panel 3 into the slots on the A-Frame 1/2. The Learning Panel 3 will rest in the slots until it is secured. 8. Secure Learning Panel 3 to A-Frame 1/2 with two Screws on each side as shown.
- Page 10 11. Firmly snap the other end of Brace 5 into the yellow slot in the back of Upper Rear Leg 4 as shown. (Note: Once inserted, this piece cannot be removed.) You have now assembled the upper easel. 12. Lay the assembled upper easel face down on a flat surface.
- Page 11 15. Fit Lower Rear Leg into the top of A-Frame 1/2 with the curved side of the leg facing up. Secure with two Nuts and two Bolts, inserting the Nuts from the top. 16. Secure the Lower Rear Leg to the Upper Rear Leg 4 with two Nuts and two Bolts.
- Page 12 19. Slide the Board Clip Release switch to the right and while holding it, lift the Board Clip. 20. Position the Whiteboard/Blackboard under the Board Clip. Release the clip to secure the Whiteboard/ B l a c k b o a r d i n p l a c e . R e p e a t these steps when switching from whiteboard to blackboard.
- Page 13 GETTING STARTED BATTERY REMOVAL AND INSTALLATION 1. Make sure the unit is turned Off. 2. Find the battery cover located on the back of the unit, use a screwdriver to loosen the screw, and then open the battery cover. 3. If used batteries are present, remove these batteries from the unit by pulling up on one end of each battery.
- Page 14 IMPORTANT: BATTERY INFORMATION • Insert batteries with the correct polarity (+ and -). • Do not mix old and new batteries. • Do not mix alkaline, standard (carbon-zinc) or rechargeable batteries. • Only batteries of the same or equivalent type as recommended are to be used.
- Page 15 The solid bar indicates that the product was placed on the market after 13th August, 2005. Help protect the environment by disposing of your product or batteries responsibly. LeapFrog cares for the planet. ® Care for the environment and give your toy a second life by disposing of it at a small electricals collection point so all its materials can be recycled.
- Page 16 PRODUCT FEATURES 1. Off/Low/High Volume Switch To turn the unit On, slide the Off/Low/ High Volume Switch to the Low or High position. To turn the unit Off, slide the Off/Low/High Volume Switch to the Off position. 2. Double-sided Whiteboard/Blackboard Select either the whiteboard or blackboard side of the easel to explore a variety of activities.
- Page 17 3. 26 Magnetic Letter Tiles and Letter Tile Reader Insert any of the 26 magnetic Letter Tiles into the Letter Tile Reader to hear letter names, sounds and a word starting with that letter. Press to explore colours and vocabulary. Then remove the tiles to hear drawing and writing prompts.
- Page 18 6. Light-Up Music Button Press to hear four learning songs about the alphabet, colours, shapes and creativity while the lights flash along. 7. Erasable Marker and Three Chalk Pieces Use the included Erasable Marker for activities on the whiteboard side and to draw directly onto the Six Magnetic Shape Tiles.
- Page 19 10. Automatic Shut-Off To preserve battery life, the Interactive Learning Easel will automatically shut off after approximately 90 seconds without input. The unit can be turned on again by turning a book page, pressing any of the five buttons, or flipping the board over.
- Page 20 SONG LYRICS Song 1 Grab your chalk and marker, And let’s go! Use your imagination, And let the art flow! Song 2 Express yourself, Create and play! Make it silly or smart, You can do it your way. Draw a line, Up and down.
- Page 21 CARE & MAINTENANCE 1. Keep the unit clean by wiping it with a slightly damp cloth. 2. Keep the unit out of direct sunlight and away from any direct heat sources. 3. Remove the batteries if the unit will not be in use for an extended period of time.
- Page 22 CONSUMER SERVICES Creating and developing LeapFrog products is ® accompanied by a responsibility that we at LeapFrog take ® very seriously. We make every effort to ensure the accuracy of the information, which forms the value of our products. However, errors sometimes can occur. It is important for you...
- Page 23 Visit our website for more information about our products, downloads, resources and more. leapfrog.com LeapFrog Enterprises, Inc., A subsidiary of VTech Holdings Limited. TM & © 2022 LeapFrog Enterprises, Inc. All rights reserved. IM-615300-001 Version:0...
Need help?
Do you have a question about the Interactive Learning Easel and is the answer not in the manual?
Questions and answers