
Summary of Contents for Mobil in Time MCU-010
- Page 1 MCU – Mobile Control Unit MCU-010 Quick instructions for the operator Read the quick instructions before beginning any work! MCU Quick Instructions Version 1.1 / 09.2018 / EN...
-
Page 2: Table Of Contents
Contents Important notes ......................4 Notes to the quick instructions ................4 General .......................... 5 Physical components ....................6 Safety information ....................6 Components on the front ..................7 Components on the back ..................8 Operation ........................9 Switching on the MCU ..................9 Insert SIM card (not included in scope of delivery) .......... - Page 3 This brochure is part of the documentation for the Mobile Control Unit - MCU Copyright All rights reserved. The complete or partial reproduction or copying of these quick instructions is not permitted without the prior written approval of Mobil in Time Deutschland GmbH. Legal notice Mobil in Time Deutschland GmbH...
-
Page 4: Important Notes
Important notes 1.1 Notes to the quick instructions These quick instructions form part of the operating instructions - Mobile Electric Heating. Read these quick instructions carefully before starting the Mobile Control Unit (MCU). 1. Read these quick instructions. 2. Keep these quick instructions in a safe place. 3. -
Page 5: General
General Thank you for choosing the MCU-010 and for your confidence in the quality of our products that goes with it. The MCU-010 circuit board consists of hardware and firmware and serves the purpose of automated functional heating. The purpose of the MCU-010 circuit board is to run through heating cycles, to be adjusted by the end-user, over a defined length of time. -
Page 6: Physical Components
3.1 Safety information WARNING: Before starting to set up and use the MCU-010 board for the first time, read the important safety information, instructions for use and legal notices. WARNING: The MCU-010 is not intended for use in a moist environment or in the rain. -
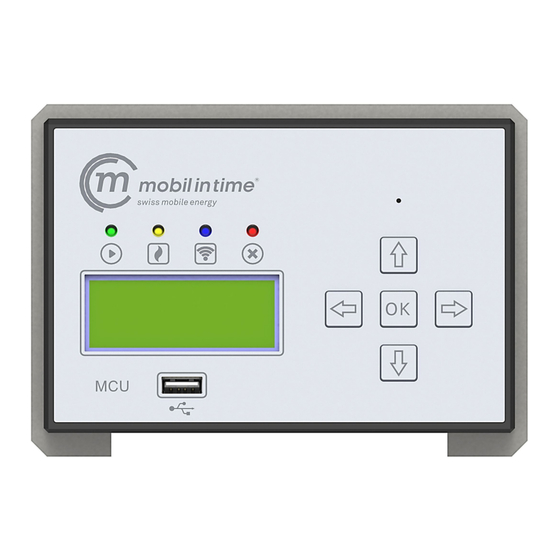
Page 7: Components On The Front
3.2 Components on the front Components Description 1) LED green Lights up as soon as a heating program is active. 2) LED orange Lights up as soon as the heating is running. 3) LED blue Blinks if reception is poor. Lights continuously if reception is sufficient. -
Page 8: Components On The Back
3.3 Components on the back Components Description 1) Metal mounting bracket The mounting bracket is required for fitting and fixing the MCU. 2) Temperature sensor port The temperature sensor is inserted here. 3) Programming interface This interface is used exclusively for programming purposes. 4) SD card The logs are stored on the SD card. -
Page 9: Operation
Operation 4.1 Switching on the MCU The MCU is automatically started via the button that turns on the electric heater. The start-up screen appears: 23.07.2018 12:34:56 Heating program: ACT: +26°C The start-up screen will always appear automatically after 30 seconds of inactivity. The display will turn dark after 5 minutes of inactivity. -
Page 10: Unlocking The Mcu
23.07.2018 11:34:37 SIM card has been unlocked The reception symbol lights up in blue. If reception is poor, the lamp will blink. 4.3 Unlocking the MCU The password must be entered in order to unlock the MCU. The standard password on delivery is “1234”. -
Page 11: Settings
Settings To open the Settings menu, use the arrow key to go to “Settings” in the main menu, 23.07.2018 11:41:40 Settings and confirm with “OK”: 23.07.2018 11:43:15 Settings menu The arrow keys can be used to call up various functions. 5.1 Display log The heating logs are stored on an internal SD card and can be read through a storage medium with a USB connection (not included in scope of delivery). - Page 12 Important note for your storage medium: At least 100 MB free storage capacity Max. 32 GB of available storage space If no USB stick is inserted in the time specified, the following message appears in the display: 23.07.2018 11:51:06 Error no USB stick Press “OK”.
-
Page 13: Change Date And Time
The USB stick can be removed again. You can read the data on your computer via Excel. After one second, you automatically return to the “Settings” menu item. 5.2 Change date and time The arrow key takes you to the menu item “Change date/time”. The number to be changed is displayed by blinking. -
Page 14: Change Sim Card Pin
23.07.2018 11:59:22 Enter telephone number 1 + _ _ _ _ _ _ _ _ _ _ _ _ _ _ _ _ _ _ _ _ _ Enter the number with the arrow keys Proceed to the next number with the arrow key ... -
Page 15: Enter/Change Password
The arrow key takes you to the menu item “firmware version”. You will find out from Mobil in Time Deutschland GmbH whether there is a new firmware version available. The latest version is always installed in loan units. 23.07.2018... -
Page 16: Standard Programs
Standard programs The MCU has three preinstalled standard heating programs. Standard program 1 (in accordance with EN 1264-4) 25°C 50°C 25°C Standard program 2 (in accordance with Central Association for Parquet and Floor Technology) 25°C 30°C 35°C 40°C 45°C 40°C 35°C 30°C 25°C... - Page 17 You can use the arrow keys to move between the 3 standard programs. You start the standard program selected by pressing the “OK” button. You are asked whether the desired program is to be started. 23.07.2018 14:24:20 Standard program 1 start ...
-
Page 18: User Program
6.1 User program You can use the arrow keys to choose between the settings. 23.07.2018 14:32:46 User program Settings 6.2 Reset all Before restarting the unit, we recommend selecting the setting “Reset all”. 23.07.2018 14:33:09 User program Reset all ... -
Page 19: Set Temperature Periods
Set temperature periods 23.07.2018 14:33:13 temperature periods Days 00 OK Select “OK” and set the days of heating and desired temperature for the desired periods. 23.07.2018 14:40:03 Period: 01 Days 02 Temp: 47°C You can set up to 30 periods with a total of 99 days. ... -
Page 20: Interrupt/End User Program
You can use the arrow keys to choose between “Yes” and “No”. You confirm your selection with “OK”. The user program which you entered previously, will start. The display shows the message “log data saved”. 23.07.2018 14:53:22 Log data saved The display then changes to: 23.07.2018 14:53:23... - Page 21 23.07.2018 14:57:24 Interrupt user program? OK You can use the arrow keys to choose between “Yes” and “No”. You confirm your selection with the “OK”. If the heating program is interrupted, it can be resumed later at the same point. 23.07.2018 14:57:27 23.07.2018...
-
Page 22: Error Messages
Error messages If a non-critical error occurs, the following error message is displayed: 23.07.2018 14:59:27 Heating: error Day: 99 of: 99 periods: 99 ACT: +25°C SETTING: 25°C If you press “OK”, the following message appears: 23.07.2018 15:02:27 Heating: error OK Press “OK”. -
Page 23: Mcu Error Codes
8.1 MCU error codes Error: Max. temperature of 95°C reached. Error: Temperature sensor must be checked. Error: Actual temperature permanently 5°C below temperature setting Error: Power failure Maximum power outage time exceeded SD card error Unknown 8.2 MCU status enquiry by SMS Conditions for status enquiry by SMS: MCU switched on SIM card with credit inserted... -
Page 24: Notes
The program has been interrupted by the user The program is being resumed Standard program 1 has been started Standard program 2 has been started Standard program 3 has been started The user program has been started Further heating terminated by the user Notes MCU Quick Instructions Version 1.1 / 09.2018 / EN...
Need help?
Do you have a question about the MCU-010 and is the answer not in the manual?
Questions and answers