
Related Manuals for FIMI TX10

Summary of Contents for FIMI TX10
- Page 1 FIMI TX10 User Manual & Disclaimer Please read the user manual &Disclaimer carefully before using and keep it for future reference.
-
Page 2: Disclaimer And Warning
FIMI Technology will not bear any responsibility. 5. FIMI Technology will not bear any responsibility for any violation of laws and regulations that occurs directly or indirectly by the user using this product. - Page 3 6. Do not modify this product without authorization, and if resulting in property loss and personal injury, FIMI Technology will not bear any compensation and legal responsibility. 7. When the propeller rotates at high speed, it may cause serious injury to the human body. To ensure user safety, please turn off the power of the drone when operating the propellers.
-
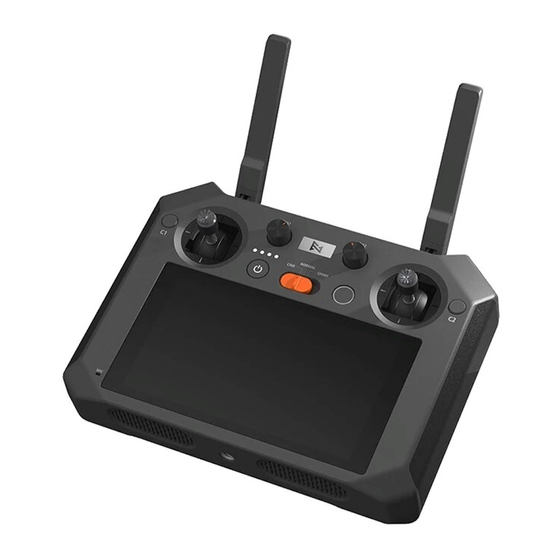
Page 4: Product Description
The Fimi remote control with screen has built-in third-generation RokLink high-definition digital image transmission system, which is compatible with FIMI X8 SE 2022 and subsequent drone products.It can achieve a control distance of up to 10km at 1080p 30 FPS with the transmission low delay.The remote control comes with a built-in 5.5-inch of 1920x1080p touch screen, the highest brightness can reach... - Page 5 Buttons and functionality of the remote control...
- Page 6 17 18 20 21...
- Page 7 1. Custom button: The system defaults one click to return to the menu, double click to return to the main interface (Home button function), and long press for 2 seconds to display all the applications in use. (Identifier: C1) 2. Antenna: Transmit control signal and video image 3.
- Page 8 13. Airplane mode switch button: Three modes, from left to right: smooth, normal, sport 14. Power button: Short press then long press for 1.5 seconds to turn on the remote control. When the remote control is on, press it to turn on/off the screen; when the power is on, long press for 1.5 seconds to shutdown/restart 15.
- Page 9 25. Custom button: Mark C5 26. Joystick compartment : Joystick can be disassembled and stored here (the joystick needs to be taken out from here for the first use) 27. Spare battery: Spare battery increases the battery life of the remote control (spare battery is optional) 28.
- Page 10 Basic parameter information Image transmission Operating frequency 2400-2483MHz The maximum control distance 10 Kilometers Storage space ROM 16GB+ expandable (up to 128G) All telecom (China): SIM card LTE-FDD B1/3/5/8 LTE-TDD B34/38/39/40/41 WCDMA B1/8 Video output interface HDMI Audio output interface Standard 3.5mm audio port Built-in battery Li-ion battery (4800mAh-7.2V)
- Page 11 Charging ambient temperature 0-40℃ Working environment temperature -10-60℃ GNSS GPS,GLONASS,BEIDOU Charge and view battery level Please fully charge the remote control before using it for the first time. The built-in battery of the remote control will enter the sleep mode as the factory default , please charge and activate it before use.
-
Page 12: Preparation Before Use
Check the battery: Short press the power button when the power is off. Power on: Short press then long press for 1.5 seconds to turn on the remote control. Power off: Long press 1.5 seconds to pop up the shutdown option, click the shutdown option to shut down. Battery level High Preparation before use... - Page 13 In order to ensure the best transmission, the angle of the antenna should be in accordance with the flight environments. Activation When using the remote control for the first time, please follow the instructions on the screen. Connect the drone In the standard package, the drone and the remote control are already paired by default.
- Page 14 Pairing After turning on the drone and the remote control, long press the pairing button of the drone until the tail light goes off, the drone enters the pairing state, and then long press the remote control C1+C2 at the same time. After pressing the buttons for more than 5 seconds, the remote control enters the frequency pairing state.
- Page 15 Forward Counter- Mode 2 Clockwise Left Right clockwise Down Backward Right stick Left stick Forward Counter- Mode 3 Left Right Clockwise clockwise Backward Down Left stick Right stick...
- Page 16 3. FIMI Navi 2.0 After downloading and installing the APP, register a FIMI user account and log in, click to enter the flight interface, you can also use it without logging in. Note: You will not be able to enjoy some functions without logging in, such as flight recording, etc.
- Page 17 After launching the APP, click "Enter Device" to enter the main interface of the APP, and the option box "Do you want to allow Fimi Navi2.0 to access rc? Click "OK" to connect. Do you want to allow Fimi Navi2.0 to access rc?
- Page 18 Image transmission interface...
- Page 19 1. Drone status In flight: Displays the current status of the drone GPS: Displays the current flight mode of the drone, including GPS, VPU, ATTI S: Displays the current sport mode of the drone :Click to return to the interface 2.
- Page 20 4. Camera operation 3:26: Video duration : Switch the current mode of the camera between taking photos or video recording : Take a photo or start video recording, or stop video recording : Media library, enter to download or view the video and photos stored on the Micro SD card inserted in the aircraft : Displays Current zoom factor or adjust zoom 5.
- Page 21 : Flying around the point : Pointing flight : Selfie flight (vertical selfie, customized selfie) : Helical flight : SAR mode : Aerial mode : Tripod : Course lock : Fixed wing 6. Image parameters and settings : For more parameter settings of the camera, click to set the video or photo modes, resolution, image sizes, white balance, styles, etc : Displays the remaining capacity of the SD card and the total capacity of the SD card 4K/30: The current video resolution/frame rate in video mode, or the image size in photo mode...
- Page 22 : Displays the current shutter parameters 7. Accessory module - megaphone and release-and-drop module : Open the megaphone function, click to enter to use real-time shouting or other functions : Open the release-and-drop function, click to enter the control module to lock and unlock 8.
- Page 23 4. Remote control setups Remote control calibration:Click "Calibrate" on the remote control setting interface to enter the remote control calibration interface, and follow the corresponding prompts to complete the calibration. Remote control customization: You can customize the shortcut functions of the corresponding buttons and knobs on the remote control.
-
Page 25: Application Upgrade
Application upgrade To upgrade the APP through the Internet, open the FIMI Navi2.0 APP, click "Upgrade Now" to enter the download and upgrade interface. *If there is a new version of the APP, the upgrade entry will pop up on... - Page 26 5. Peripheral port/slot HDMI TX10 has the function to connect to an external HDMI display, which can synchronize the screen image to the display in real time. The port is a standard HDMI A type, which supports up to 1920*1080@60fps image output.
- Page 27 2. When using a memory card, try to avoid directly taking out the card. 3. It is best not to use the flash memory card to write or read data when the TX10 remote controller is about to run out of battery, or when the battery level is low.
-
Page 28: Audio Jack
SD card". Please do not take out the memory card during the process of formatting, it may cause card abnormality. Audio jack TX10 has audio input and output function, the interface is a standard 3.5mm audio jack, and supports external microphone audio input. WIFI... -
Page 29: Operating System
6. Operating system Language selection at first boot :Click to enter language selection :Click to enter the main interface... - Page 31 System desktop...
- Page 32 1. Time View the current time. 2. USB Connect the computer via USB cable to transfer files, and copy the files on the remote control to the computer. 3. Network signal status indication Displays the network signal strength after connecting to Wi-Fi or inserting a SIM card. It can be turned on or off using the drop-down menu or through system settings.
-
Page 33: Search Apps
5. Search apps Click to enter the search bar. 6. Interface slider When there are many applications in the interface, pull down the slider to display the remaining applications. - Page 34 Quick Panel Interface Pull down from the top of the screen to enter the Quick Panel interface.
-
Page 35: Navigation Bar
Navigation bar Swipe left on the far right side of the screen to pop up the navigation bar. -
Page 36: Firmware Upgrade
Power on the remote control, and make sure that remote control’s network connection is normal. Open the FIMI Navi2.0 App, if the remote control has a version update, the upgrade entry will pop up in the status bar of the App interface, click to enter.
Need help?
Do you have a question about the TX10 and is the answer not in the manual?
Questions and answers
Здравствуйте. У пульта TX10 есть много пользовательских и специальных кнопок. Не могли бы Вы дать информацию о некоторых из них? А именно: DIP-переключатели С3-С4, кнопки С5-С6, ролик С8, а также AUX1-AUX2. Для чего нужны и как работают? Спасибо. С уважением.
On the FIMI TX10 remote control:
- Buttons C3 and C4: C3 is undefined and cannot be used with the current app. C4 can be customized.
- Buttons C5 and C6: These can be customized.
- AUX1 and AUX2 (dials): These dials currently do nothing.
- Dial C8: Not mentioned in the context.
No further functions or operations are described for these controls.
This answer is automatically generated
Добрый день. У меня Fimi 2022 с картой памяти и я записываю на неё. В пульте ТХ10 тоже есть слот под карту памяти. Как осуществляется запись на карту памяти пульта ? Я могу выбирать между ними? На что лучше делать фото и видео? Разъясните, пожалуйста.
Recording to the memory card in the FIMI TX10 remote control requires proper handling of the card. Avoid removing it while in use, ensure enough space is available, and do not use it when the TX10 battery is low. You must also avoid cards previously used in non-compatible devices and select "For Portable Storage Device" when inserting the card after a system refresh.
There is no clear information provided about choosing between recording on the FIMI 2022 and the TX10. The better device for taking photos and videos is not specified in the context.
Therefore, based on the available information, the TX10 supports recording if the memory card is correctly used, but it is not confirmed whether you can choose between devices or which one is better for media capture.
This answer is automatically generated