
Related Manuals for SCHWIND ESIRIS

Summary of Contents for SCHWIND ESIRIS
- Page 1 EXCIMERLASER ESIRIS SERVICE MANUAL Schwind GmbH Mainparkstrasse 6-10 D-63801 Kleinostheim...
- Page 2 ___________________________________________________________________________ _______ ESIRIS - - Version 1.0 Date: 22.09.00...
-
Page 3: Table Of Contents
:..........................40 ENU ADJUSTMENT Laser:..............................40 (TSC)....................44 ECHNICAL ECUTITY HECK 5. UNPACKING AND CONTROLLING ....................45 ........................46 UTTING INTO OPERATION .............................. 47 ARRANTY 6. DISMANTLING OF THE ESIRIS-LASERS ..................48 ___________________________________________________________________________ _______ ESIRIS - - Version 1.0 Date: 22.09.00... - Page 4 DISMANTLE MONITOR AND KEYBOARD..................59 DISCONNECTION OF THE FLUENCE DETECTOR................61 ....................... 61 ISMANTLING THE ATIENT ..........................62 ISMANTLING ASER 7 INSTALLATION OF THE ESIRIS-LASER ..................63 .......................... 63 SSEMBLING THE ASER ......................63 SSEMBLING OF THE ATIENT , CAN-B .
-
Page 5: Security Of Device (Laser Beam)
1. Security of Device (Laser beam) General The SCHWIND ESIRIS is working with a pulsed UV-Laser. The Laser belongs to class 4, which is the one with the highest danger potential. In any case, exposition of eye or skin through direct or scattered laser beams has to be avoided. A professional instrument maintenance - done in the planned intervals - secures that unintended beams can not be exposed of the unit. -
Page 6: Alarm Shields And Type Shield
Persons, not used with the lasers, have to be informed about possible risks! Alarm Shields and Type Shield Beam output is marked with laser warning signs..1.2. Warnschilder They are looking as following: ___________________________________________________________________________ _______ ESIRIS - - Version 1.0 Date: 22.09.00... -
Page 7: Accessible Beam Area
Protection level of glasses depends on maximum existing middle output density (at max. pulse following frequency) or the maximal energy density. These values are 5 x 10 ___________________________________________________________________________ _______ ESIRIS - - Version 1.0 Date: 22.09.00... -
Page 8: Working Gas
For service demands, there is a pressure gas bottle with helium, stored inside the gas containment too. ___________________________________________________________________________ _______ ESIRIS - - Version 1.0 Date: 22.09.00... -
Page 9: Declaration Of Manufacturer (Mpg)
Declaration of Manufacturer (MPG) The device has been developed according to the Medical Device Regulations MPG. The named TÜV-office Munich mark: 0123 manufacturer Co. Herbert Schwind GmbH is allowed to produce laser devices for medicine purposes and to put them into circulation. -
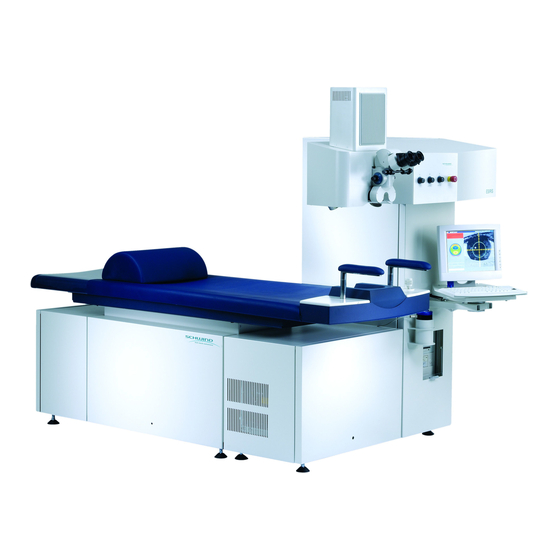
Page 10: Description
• Wavelength 635 nm • Power (middle, beam output) < 100 µW • Mode continued Fixationlaser Diodelaser • Wavelength 650 nm • Power (average, beam output) < 10 µW • Mode pulsed ___________________________________________________________________________ _______ ESIRIS - - Version 1.0 Date: 22.09.00... - Page 11 16 A, sluggish, C-character • Frequency 50 Hz/60 Hz (switchable) • Connecting Plug 3 pole CEKON (blue) Dimensions and Weight • Floor Space see next chapter • Total weight appr. 400 kg ___________________________________________________________________________ _______ ESIRIS - - Version 1.0 Date: 22.09.00...
-
Page 12: Excimer-Laser
10 x 10 impulses or after 2-3 days. The ‘OPTEX’ laser used with the SCHWIND ESIRIS is produced by Lambda Physik, Goettingen. It is a very compact unit, which is optimised in reliability and low gas consumption. -
Page 13: Gas Supply
13 of Gas Supply The noble gas mixture has to be received directly by SCHWIND or the responsible SCHWIND dealer, because only by this purity ranks and strictly check criterions are guaranteed. Otherwise damages to the system could be coursed. This is to fix into a Service- and Maintenance-Agreement. -
Page 14: Delivery System
The light is directly provided from a ring formed positioning of the lightening end of the fiber below the beam output opening. ___________________________________________________________________________ _______ ESIRIS - - Version 1.0 Date: 22.09.00... -
Page 15: Controlling
Monitor and using keyboard are located at the front-wall of the ESIRIS. The controller can easily interact with the SCHWIND ESIRIS through input keyboard and monitor. Inputs into the computer are menu controlled, so that input mistakes can be avoided mostly. - Page 16 To avoid a slow loss of nitrogen through little leaks at the valve of the bottle, it should be closed, while the ESIRIS is not in use. Often, the above mentioned message appears, when opening of the valve had been forgotten.
-
Page 17: Installation Requirements And Preparations
Working Room The room, where ESIRIS will be installed, should have a minimum of 3 x 4 m (12 m²). At the outer side of the entrance door, a laser warning lamp and the official laser warning symbol have to be installed. The warning lamp has to lighten, during the laser is in use. -
Page 18: Dimensions Esiris
18 of Dimensions ESIRIS Picture 2: Dimenstions ESIRIS upside ___________________________________________________________________________ _______ ESIRIS - - Version 1.0 Date: 22.09.00... -
Page 19: Input Requirements
19 of Picture 3: Dimensions ESIRIS front Picture 4: Dimensions ESIRIS side Input Requirements SCHWIND ESIRIS needs as electrical input. Electric connections 1,2 kVA - Power supply voltage 230 V, 1 phase - Fuse protection 16 A, slow; C-characteristic - Frequency... -
Page 20: Installation And Room Preparations For The Installation
• No. of supporting feet for the patient bed: 4 • Door width: min. 80 cm • Floor covering: PVC or stable, vibration free underground Installation Requirements • Stable, unyielding vibration free underground (no carpet) ___________________________________________________________________________ _______ ESIRIS - - Version 1.0 Date: 22.09.00... -
Page 21: Laser Warning Lamp
• An air drier is absolutely necessary in countries with an humidity of more than 60 % • Voltage constant provider ( ~ 230 Volt ± 10 %) • The ESIRIS laser is operated with a premix gas mixture, with is stored inside the laser. Laser warning lamp •... -
Page 22: Delivery
A storage of the boxes outside has to be avoided. It is recommended to unpack the boxes immediately after receipt and to check the goods for damage and completeness. Inform SCHWIND or your distributor, that you have received the device, in order to organise visit of a service technician/engineer for the installation. -
Page 23: Software Description By Service Login
4. Software description by Service Login The following chapter gives you a description of the service software functions in the ESIRIS software. By using the service password, the service get following main menu with the pull-down menu Extra and Service. -
Page 24: Menu Parameter
Schwind and the surgeon. Picture 8: parameter menu General: In this section the user can change the minimum and maxium treatment diameter and the maximum ablation depth. ___________________________________________________________________________ _______ ESIRIS - - Version 1.0 Date: 22.09.00... -
Page 25: Distributor Adress
Distributor adress By selecting the menu distributor adress the service can store the adress of the manufacturer Schwind or the distributor. This is interesting to show the user, who is responsible for gas orders or service cases. Everytime, when something is happening or necessary the software will display the adress on the screen. - Page 26 26 of Picture 9: Distributor adress ___________________________________________________________________________ _______ ESIRIS - - Version 1.0 Date: 22.09.00...
-
Page 27: Menu Service
Menu Service Picture 10: Service menu In this menu the service can select following items: !"Laser !"Scanner !"Input / output !"Gascontainment !"Adjustment !"TSC ___________________________________________________________________________ _______ ESIRIS - - Version 1.0 Date: 22.09.00... - Page 28 28 of On the next pages all menus will be explained in detail. ___________________________________________________________________________ _______ ESIRIS - - Version 1.0 Date: 22.09.00...
-
Page 29: Menu Laser
On the top the current pressure in the laser tube will be displayed. Change laser mirror: By pressing this button the mirror change procedure will be activated. Please follow the instructions on the screen, because this is an automatic function. ___________________________________________________________________________ _______ ESIRIS - - Version 1.0 Date: 22.09.00... - Page 30 Pressure is not reached in the present time limit (time out error) Errorcode 8: Heating circuit error (less then 5.8V or more than 7.5V) Errorcode 9: HV charging time exceeded (more than 4.5 ms) ___________________________________________________________________________ _______ ESIRIS - - Version 1.0 Date: 22.09.00...
- Page 31 The Status 2 and Status 3 shows the service the current status of the machine. Status 2: Online: Laser online Laser On: High voltage module activated and ready to be switched on Las Ready: Laser ready for operation (high voltage module can be activated) ___________________________________________________________________________ _______ ESIRIS - - Version 1.0 Date: 22.09.00...
- Page 32 Current energy set value is valid Status 3: MedReady: Reservoir module is activated NewFill: New fill procedure is activated Gpre: Premix gas valve is open GHV: Laser head valve is open ___________________________________________________________________________ _______ ESIRIS - - Version 1.0 Date: 22.09.00...
- Page 33 200 Hz. This setting is no effect of the treatment frequency. Quantity: In the input mask ‘Quantity’ the user can set the number of pulses for the Quantity burst mode. ___________________________________________________________________________ _______ ESIRIS - - Version 1.0 Date: 22.09.00...
- Page 34 In this case you have to use an external powermeter. The energy value, which was measured the user has to input the value in the input mask. Counter: To reset the second pulse counter for the service, press this button. ___________________________________________________________________________ _______ ESIRIS - - Version 1.0 Date: 22.09.00...
-
Page 35: Menu Scanner
Attention: This has to be checked. If the user is changing these parameter, then he has to press the teach-in button Test new position: For checking the reference position, press this button ___________________________________________________________________________ _______ ESIRIS - - Version 1.0 Date: 22.09.00... -
Page 36: Menu Digital Inputs / Outputs
Menu digital inputs / outputs The input / output window shows the current input status. The outputs can be activated by pressing the lamp icon. General: light-green lamps show an activity. ___________________________________________________________________________ _______ ESIRIS - - Version 1.0 Date: 22.09.00... - Page 37 37 of Picture 13: Digital input ___________________________________________________________________________ _______ ESIRIS - - Version 1.0 Date: 22.09.00...
- Page 38 38 of Picture 14: Digital output The Output window shows the switchable functions. By clicking the lamps, the electronic switch is activated. ___________________________________________________________________________ _______ ESIRIS - - Version 1.0 Date: 22.09.00...
-
Page 39: Gascontainment
Premix VE1a closed: Press this button to switch the VE1a valve. Premix VE1b closed: Press this button to switch the VE1b valve. Helium VE2 closed: Press this button to switch the VE2 valve. ___________________________________________________________________________ _______ ESIRIS - - Version 1.0 Date: 22.09.00... -
Page 40: Menu Adjustment
The adjustment menu was created for the service to make a perfect adjustment of the ESIRIS laser. Picture 16: Adjustment menu Laser: Intern trigger: Switch the laser in the internal trigger mode ___________________________________________________________________________ _______ ESIRIS - - Version 1.0 Date: 22.09.00... - Page 41 Measure drift offset: By pressing the button the scanning drift procedure will be activated. Input / output: Shutter: By pressing the button the shutter will be opened N2: By pressing the button the nitrogene will be opened ___________________________________________________________________________ _______ ESIRIS - - Version 1.0 Date: 22.09.00...
- Page 42 Attention: The quality value should be higher than 120. The position POS shows the coordinates of the center of the pupil. (compare it with the red cross-hair. ___________________________________________________________________________ _______ ESIRIS - - Version 1.0 Date: 22.09.00...
- Page 43 By pressing the foot- switch the laser begins to fire. During the movement of the pinhole the intensity which will be displayed in the histogram shows the maximum what is possible. ___________________________________________________________________________ _______ ESIRIS - - Version 1.0 Date: 22.09.00...
-
Page 44: Menu Technical Secutity Check (Tsc)
Menu Technical Secutity Check (TSC) If the user is selecting this menu, he will asked if he had done the TSC. By confirming with the print-button a protocol will be printed out. ___________________________________________________________________________ _______ ESIRIS - - Version 1.0 Date: 22.09.00... -
Page 45: Unpacking And Controlling
45 of 5. Unpacking and Controlling SCHWIND ESIRIS is delivered in three separate crates. Remove and store packing material until installation. Check the components for damage and completeness according to delivery list. The customer is not allowed to perform electrical connection. Disregard would invalid warranty. -
Page 46: Putting Into Operation
Putting into operation Installation and instruction according to MDD 93/42 EWG is done through a service technician/engineer from SCHWIND or authorised distributor. A not permitted installation, starting or use of the device invalidates warranty. The service technician inspects the room for necessary installations (space, voltage connection, security regulations, and ventilation). -
Page 47: Warranty
Further, malfunctions that are not coursed through improper use, are repaired under warranty. Further, wilfully damage is not repaired under warranty. • SCHWIND or distributor have to be informed about damages or malfunctions immediatelly. • Defective parts have to be returned to SCHWIND... -
Page 48: Dismantling Of The Esiris-Lasers
So please follow the instructions below: Removal of gas bottles (premix and helium) Turn on the Esiris laser with the main key-switch and log in with service authority.. 1. Choose menu ‘SERVICE’ > ‘gas containment’ 2. Press button ‘Exchange Gas Premix Bottle‘... - Page 49 49 of ___________________________________________________________________________ _______ ESIRIS - - Version 1.0 Date: 22.09.00...
- Page 50 7. Close helium gas bottle valve and loosen the connection ‘‘pig tail’’ to helium bottle with open-end wrench. 8. Mount screw cab onto helium gas bottle and pig tail. ___________________________________________________________________________ _______ ESIRIS - - Version 1.0 Date: 22.09.00...
- Page 51 Hint: in fact of using an uninterruptable power supply (UPS), switch it off and also switch off the in- and outputbreaker. 11. Disconnect the power cable of Esiris from the UPS. 12. Unplug the optical trigger cable and the optical RS 232 cable from the OpTex laser.
-
Page 52: Unplug Electrical Connections Of Patient Bed, Can-Bus Module And Gascontainment
• 24VDC Gas • 9 pole sub D plug (can Gas M.) • patient bed (T.) • RS232 cable for bed control (com 1) • Remove power cable patient from power socket Esiris ___________________________________________________________________________ _______ ESIRIS - - Version 1.0 Date: 22.09.00... - Page 53 53 of ___________________________________________________________________________ _______ ESIRIS - - Version 1.0 Date: 22.09.00...
-
Page 54: 6.3 Dismantling Of Optical Parts
1. Loosen the 4 screws of the microscope base plate (3 mm allenwrench) 2. After removal of the microscope, tighten the screws again with the hands (to prevent them from loosing) ___________________________________________________________________________ _______ ESIRIS - - Version 1.0 Date: 22.09.00... -
Page 55: Dismantling Ccd Camera Tower
Dismantling CCD camera tower: 1. Remove the 25 pole plug of the CCD camera 2. Loosen the BNC cable of CCD camera 3. Unplug the power cable of the fixation laser ___________________________________________________________________________ _______ ESIRIS - - Version 1.0 Date: 22.09.00... - Page 56 5. After removal of the CCD camera tower, tighten the screws again with the hands (to prevent them from loosing) 6. Cover the opening with tape 7. Protect the CCD camera tower with plastic hood ___________________________________________________________________________ _______ ESIRIS - - Version 1.0 Date: 22.09.00...
-
Page 57: Dismantling Scanning Mirror
57 of 8. Fixate the cables at the optical arm with tape Dismantling Scanning mirror 1. Open the electronic box 2. Unplug both connections of the galvos ___________________________________________________________________________ _______ ESIRIS - - Version 1.0 Date: 22.09.00... - Page 58 4. After removal of scanner, tighten the screws again with the hands (to prevent them from loosing) 5. Protekt both beam openings with tape to protect them against dust. ___________________________________________________________________________ _______ ESIRIS - - Version 1.0 Date: 22.09.00...
-
Page 59: Nitrogen Gas Cylinder
59 of Nitrogen gas cylinder 1. Unplug nitrogen tube at nitrogen management Dismantle Monitor and Keyboard 1. Loosen the 2 screws at the bottom of the monitor table and remove the cover ___________________________________________________________________________ _______ ESIRIS - - Version 1.0 Date: 22.09.00... - Page 60 3. Unplug VGA connector and pull both cables to the front of the system 4. Unplug the power cable (12V DC) for the monitor 5. Remove the monitor and the keyboard ___________________________________________________________________________ _______ ESIRIS - - Version 1.0 Date: 22.09.00...
-
Page 61: Disconnection Of The Fluence Detector
1. Screw up the 4 feet to a height of 14 cm from floor to bottom edge of the rack. 2. Fixate the wheels into the allocated drills. 3. After that carefully rolling out of the patient bed to the back. ___________________________________________________________________________ _______ ESIRIS - - Version 1.0 Date: 22.09.00... -
Page 62: Dismantling Laser
(Danger!!). Screw the feet up to 15 cm distance from the floor to the bottom edge of the laser rack. 2. Fixate the wheels into the allocated drills. ___________________________________________________________________________ _______ ESIRIS - - Version 1.0 Date: 22.09.00... -
Page 63: Installation Of The Esiris-Laser
63 of 7 Installation of the ESIRIS-Laser Assembling the Laser 1. Move the laser rack to the correct place in the room. Then screw down the 4 feet of the rack until the wheels rotate free. 2. Unscrew all 4 wheels and put them away. - Page 64 4. Screw down all the 4 feet to a distance of 8 cm from floor to the bottom edge of the lasser rack. 5. Align the patient bed with a spirit level by minimally moving the feet. Use the accessable three sides of the rack by minimally moving the feet. ___________________________________________________________________________ _______ ESIRIS - - Version 1.0 Date: 22.09.00...
- Page 65 65 of ___________________________________________________________________________ _______ ESIRIS - - Version 1.0 Date: 22.09.00...
-
Page 66: Electrical Connection Of Patient Bed, Can-Bus-Module And Gas-Containment
3. 3. Anschließend Erdungskabel Liege Lasergestell anbringen (13 mm Connect the Ground cable of the bed with the allocated screw at the laser rack (13 mm screw-wrench) ___________________________________________________________________________ _______ ESIRIS - - Version 1.0 Date: 22.09.00... -
Page 67: Assembling Of Monitor And Keyboard
2. Build in the monitor and keyboard in the table and thread in the three cables of monitor, keyboard and power supply. Connect the monitor with the according cables. Then fix the cover with the screws. ___________________________________________________________________________ _______ ESIRIS - - Version 1.0 Date: 22.09.00... -
Page 68: Assembling Of The Laser Beam Delivery System
Connect the monitor cable to the according jack at the back side of the PC. Assembling of the Laser Beam Delivery System Assembling the Microscope: Connect the four screws of the basic plate with the laser arm. ___________________________________________________________________________ _______ ESIRIS - - Version 1.0 Date: 22.09.00... -
Page 69: Assembling Ccd-Camera Tower
4. Remove the four screws for the camrea tower out of the laser arm. 5. Fixate the camera tower with the four screws to the laser arm. 6. Connect the BNC- and the 25-pin SubD-cable to the camera. 7. Connect cable of the fixation-laser. ___________________________________________________________________________ _______ ESIRIS - - Version 1.0 Date: 22.09.00... -
Page 70: Assembling The Scanner
3. Connect the cables of the scanner to the cables that come out of the electronic box. Connection of the Nitrogen Bottle Pull the nitrogen tube through the bottom plate of the laser and connect it to the nitrogen pressure management. ___________________________________________________________________________ _______ ESIRIS - - Version 1.0 Date: 22.09.00... -
Page 71: Assembling Fluence Detector
7. Insert the gas bottles into the gas containment and connect the pig-tails to the according gas bottles. 8. Open the bottles. 9. Control all the connections by using the Snoop. ___________________________________________________________________________ _______ ESIRIS - - Version 1.0 Date: 22.09.00... - Page 72 72 of 10. Connect the ESIRIS to the UPS and switch it on with the main key-switch. Log in with service authority. 11. Choose menu ‘SERVICE’ > ‘gas containment’ 12. Press button ‘Change Premix Bottle‘ 13. Follow the messages on screen until the end of the procedure.
-
Page 73: Alignment Of The Esiris
73 of 8. Alignment of the ESIRIS 1. Check the laser beam behind the Optex and make sure that the laser beam is central to the first mirror. For the check use fax paper. 2. Remove all optical and mechanical parts of the first optic... -
Page 74: Appendix
R 2 = bending radii of cornea after treatment Based on the change of bending on corneal surface, the power of refraction is changed referring to the following formulae: D = (1-n) x ( 1/R2 – 1/R1) ___________________________________________________________________________ _______ ESIRIS - - Version 1.0 Date: 22.09.00... -
Page 75: A2. Correction Of Myopia
R[mm] = (1-n) / D = -376 / D The refractive index of cornea is taken with n = 1.376. The requested correction of refraction D has to be taken in diopters [m -1 ]. ___________________________________________________________________________ _______ ESIRIS - - Version 1.0 Date: 22.09.00... -
Page 76: Appendix B: Beam Delivery System
For a wavelength of 193 nm the optical components have to be well transparently. They are made of synthetic quartz glass. The way of beams inside the SCHWIND ESIRIS is schematically displayed in the following picture. ___________________________________________________________________________ _______ ESIRIS - - Version 1.0... - Page 77 Through this splitting mirror, the patient eye can be watched with a video camera. An automatic observation of the eye movements enables a quick interruption of the treatment procedure, if the patient leaves the fixation. ___________________________________________________________________________ _______ ESIRIS - - Version 1.0 Date: 22.09.00...
- Page 78 With enlarging the distance (driving down the patient bed) the light spots have to move outside. With this fixation of the working distance the patient is moved until the cornea is in the ablation point. ___________________________________________________________________________ _______ ESIRIS - - Version 1.0 Date: 22.09.00...
- Page 79 Picture 15 Gascontainment Picture 16 Adjustment menu Picture 17 Schematic drawing of corneal correction in section Picture 18 Simplified basis calculation (even corneal surface) Myopia Picture 19 3-Dimensional scheme of beam delivery system ___________________________________________________________________________ _______ ESIRIS - - Version 1.0 Date: 22.09.00...
Need help?
Do you have a question about the ESIRIS and is the answer not in the manual?
Questions and answers