Table of Contents
Advertisement
Quick Links
360 degree camera speakerphone
Thank you for purchasing the Panasonic product.
• Please read these instructions before operating this product and retain them for future reference.
• Be sure to read "Safety Precautions" (page 2 to 3) before use.
English
W0722GU0 -FJ
Operating Instructions
Functional Manual
Model No.
For business use
TY-CSP1
DPQP1427ZA/X1
Advertisement
Table of Contents

Subscribe to Our Youtube Channel
Related Manuals for Panasonic TY-CSP1


Summary of Contents for Panasonic TY-CSP1
- Page 1 For business use TY-CSP1 Model No. Thank you for purchasing the Panasonic product. • Please read these instructions before operating this product and retain them for future reference. • Be sure to read “Safety Precautions” (page 2 to 3) before use.
-
Page 2: Table Of Contents
INDEX Safety Precautions Safety Precautions ........... 2 WARNING: Stop using the product immediately when an Operating precautions ........4 abnormality or malfunction occurs. Accessories ............6 Remove the power plug in the case of an Part Names ............7 abnormality. Connection ............ - Page 3 Do not damage the AC adaptor and power plug. Do not pull or hang the connection cables. by damaging, modifying, forcibly bending, twisting, Doing so may cause the product to fall over or drop, pulling or bundling them, bringing them close to heat resulting in an injury.
-
Page 4: Operating Precautions
Operating precautions ■ When transporting this product Do not apply excessive vibrations or impacts during transport. Doing so may damage the internal parts, resulting in a malfunction. ■ To ensure a stable performance in the long term Using the unit for prolonged periods in locations where the temperature and humidity levels are high will cause its parts to deteriorate, resulting in a reduction of its service life. - Page 5 ■ Do not use at loud volumes over long periods. Also check that the volume on the PC is not too loud before connecting. There is a danger of hearing damage. Furthermore, the power turns on when you connect, and if a loud noise is emitted, there is a danger of hearing damage.
-
Page 6: Accessories
Accessories Check that you have the accessories and items shown. AC adaptor (DPVF4350ZA/X1) ....1 (including 3 conversion plugs) USB Type-C to USB Type-C cable (Approx. 1.0 m) (DPVF4351ZA/X1) ..1 USB Type-C to USB Type-A cable (Approx. 1.8 m) (DPVF4352ZA/X1) ..1 Attention •... -
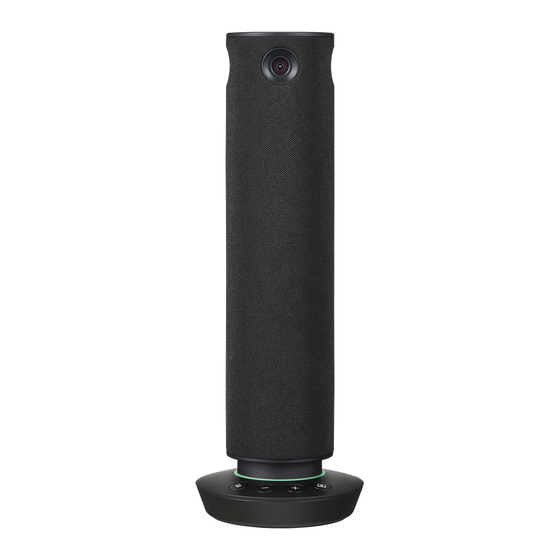
Page 7: Part Names
Part Names ■ On the 360 degree camera speakerphone Microphone Attention • Do not block the microphone hole as this may cause a reduction in performance. Cameras (4 facing 4 directions) Speaker Indicator Audio muting button Speaker volume [ ] button -... -
Page 8: Connection
Connection Carefully read the operating instructions of the PC to be connected to this product before connecting. Turn off the power of each device before connecting cables. Connections with this product Connect the PC and this product with the supplied USB cable. ■... - Page 9 <How to remove the conversion plug> ① While pressing the part marked ※ ※ ② Slide in the direction indicated by the arrow to remove. Note • Do not attempt to separate the AC adaptor and the conversion plug while plugged into the outlet.
-
Page 10: Configuring The Applications On The Pc
Configuring the applications on the PC This section describes how to configure the online meeting application on your PC. Connect this product to a PC. (→ page 8) In the application, set this product as the camera, microphone, and speaker. Camera Microphone Example configuration screen for your application... -
Page 11: Operations With The Buttons On The Main Unit
Operations with the buttons on the main unit Muting the microphone Muting is switched on or off each time you press [ This works in conjunction with the muting features of some online meeting applications. Adjusting speaker volume [-]: Lowers the volume. [+]: Raises the volume. -
Page 12: Video Display Modes
Video display modes Dual View Use when you want to show the whole conference room, while making sure the facial expressions and voice of the speaker are clear. • The focus shifts to the face of the person that has spoken. (to a maximum of 2 people) •... -
Page 13: Surround View
Surround View The 360 degree overall view is split into 2 screens of 180 degrees each. Use when you want to show the expressions on the faces of all participants and give a feel for the atmosphere of the entire meeting room. •... -
Page 14: Transition Of The Display Modes
Video display modes Continued Transition of the display modes When you press the [Mode] button, the modes transition in the order “Dual View” → “Single View” → “Multi View” → “Surround View”. When you press and hold the [Mode] button for 3 seconds or more, the mode transitions to the “Stable View”. -
Page 15: Indicator Displays
Indicator displays Preparing to start up Updating firmware Red LED blinks Red LED blinks slowly (Blinks about 10 times in 10 seconds) (Blinks about 5 times in 10 seconds) Normal circumstances (camera and Device error microphone on) Red LED blinks rapidly Green LED (Blinks about 20 times in 10 seconds) Microphone is muted... -
Page 16: Installation
Installation Installing on a table Place this product on a flat, horizontal location. Attention • Install this product in a stable location where it will not be shaken. The video will shake if the location where the product is installed shakes. •... -
Page 17: Notes On The Application
By running the installer, the PC application is installed on your PC. Note • If there are cases where you are unable to access the product as a USB memory device, such as due to PC settings or security policies, etc., download the application from the following location: https://panasonic.net/cns/prodisplays/ English... -
Page 18: Pressit360 Application
PressIT360 application ■ [Control] menu PressIT360: Displays the connected device name. Displays the images from the cameras of the connected device. Zoom In: Zooms in the camera images. Zoom Out: Zooms out the camera images. Adjusts the camera images vertically and horizontally. Trigger Framing Switch: Changes the image display mode. - Page 19 ■ [Settings] menu Brightness: Sets the brightness. Setting range: 0 to 10 Contrast: Sets the contrast. Setting range: 0 to 10 Sharpness: Sets the sharpness. Setting range: 0 to 6 Saturation: Sets the depth of color. Setting range: 0 to 6 Frequency: Sets the image frequency.
- Page 20 PressIT360 application Continued ■ [Diagnostic Utility] menu Displays the version of the application. Displays the version of the connected device. S/N: Displays the serial number of the connected device. Test Speakerphone: Tests operation of the speaker. FW Update: Updates the firmware on the device. (→...
-
Page 21: Updating The Firmware
Updating the firmware Update of the firmware on TY-CSP1 is done using the PC application (the PressIT360 application). The most recent firmware file and the installer for the PressIT360 application are available on the website for the product, etc. https://panasonic.net/cns/prodisplays/... -
Page 22: Factory Default Settings
Factory default settings Restores the settings on the device to the factory default settings. The following items are initialized. Display mode: Reverts to Dual View. Image quality setting values: All image quality setting values are initialized. Press and hold all 4 buttons for 5 seconds or more. 1 Press and hold the [ ], [+], [-], and [ ] buttons simultaneously for 5 seconds or more. -
Page 23: Specifications
Specifications ■ Main unit Model No. TY-CSP1 Product name 360 degree camera speakerphone Model No. TY-CSP1 Imaging element 1/2.7" 5MP CMOS Field of view 360(H) × 60(V) UVC 1.5 USB video formats 1280 × 720 30fps or 1920 × 1080 30fps... -
Page 24: Software License
Web setting screen of this product. At least three (3) years from delivery of this product, Panasonic Connect Co., Ltd. will give to any third party who contacts us at the contact information provided below, for a charge no more than our cost of physically performing source code distribution, a complete machine-readable copy of the corresponding source code covered under GPL V2.0, LGPL V2.0, LGPL V2.1 or the other licenses with the obligation to do so, as well as the respective copyright... -
Page 25: Fcc Statement
FCC CAUTION: To assure continued compliance, follow the attached installation instructions and use only the provided power supply cord. Any changes or modifications not expressly approved by Panasonic Corp. of North America could void the user’s authority to operate this device. - Page 26 Warranty Service purposes. Model Number Serial Number Panasonic Connect North America Unit of Panasonic Corporation of North America Executive Office : Two Riverfront Plaza, Newark, New Jersey 07102 Panasonic Canada Inc.
Need help?
Do you have a question about the TY-CSP1 and is the answer not in the manual?
Questions and answers