Table of Contents
Advertisement
Quick Links
Advertisement
Table of Contents

Related Manuals for RevAir B07F6WPRHD

Summary of Contents for RevAir B07F6WPRHD
- Page 1 operating manual...
- Page 2 Thank you for purchasing RevAir, the world’s first and only Reverse-Air Dryer. HAVE ANY QUESTIONS? PLEASE REACH OUT Our team loves chatting with customers. To expedite your request, please have your serial number and details of where/when you purchased your device available when contacting Customer Support.
-
Page 3: Table Of Contents
14-15 Before Getting Started How to Rev Your Hair 16-17 New Technology Means New Techniques Troubleshooting RevAir Troubleshooting Indicators Looking After Your RevAir Device Maintaining Your Device Device Care 18-21 Keep It Clean Disposal Information It’s Hard To Say Goodbye Never Be Without •... -
Page 4: Important Safety Instructions
11. Never operate this device if it has a damaged cord or plug, if it is not working correctly, or if it has been dropped, damaged, or dropped into water. Contact RevAir Customer Support at support@myrevair.com or (440) 462-6100 for examination and repair. - Page 5 Air Outlet at least two feet away from walls, fabrics, or any surface. Allow the device to cool completely before storage. CAUTION SURFACES MAY BE HOT! CAUTION SURFACES MAY BE HOT! READ AND SAVE THESE INSTRUCTIONS THIS REVAIR DEVICE IS INTENDED FOR HOUSEHOLD USE ONLY. myrevair.com // 5...
-
Page 6: Operator Instructions
29. Do not unplug by pulling on the cord. To unplug the device, grasp the plug housing, not the cord, and pull. 30. If the supply cord is damaged, it must be replaced or repaired by RevAir, its service agent, or similarly qualified persons to avoid hazard. -
Page 7: User Maintenance Instructions
Button should illuminate when plugged in. Alternatively, try another outlet to determine whether it is an electrical issue rather than a device issue If after testing the ALCI continues to trip, unplug the device and contact RevAir Customer Support at support@myrevair.com or (440) 462-6100. -
Page 8: What's In The Box
Please visit support.myrevair.com to discover more about your unique hair type and to connect directly with our RevAir Advisor Team. WHAT’S IN THE BOX You will find the following included in your Reverse-Air Dryer box:... -
Page 9: Device Assembly
DEVICE ASSEMBLY INSTALLING THE FILTER BASKET INTO THE BASE UNIT • Slide the Filter Basket into the Base Unit, by aligning the Filter Tab with the Filter Basket Groove. • IMPORTANT: Without the Filter Basket installed and the alignment of the Filter Tab correctly in the Base Unit Groove, the device will not power on. - Page 10 DEVICE ASSEMBLY ATTACHING THE WAND TO THE HOSE • Align the Key on the Hose with the Groove on the Wand. Hold the Wand firmly in one hand and the Hose Strain Relief in the other hand. • • Turn the Hose Strain Relief clockwise until it clicks and the lock symbol is aligned with the arrow. Strain Relief Wand...
- Page 11 DEVICE ASSEMBLY BONUS ACCESSORY: DETACHABLE WAND REST • As a bonus, your device includes a Detachable Wand Rest. The Wand Rest can be installed on either side of the Base Unit simply by sliding the flat clip end • through the Wand Rest Pocket below the Base Unit Handle until the Wand Rest locks into place. To remove the Wand Rest press down on the flat clip and slide the Wand Rest out of the Wand Rest •...
-
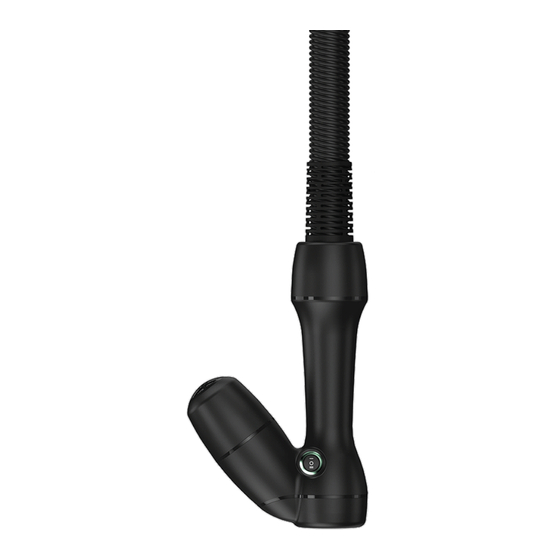
Page 12: Parts & Functions
PARTS & FUNCTIONS RevAir Reverse-Air Dryer HEAT PRODUCING WAND Fig. 1.0 Fig. 1.0 Temperature Control Switch Heat Chamber Cover • High ( II ), Low ( I ), and No Heat ( O ) settings • No Heat ( O ) setting allows cool air to seal in shine... - Page 13 PARTS & FUNCTIONS RevAir Reverse-Air Dryer HEAT PRODUCING WAND Fig. 3.0 Fig. 3.0 Heat Chamber Cover 6. Heat Chamber • Filters incoming air into the Heater Cover Fig. 4.0 Main Power On/Off Switch Heat Chamber Heat Screen & Air Inlet Chamber Fig.
-
Page 14: Using Your Revair Device
USING YOUR REVAIR DEVICE BEFORE GETTING STARTED Designed to work on all hair types, RevAir utilizes patented technology that is customizable to achieve the best results for your individually unique hair. When considering your hair type (wavy, curly, coily, or straight), also consider its length, strand thickness, and density. - Page 15 For recommended section size and drying times, see pages 16-17. TEMPERATURE CONTROL (Heat Level Settings) The effectiveness of Reverse-Air means less heat is needed when compared with traditional blow-drying. So, even on high ( II ), RevAir heat is relatively low. Still, your hair require...
-
Page 16: How To Rev Your Hair
First, determine your best heat and tension level settings*. Next, follow these steps to Rev your hair: *See “Using Your RevAir Device” on pages 14-15 to determine your best Rev settings. • Thoroughly wash your hair. Squeeze-out or towel-dry excess water from hair and complete your detangling routine. -
Page 17: Troubleshooting Revair
Avg Section Time: 45 - 60 sec Avg Section Time: 30 - 60 sec TROUBLESHOOTING REVAIR Your RevAir device is equipped with various troubleshooting indicators. Please see the chart below for tips on managing any errors that may appear on your LED screen. Filter Fault Indicator... -
Page 18: Looking After Your Revair Device
LOOKING AFTER YOUR REVAIR DEVICE • Do not perform any maintenance or repair work other than what is described in this RevAir Operating Manual or advised by the RevAir Customer Support team. • Always disconnect the ALCI plug from the wall outlet before inspecting for issues. - Page 19 • The Foam Liner acts as a barrier to protect the Filter Basket and minimize build-up on the mesh. • RevAir recommends cleaning the Foam Liner every 5 uses by removing loose hair, rinsing with warm soapy water, and air drying. Foam liners are sold in packs of 2, providing a spare while air drying the other.
- Page 20 DEVICE CARE REINSTALLING THE FILTER BASKET INTO THE BASE UNIT • Slide the Filter Basket into the Base Unit by aligning the Filter Tab with the Filter Basket Groove. • IMPORTANT: Without the Filter Basket installed and the alignment of the Filter Tab correctly in the Base Unit Groove, the device will not power on.
-
Page 21: Disposal Information
Replace the Heat Chamber Cover by aligning notches, pushing the Heat Chamber Cover on, and twisting clockwise until secure. DISPOSAL INFORMATION • RevAir products are made from high-grade recyclable materials. • Please dispose of this product responsibly and recycle when possible. myrevair.com // 21... -
Page 22: Never Be Without • One Year Warranty
What the Never Be Without Warranty Covers The RevAir Never Be Without limited warranty warrants that your RevAir product is free from all defects in workmanship and material, under normal everyday use, for a period of 12-months from the date of purchase. -
Page 23: Acquiring Warranty Service
• Tampering, including attempted repair or repair by an unauthorized party • RevAir will, at its discretion, repair or replace defective parts as covered by this warranty. As a policy, RevAir will not refund the consumer’s purchase price outside of the 30-day money-back guarantee. - Page 24 PREPARE TO BE AMAZED for Tips & Tricks, as well as the latest RevAir innovations, visit us at: myrevair.com REV IT. SHARE IT. #MYREVAIR 20220517 | RA80047 | REV 1...
Need help?
Do you have a question about the B07F6WPRHD and is the answer not in the manual?
Questions and answers