Table of Contents
Advertisement
Quick Links
Advertisement
Table of Contents

Related Manuals for MAROM-X ELITE

Summary of Contents for MAROM-X ELITE
- Page 1 ELITE User Manual...
-
Page 2: Table Of Contents
Contents Camera Overview Setting Up Your Camera MicroSD card Charge Your Camera Getting Started with Your Camera Powering ON/ OFF Video Recording Snapshot Covert Mode IR Infrared Night Vision Visible White Illumination Customizing Your Camera Camera User Menu Resolution and FPS Loop Recording Auto IR LED WIFI... - Page 3 Contents Resetting Your Camera Camera APP Camera Application Turn on the WIFI in your camera Connect Camera Application PC Camera Management Tool Install the Applications Connect the Application PC Camera Management – Menu Setting the information Download Your Media Download Via PC Camera Management Download via SD card Mounting Your Camera Mount your camera with the PICATINNY Adapter...
-
Page 4: Camera Overview
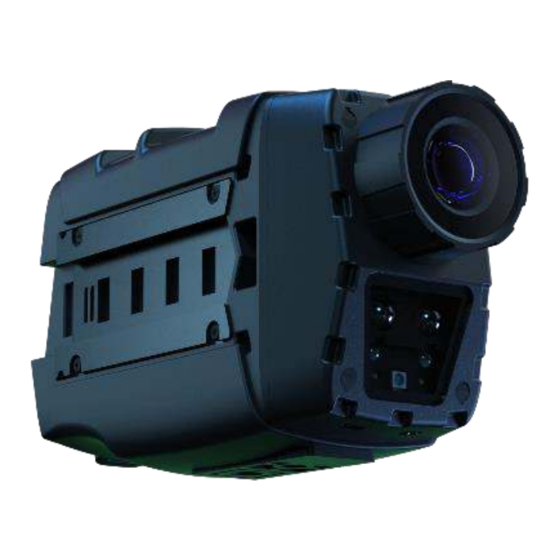
Camera Overview Top side Bottom side 1. SD-card slot Reset Button 3. 1/4” Nut 4. Status Indication LED’s 5. Battery Indicator LED’s 6. LCD Screen 7. Snapshot/ Scroll Button 8. Power/ Record/ Scroll Button Note: The SD-card & the Reset button located under the flexible shield... - Page 5 Camera Overview Front side Back side 9. Camera Lens 10. Infrared Illumination LED 11. White Illumination LED 12. Light Sensor 13. HDMI/AV Port 14. Pogo Pin interface Connector 15. FN Button...
- Page 6 Camera Overview Camera Side 16. Secure Mechanical Attachment Learn how to use the accessories that came with your MAROM-X camera. See Mounting Your camera (page 34). Docking Station The Docking Station is the data interface and the camera battery charging.
- Page 7 Camera Overview LCD Screen The status is symbolized in the following way; 1. Still non-color icon represents an Off function. 2. Flashing icon represents a function initiation. 3. Still colored icon represents an operating function. Battery Level Snapshot Function Video Recording GPS Function Battery Charging IR Illumination...
-
Page 8: Setting Up Your Camera
Setting Up Your Camera MicroSD card The camera comes with a 32GB MicroSD card (Inside the camera) to save your videos and photos. You can use any MicroSD card with a capacity up to 128GB. The MicroSD card located under the flexible cover at the bottom of the camera. -
Page 9: Getting Started With Your Camera
Getting Started with Your Camera Powering ON/ OFF ▪ Press and hold the power button for 3 seconds to turn the camera on. The camera will be in standby mode. ▪ Hold the power button for 3 seconds again to turn the camera off. Pro Tip: When the camera is powered off, a short press on the power button will power the camera and start video recording. -
Page 10: Snapshot
Getting Started with Your Camera Snapshot Either when the camera is at standby mode or at recording video: ▪ Short press the snapshot button to take a photo. Covert Mode ▪ Long press the snapshot button for 3 seconds to enable covert mode. -
Page 11: Ir Infrared Night Vision
Getting Started with Your Camera IR Infrared Night Vision ▪ Short press the FN button once to turn on the IR Illumination. Press again to turn IR Illumination Off. Visible White Illumination ▪ Press and hold the FN button for 3 seconds to turn on the white illumination. -
Page 12: Customizing Your Camera
Customizing Your Camera Camera User Menu ▪ To enter the user menu double press the FN button while the camera is on Standby. ▪ Press the scroll up or the scroll down button to select the right option from the menu. -
Page 13: Resolution And Fps
Customizing Your Camera Resolution and FPS Choose the resolution and the FPS that suits you best; ▪ 2560 X 1440 @ 30FPS ▪ 2304 X 1296 @ 30FPS ▪ 1920 X 1080 @ 60FPS ▪ 1920 X 1080 @ 30FPS ▪... -
Page 14: Auto Ir Led
Customizing Your Camera Auto IR LED The camera has a lighting sensor allowing her to switch between day to night mode automatically. When the camera operates under night mode, the IR Illumination will turn on. You can choose the option you prefer; On –... -
Page 15: Wifi
Customizing Your Camera WIFI Choose the interface that your camera will connect wirelessly to him; ▪ App On - for IOS/Android interface ▪ STA On - for PC interface. ▪ The built-in GPS records the camera location to be viewed through dedicated video and location players. -
Page 16: Sound
Customizing Your Camera Sound The camera has audial indications, choose if you prefer it to be active or turned off ▪ On - for active audial indications. ▪ See guidance on how to operate the user menu on page 13 Sound Indications The sound indications are as follows: General function On –... -
Page 17: Led
Customizing Your Camera Set which status lights blink. Choose On (default) or Off; On – for active LED Indication. ▪ ▪ See guidance on how to operate the user menu on page 13 LED indications The Status indication LED are as follows: ▪... -
Page 18: Vibration
Customizing Your Camera Vibration The camera has vibration indications, choose if you prefer it to be active or turned off; On – for active vibration Indication. ▪ ▪ See guidance on how to operate the user menu on page 13 The Vibration indications are as follows : General function On –... -
Page 19: Format Card
Customizing Your Camera Format Card By using this function, you can delete all the information stored in the camera SD card. Choose the option to do or not to do; On – would format the camera SD card. ▪ And the camera would turn Off. ▪... -
Page 20: Ir Led
Customizing Your Camera IR LED The camera has the ability to enter night shooting mode (black & white) with or without IR illumination. You can choose to turn the function on or off; On – Shooting with the IR illumination. ▪... -
Page 21: Resetting Your Camera
Resetting Your Camera Camera Hard Reset The Reset Button is located inside the SD card port, with located under the flexible cover at the bottom of the camera. Press and hold the reset button using a thin element for 10 seconds. -
Page 22: Camera App
Camera APP Camera Application Use the app to control your camera, start recording, frame shots, adjust settings, and more. Download the camera app from the Apple© App Store© or Google Play™. The application name: EYESCAM PRO Follow the app's on-screen instructions to connect your camera. -
Page 23: Turn On The Wifi In Your Camera
Camera APP Turn on the WIFI in your camera While the camera is at Standby, enter the user menu in your camera by double-pressing the FN button. Press the scroll up or the scroll down button to select the WIFI option from the menu. -
Page 24: Connect Camera Application
Camera APP Connect Camera Application Select the camera WIFI name on your smartphone and enter the password. The default password is 1234567890 Turn on the EYESCAM PRO application and select “connect device” to enter the camera interface. Connect device Once the device is connected, click the "Device Connected" button, and then the camera video stream should appear on your screen. -
Page 25: Pc Camera Management Tool
PC Camera Management Tool Install the Applications The PC camera management tool is provided for camera settings, configuration and files download. ▪ Download and install the fallowing tools to your PC; 1. PC management tool 2. Docking Station USB driver You can download them from: www.maromx.com/support ▪... -
Page 26: Connect The Application
PC Camera Management Tool Connect the Application Once the application installed, click on the management tool application. A welcome screen would appear: ▪ Click the CONNECT virtual button on the screen, if the connection is successful the writing would change to CONNECTED ▪... -
Page 27: Pc Camera Management - Menu
PC Camera Management Tool PC Camera Management – Menu Once entered, the following screen would appear: The sub-screens fields are as follows: 1. Camera ID 2. Camera password 3. Camera info 4. Network configurations 5. Camera configurations... - Page 28 PC Camera Management Tool PC Camera Management – Menu 1. Camera ID In this section, you can determine a new camera ID if required. ▪ Device ID ▪ Police ID Note: The ID information will be part of the video recorded watermarking and metadata signature that can be later searched.
- Page 29 In this section, you can view and set the camera streaming configurations. ▪ WIFI Information: Name & Password. as would appear on your Smartphone/Computer. 4G Information (not available on the Elite model) ▪ ▪ Server Information. (not available on the Elite model)
- Page 30 ▪ ▪ Rec Warning ▪ Video Stamp ▪ Photo size by electronic enhancement 4G streaming (not available on the Elite model) ▪ ▪ Wi-Fi Streaming ▪ Post Record (not available on the Elite model) ▪ Auto Record (not available on the Elite model) ▪...
-
Page 31: Setting The Information
PC Camera Management Tool Setting the information ▪ To get the connected camera existing setting, press the GET button. The information will appear in the relevant fields. ▪ For information setting, insert information or select an option of the desired available field. After the selection is made, press the SET button to compile the settings to the connected camera. -
Page 32: Download Your Media
Download Your Media You can download your media from the camera via the PC Camera Management tool or via the SD card. Download Via PC Camera Management Insert the camera into the docking station and enter the PC Camera Management application (see instructions on page 26) Clicked on the “Enter U Disk”... -
Page 33: Download Via Sd Card
Download Your Media Download via SD card Remove the SD card from your camera. Insert the card into an SD card reader or adapter . Plug the card reader into your computer’s USB port ,or insert the adapter into the SD card slot. Copy the files to your computer. -
Page 34: Mounting Your Camera
Mounting Your Camera PICATINNY Rail and Sticker Adapters A. Adaptor Handle B. Rail to the Camera side C. Screw Nut D. Rail to the Rifle Side A. Adaptor Handle B. Rail to the Camera side C. Adhesive Surface... -
Page 35: Mount Your Camera With The Picatinny Adapter
Mounting Your Camera Mount your camera with the PICATINNY adapter Open the screw nut of the adaptor, and insert the Picatinny adaptor into the rails of the rifle. When the adapter is placed, close the screw nuts to lock the adapter in the desired location. Insert the camera into the adaptor rails. -
Page 36: Mount Your Camera With The Sticker Adapter
Mounting Your Camera Mount your camera with the sticker adapter Thoroughly clean the adhesive surface. (See guidelines in the next page) Remove the protective paper from the adhesive area of the adapter, and attach the adhesive surface of the adapter to the object you wish to stick. Insert the rail of the camera to the adapter until the end of the move, when the side without the handle enters first. - Page 37 Mounting Your Camera Guidelines for the sticker adapter Follow these guidelines when attaching adhesive mounts to helmets, vehicles, and gear; ▪ Only attach the mounts to smooth surfaces. They won’t stick properly to porous or textured surfaces. ▪ You can clean with alcohol but before it is recommended to check with the manufacturer's instructions ▪...
-
Page 38: Regulatory Information
Regulatory Information FCC ID: 2AWVP-WATCHCAM E-Label instructions ▪ When the camera is on standby mode, press twice on the FN button, it’s will be entering the "user setting menu." ▪ Scroll down to "certification info" mode. ▪ Press the FN button to see the certification data. ▪... - Page 39 Regulatory Information RF Exposure Warnings Portable Device RF Exposure Statement (If Applicable): A. Portable: (§2.1093) — A portable device is defined as a transmitting device designed to be used so that the radiating structure(s) of the device is / are within 20 centimeters of the body of the user.
- Page 40 Regulatory Information The FCC Wants You to Know This equipment has been tested and found to comply with the limits for a Class B digital device, pursuant to Part 15 of the FCC rules. These limits are designed to provide reasonable protection against harmful interference in a residential installation.
- Page 41 Regulatory Information FCC Warning (Modification statement) Modifications not expressly approved by the manufacturer could void the user's authority to operate the equipment under FCC Rules. FCC Regulatory notices A. Interference statement This device complies with Part 15 of the FCC Rules . Operation is subject to the following two conditions: (1) this device may not cause interference, and (2) this device must accept any interference, including interference that may cause undesired...
-
Page 42: Customer Support
Customer Support MAROM-X is dedicated to providing the best possible service . To reach MAROM-X customer support please visit; www.maromx.com/support...
Need help?
Do you have a question about the ELITE and is the answer not in the manual?
Questions and answers