Table of Contents
Advertisement
Quick Links
Advertisement
Table of Contents

Related Manuals for URIT Medical Electronic UC-32A


Summary of Contents for URIT Medical Electronic UC-32A
-
Page 2: Table Of Contents
Table of Contents Copyright and Declaration....1 Preface ........5 Symbols........6 Warnings and Precautions ....7 1. Instrument Introduction ....11 1.1 Instrument Features....11 1.2 Intended Use....... 13 1.3 Contraindication ....14 1.4 Specifications ...... 14 1.5 Structure and Principle ....17 1.6 Appearance and Components .. - Page 3 3.2 Reagent Strips Usage Precautions ..35 3.3 Instrument Usage Precautions ..36 4. The Instrument Use Procedures ... 39 4.1 Shut-down procedure ....39 4.2 Routine Measurement ....40 5. Instrument Checkup ..... 47 5.1 Checkup ......47 5.2 Checkup Operate ....48 6.
- Page 4 8. Storage and Handling ....61 8.1 Handling ......61 8.2 Storage ......61 9. Troubleshooting ......62 Appendix ......... 65...
-
Page 6: Copyright And Declaration
Copyright © URIT Medical Electronic Co., Ltd. All contents in this manual were strictly compiled according to related laws and regulations in China, as well as the specific condition of UC-32A urine analyzer, covering all the updated information before printing. URIT is fully responsible for the... - Page 7 noncompliance with procedures precautions outlined herein. Limitation of Liability URIT warrants to the original purchaser that this instrument will be free from defects in materials and workmanship for a period of one year from the later of the date of original purchase or installation. URIT assumes no liability in the following situations even during the period of warranty.
- Page 8 Technical service and troubleshooting are provided by URIT. If the instrument has malfunction, please contact the agency authorized by URIT. CAUTION: THE INSTRUMENT IS FOR PROFESSIONAL AND PRESCRIPTION USE ONLY. URIT Medical Electronic Co., Ltd. Address: No.D-07 Information Industry District, High-Tech Zone, Guilin, Guangxi 541004, P.R.China...
- Page 9 Web: www.urit.com Email: service@uritest.com Supplied by: URIT Medical Electronic Co., Ltd. VERSION: 12/2020...
-
Page 10: Preface
Preface This operating manual describes in detail the installation, structure, operation and maintenance of UC-32A urine analyzer (Hereinafter we simple call the UC-32A urine analyzer as Instrument). Please carefully read through this manual before using the instrument and follow the instructions presented in the manual to perform measurements. -
Page 11: Symbols
Symbols Consult instructions for use Protect from heat and radioactive sources Electrical and electronic products recycling symbol Environment-Friendly Use Period Authorized representative in European Community Class Ⅱ direct-current equipment (DC) Caution Biological risks Manufacturer Serial number Date of Keep dry manufacture In Vitro Use-by date... -
Page 12: Warnings And Precautions
Warnings and Precautions The instrument power supply is 5V DC or two AA alkaline batteries, please pay attention to the battery polarity when installing the battery. Only the accompanying AC adapter is allowed. Remove the battery from the instrument when the battery is used up or the instrument is not used for a long time. - Page 13 temperature before measurement. Leave at least 10 cm space to the front side of the instrument. Use only the URIT reagent strips and carefully read through package inserts of the reagent strips. Do not use attachments that are not provided recommended manufacturer.
- Page 14 Do not place in the storage of chemicals or near items that produce corrosive gases and electromagnetic interference. Do not repair or rebuild the instrument by yourself, in order to avoid damage to the instrument or injury. Keep the instrument away from magnetic sources devices that...
- Page 15 protective gloves, etc., should be handled in accordance with the relevant local regulations. The result tested by the instrument can only be applied to screening some related diseases in the group according to the detection results of human urine. It can’t used directly evidence...
-
Page 16: Instrument Introduction
1. Instrument Introduction 1.1 Instrument Features ■ Compact and portable The instrument weighs 190g (battery-free) and only has the size of a palm, making it easy to carry ■ Simple operation Insert the strip tray into the tray conveyor and the instrument will test automatically. - Page 17 2) Correct specific gravity based on pH readings. ■ Convenient daily maintenance Strip tray can be easily detached for daily cleaning. Using LED as light source, so you do not need to replace sense light. ■ Automatic identification of reagent strip type The instrument can automatically identify the type of the reagent strip and is more intelligent.
-
Page 18: Intended Use
■ Accuracy of the reagent strip for urine analysis No more than one order of magnitude of difference between the test result and the corresponding reference value, and no reverse difference shall occur. A positive reference solution shall not produce a negative result, and a negative reference solution shall not produce a positive result. -
Page 19: Contraindication
the urine test. The instrument is for professional, in vitro diagnostic use ( ). The result tested by the instrument can only be applied to screening some related diseases in the group according to the detection results of human urine. It can’t be used directly as evidence for diagnosing diseases. - Page 20 Creatinine (CR), Microalbumin (MA), Vitamin C (VC) and Calcium (Ca). Measuring Principle:Reflectance photometry. Measurement Wavelength: 470 nm, 550 nm, 620 nm, 720 nm. Sample Supply Method: Manual dipping. Throughput: 50±1 s test. Measuring Mode: Automatic single measuring mode. Display: Color display screen, which can display operational information...
- Page 21 Operating Condition: Temperature: 5℃~40℃; Humidity: ≤ 80%. (Optimum use temperature: 23℃~28℃) Measuring Condition: Temperature: 15℃~30℃; Humidity: ≤ 80% (Recommended). Dimension: 130 mm × 70 mm × 29 mm (L×W×H). Weight: 190 g (No battery). Power Supply: Two AA alkaline batteries or 3 A.
-
Page 22: Structure And Principle
Weight: 180 g (without thermal paper). Operating Voltage: 5 V Power Supply: Printer: 5 V 3 A. The adapter: Input: 100 V-240 V~, 50/60Hz. Power Consumption: 13.5 W. Environment-Friendly Use Period: 10 years. 1.5 Structure and Principle instrument basically composed optical-electronic sensor system, mechanism and I/V converter, etc. - Page 23 Figure 1.1 The optical-electronic sensor system consists of a light source and a light receptor. The light from the light source falls on the reagent pads on the strip. The absorbance and reflectance vary with the color development of reagent pad, i.e. The degree of color development proportional...
-
Page 24: Appearance And Components
reflected light transmitted into Optical-electronic sensor system where the optical signals are transformed into electric signals. Then the electric signals are transformed by I/V convert then processed by CPU. Finally, test results are displayed on color display. 1.6 Appearance and Components Instrument (figure 1.2) Figure 1.2... - Page 25 Printer (figure 1.3) Figure 1.3 Items Function a. For charging. Charging USB interface voltage is 5 V DC. b. For transmitting data. Displays operational Display screen information, test results, etc.
- Page 26 Used operating instruments. first button on the left is the Key panel start key. Press seconds start instrument. Two AA alkaline batteries Battery cover placed when turned on. Used to place the strip Tray conveyor tray. Used to place the reagent Strip tray strip.
- Page 27 Long press for 3 seconds to start-up. After start-up press this The printer key into paper skip status. power switch When turned on, long press for 3 seconds to shutdown. The printer will be re-start The printer after you push down this reset key key.
-
Page 28: Installation
2. Installation 2.1 Action upon delivery Please check the instrument and accessories as below steps after receiving the carton: 1) Carefully unpack the shipping carton and take out the instrument and accessories. 2) Check the contents for quantity and visible signs of damage according to the accompanying Packing List. - Page 29 the equipment can be maintained in order that the device will perform as intended. Caution 1. Instructions for IVD medical equipment for self-testing: a) Use of this instrument in a dry environment, especially if synthetic materials are present (synthetic clothing, carpets etc.) may cause damaging electrostatic discharges that may cause erroneous results.
- Page 30 b) This equipment has been designed and tested to CISPR 11 Class A. In a domestic environment it may cause radio interference, in which case, you may need to take measures to mitigate the interference. c) The electromagnetic environment should be evaluated prior to operation of the device.
- Page 31 operation. Caution NOTE: This equipment has been tested and found to comply with the limits for a Class B digital device, pursuant to part 15 of the FCC Rules. These limits are designed to provide reasonable protection against harmful interference in a residential installation. This equipment generates, uses and can radiate radio frequency energy and, if not installed and used in accordance with the instructions, may...
- Page 32 one or more of the following measures: --Reorient or relocate the receiving antenna. --Increase separation between equipment and receiver. --Connect the equipment into an outlet on a circuit different from that to which the receiver is connected. --Consult the dealer or an experienced radio/TV technician for help.
-
Page 33: Installing The Battery
Caution Hereby, URIT Medical Electronic Co., Ltd., declares that this UC-32A urine analyzer is in compliance with the essential requirements and other relevant provisions of RE Directive 2014/53/EU. A copy of the full DoC is attached. 2.3 Installing the battery Caution 1. -
Page 34: Connect Printer
when the battery is used up or the instrument is not used for a long time. 4. Replace the waste batteries please in accordance with the relevant local laws and regulations properly handled. 1) Open the battery cover of the instrument. 2) Install two AA alkaline batteries in the instrument battery bin. -
Page 35: Loading Thermal Print Paper
Figure 2.1 2.5 Loading Thermal Print Paper Printer cover Print paper storage area Paper exit Rubber roller Figure 2.2 1) Open the printer cover in the direction of upward, as shown in figure 2.2. 2) Use your fingers slight lift the printer rubber roller... - Page 36 toward your direction, and then upward remove the printer rubber roller. 3) Load the paper roll, put the printer rubber roller upward the printer clip, then use your fingers downward slightly push it into clip. 4) Please make the paper roll extends from the printer paper exit and put it into printing paper roll storage area, then closed the printer cover.
- Page 37 check the print paper whether dry, if the print paper is moisture, then need to be changed in order to avoid the print paper jam. 5. Please reinstall if appears print paper jam situation.
-
Page 38: Usage Precautions
3. Usage Precautions 3.1 Sample Usage Precautions 1) Be careful to take samples. Urine samples may carry pathogenic microbes that can cause infectious diseases. Take the utmost care when handling urine. Wear protective gloves to avoid exposure to urine samples. 2) Use fresh urine samples (Collect within one hour). - Page 39 temperature before testing, otherwise, the test results may be higher. 4) Mix each sample well before measurement. Do not centrifugal separation. If centrifugal separation is carried out, some components in the urine sample will precipitate, and some test items will not get accurate test results.
-
Page 40: Reagent Strips Usage Precautions
When test the sample which contains Vitamin C may lead the occult blood and glucose readings may be lower than the actual value. 9) Drug-administered urine visual hematuria can affect test results. Drug-administered urine and visual hematuria can affect test results and may not get the accurate test results. -
Page 41: Instrument Usage Precautions
from bottle before measuring samples, and cap the bottle immediately. Exposing the reagent strips to air for a long time will deteriorate the compositions of the reagent strips. 4) Do not touch the reagent pads on the reagent strips. Do not touch the reagent pads on the reagent strips. Doing so may affect test results. - Page 42 temperatures. It should be used in a room of appropriate size, preferably conditioning, temperature and humidity in accordance with the technical requirements of the instrument. To ensure the accuracy of the test results, please keep the temperature and humidity of workshop consistent with the environmental conditions required by the urine strip used.
- Page 43 4) Observe the battery power of the instrument during use. Caution 1. If you continue to do the tests during the low power situation, in that case it can’t guarantee the accuracy of the test results. 2. Please do not wait for the battery to run out of charge before charging, otherwise it will affect battery life.
-
Page 44: The Instrument Use Procedures
4. The Instrument Use Procedures 4.1 Shut-down procedure 1) Turning on the power Keep pressing the Start key for 3 seconds to turn on the power. The instrument display screen lights up to display the welcome interface, the system self-test, the tray conveyor extends from the front of the instrument. -
Page 45: Routine Measurement
Indicate that the item is in a state of waiting to be tested. Indicate that test results are normal. Indicate that the test results are not within the normal range. 2) Turning off the power Keep pressing the Start key for 3 seconds to turn off the power. - Page 46 Biological risks 1. Put on protective gloves to avoid exposure to pathogenic microbes. 2. Dispose of used samples, reagent strips and gloves according to local regulations. Caution 1. The instrument should be placed on a level, stable and vibration-free worktable. 2.
- Page 47 Figure 4.1 Caution The sample volume must be enough to soak all pads entirely on the reagent strip. Caution Do not centrifugal separation, otherwise will cause haemocyte precipitation and make some items can't get accurate test results. 4.2.3 Preparing reagent strips Please refer to the package insert of reagent strips for specific information about how to handle reagent strips.
- Page 48 Caution Do not use the reagent strip that has exceeded the service life, or the reagent strip that has not expired reagent changes color, otherwise, the accurate test results cannot be obtained. 4.2.4 Measuring samples After you prepare the samples and reagent strips, please soaking the reagent strips with samples and then do the tests.
- Page 49 interface and prepare the reagent strips and samples for use. 2) Prepare some blotting papers at hand for later use. Used for remove the excess samples from the reagent strips. 3) Soak the reagent strip in the sample. Caution 1. Be sure to make sure all the reagent strips are soaked in the sample.
- Page 50 4) Remove the reagent strip from the sample, gently touch the edge of the reagent strip and suck out the excess urine. 5) Place the reagent strip on the strip tray. When placing, it is important to ensure that the reagent strip is fully placed in tray groove, and that the reagent strip has one side of the reagent block facing up.
- Page 51 2. Be sure to place the strip tray on the tray conveyor correctly. Incorrect position of strip tray will affect the accuracy of test results. 7) Test result will be displayed after the strip tray re-move to the front of the instrument. The results will be transmitted to external devices via the Bluetooth interface if connected.
-
Page 52: Instrument Checkup
5. Instrument Checkup 5.1 Checkup There are two check strips that come with the instrument. either check performance of the instrument and compare the obtained results with the range printed on the check strip container. If the obtained results fall outside the range, use another check strip to repeat the test. -
Page 53: Checkup Operate
Caution 1. The check strip only used for daily check. 2. Please do not soak the check strip into any liquid. 3. Please keep the check strip clean. 4. Compare the obtained results with the range printed on the check strip container. If the obtained results inside the range that means the instrument can be normal use;... - Page 54 the deepest slot of the tray conveyor. Then the instrument will test automatically. Caution 1. The handle end of the reagent strip should be guaranteed to be on the outside of the instrument. If the reagent strip is in the wrong direction, the instrument will prompt for the error.
-
Page 55: Function Introduction
6. Function Introduction 6.1 Function Introduction of Printer The instrument and printer can be connected to the Bluetooth interface. The “ ” will show in the instrument status bar when the instrument is open printer function printer been successfully connected to the instrument. 6.2 Test Function Click the second button on the right at the main interface to select the range for automatic... -
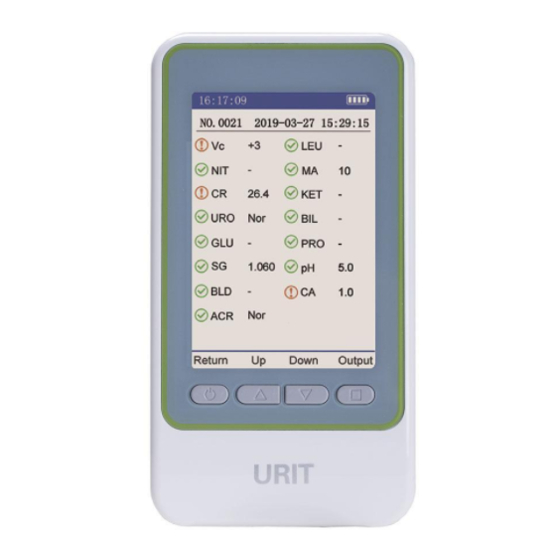
Page 56: Introduction Of Testing Result
Caution The result tested by the instrument can only be applied to screening some related diseases in the group according to the detection results of human urine. It can’t be used directly as evidence for diagnosing diseases. 6.3 Introduction of Testing Result 1) The test results are as shown in figure 6.1. - Page 57 Items Content The sequence number of Measurement the current sample test number results. Test items and results. (The system will display corresponding test items based on the type of reagent strip detected.) test results represented semi-quantitative symbol. Test results (See Appendix comparison table between semi-quantitative symbols...
-
Page 58: Reviewing Results
The test item is preceded , which indicates that the result is not within the normal range. The date and time of the Date and Time current test results. 2) Output test result. A. The results will be transmitted to external devices via the Bluetooth interface if connected. -
Page 59: Setting
Function Return to main Interface. View previous result. View the next result. For transmitting data. 6.5 Setting Please click 【Setting】 key under the standby screen into setting menu which has following functions: 1) 【QR code】: Scan the QR code and connect to the mobile APP. -
Page 60: How To Connect Mobile App
connection mode is printer mode or phone mode. If you need to connect to the mobile APP, please switch to phone mode. If the printer mode is selected, press [Con] key will connect the printer and press [Discon] key will disconnect the Bluetooth device. - Page 61 the system switch of geographical location. B. Download WeChat APP -- register WeChat account -- Search "UC32" -- enter app interface. C. Click search or scan to search instrument or scan the QR code of urine analyzer setting interface to directly connect the instrument and app.
-
Page 62: Mobile App Introduction
6.7 Mobile APP introduction The mobile app is divided into three modules: Device Management, Health Assessment and Data Center. As shown in figure 6.2. Figure 6.2... - Page 63 1) Device Management Manage the connected devices in the Device Management interface. 2) Health Assessment The latest comprehensive health assessment is displayed in the Health Assessment interface. 3) Data Center In the data center, you can synchronize all the test results data on the urine analyzer, and you can also switch the account number.
-
Page 64: Maintenance
7. Maintenance 7.1 Precautions Biological risks 1. To avoid exposure to pathogenic microbes, put on protective gloves during maintenance. 2. Dispose of used reagent strips, fabric, and protective gloves according local regulations. 7.2 General cleaning Keep the instrument clean and dust-free. If cleaning is needed, clean the instrument surface with clean paper or gauze dipped with medical alcohol.. - Page 65 strip tray which will contaminate the reagent strip. So, it is necessary to wash the strip tray each day when all measurements are completed. 1)Turn on the power and wait for self-check of the instrument. 2) Please remove the strip tray from the tray conveyor.
-
Page 66: Storage And Handling
8. Storage and Handling 8.1 Handling UC-32A is a precise instrument. Transport it with utmost care and avoid moisture, sunlight and collision. Transportation Condition:-20℃~55℃, RH ≤ 95%, 75 kPa~106 kPa 8.2 Storage The packed instrument should be stored in a ventilated room. -
Page 67: Troubleshooting
9. Troubleshooting Fault message will display on the display if there is something wrong with the instrument. Please refer to the following. If you still can not resolve the problem, please contact your dealers or after-sales service unit immediately. Caution 1. - Page 68 Troubleshooting Table Trouble Possible Handling Method Code Cause Please check to see if the strip tray is falling off. Restart Test Sensor instrument. still Error unable resolve, please contact the after-sales service unit. Strip Motor Check if the strip tray Error is installed correctly.
-
Page 70: Appendix
Appendix The instrument test results and the density contrast compare table...
Need help?
Do you have a question about the UC-32A and is the answer not in the manual?
Questions and answers