Advertisement
Quick Links
Penguin Edge™
ATCA-754x Series
Quick Start Guide
P/N: 6806871A06B JUNE 2022
1 Box contents
Make sure you receive all items of your shipment:
•
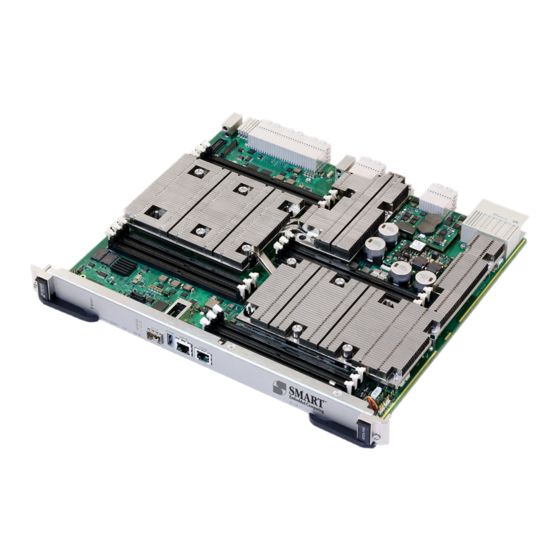
One Penguin Edge™ ATCA-754x blade
•
One printed copy of Quick Start Guide (this document)
•
One printed copy of Safety Notes Summary
•
Any optional items ordered
When installing or servicing the system or accessories,
strictly observe the safety precautions in the Safety Notes
Summary. Ignoring these instructions can void the system
warranty and cause personal injury or property damage.
2 ESD
Electrostatic discharge and incorrect installation or
removal of the product can damage circuit or shorten its
life.
Use a properly grounded ESD wrist strap or work in an
ESD-safe environment.
Connect to the ESD connector at the front or the rear of
the system.
3 Site preparation
Prior to installation, prepare your site. For information on the
environmental and power requirements, see the ATCA-7540 Series
Installation and Use manual.
Operating temperatures refer to the temperature of the air circulating
around the blade and not to the actual component temperature.
4 Install the DIMM
NOTE: Some blade variants come with the DIMM already installed.
For thermal safety concerns, no 4-rank DIMMs or stacked DIMMs
are allowed. At least one DDR4 VLP RDIMM must be installed in a
socket labeled DIMM A through DIMM F, see the marking on the
outside edge of the blade. Installing RDIMMs in the remaining
sockets is optional.
For a list of tested memory modules, refer to the Penguin Edge™
ATCA-7540 Series Installation and Use manual.
1. Open the locks of the memory module socket.
2. Orient the memory module to the correct key position of the
socket.
3. Press the memory module carefully into the socket. As soon as
the memory module is fully inserted, the locks close
automatically.
4. If necessary, repeat steps 1-3 to install additional memory
modules.
5. Install the blade into the system (see Step 6, Install the blade).
5 Install the M.2 NVME SSD
module
Some blade variants come with up to two M.2 NVME SSD modules
already installed; the blade can be installed directly into the system
(see Step 6).
Some blade variants do not have M.2 NVME SSD modules
installed. If SSD modules are needed, please refer to the
SSD Module and Hardware Kit NVME-M.2-1TB Quick Start Guide
(P/N 6806868A01) for installation instructions. This document can
be found using the Documentation Search function at
https://www.penguinsolutions.com/edge/support/. Once installed,
proceed to Step 6, Install the blade.
6 Install the blade
The following procedure assumes that the system is powered. If it is
not powered, disregard the blue LED information below and skip its
respective step(s).
1. Prior to installing the blade into the slot, slide the top and
bottom latches into the handle release position and pull the
handles outward to unlatch the handles from the faceplate. Do
not pull the handles fully outward.
2. Insert the blade into the shelf by aligning the top and bottom
edges of the blade in the card guides of the shelf.
3. Apply equal and steady pressure to the blade to carefully slide
the blade into the shelf until you feel resistance. Continue to
push the blade gently until the blade connectors engage.
4. Fully insert the blade and push the handles towards the
faceplate. The latches automatically slide inwards and lock the
handles.
NOTE: If the shelf is powered, the blue LED (H/S) illuminates as
soon as the blade is connected to the backplane power pins.
When the blade is completely installed, the blue LED starts to
blink. This indicates that the blade has signified its presence to
the shelf management controller.
5. Wait until the blue LED is switched off and then fasten the
faceplate screws to secure the blade to the shelf. Torque the
faceplate screws to 0.40 N-m.
NOTE: When the blue LED is switched off and the green LED (IS)
is switched on, this indicates that the payload has been powered
up and the blade is active.
6. Connect cables to the faceplate, if applicable. Refer to the
Penguin Edge™ ATCA-7540 Series Installation and Use manual.
NOTE: If an RTM is connected to the ATCA-754x Series blade,
make sure that the handles of both the RTM and the ATCA-7540
blade are closed in order to power up the blade's payload.
Advertisement

Related Manuals for Penguin Edge ATCA-754 Series


Summary of Contents for Penguin Edge ATCA-754 Series
- Page 1 Any optional items ordered edges of the blade in the card guides of the shelf. For a list of tested memory modules, refer to the Penguin Edge™ 3. Apply equal and steady pressure to the blade to carefully slide ATCA-7540 Series Installation and Use manual.
- Page 2 Penguin Solutions is a trade name used by SMART Embedded Computing, Inc., a wholly owned subsidiary of SMART Global Holdings, Inc. Penguin Edge is a trademark owned by Penguin Computing, Inc., a wholly owned subsidiary of SMART Global Holdings, Inc. All other logos, trade names, and trademarks are the property of their respective owners.