Table of Contents
Advertisement
Advertisement
Table of Contents

Related Manuals for Lumberjack YTL-590-111

Summary of Contents for Lumberjack YTL-590-111
- Page 1 9 TON LOG SPLITTER INSTRUCTION MANUAL ASSEMBLY AND OPERATING INSTRUCTIONS This safety alert symbol identifies important safety messages in this manual.
-
Page 2: Table Of Contents
Table of Contents Important Safety Information..................... 3-5 Intended Use........................3 Personal Protective Equipment..................3 General Safety........................4 Work Area.......................... 4 Preparing Logs for the Splitter.................... 4 Operation of the Log Splitter....................4 General Repair....................4 Maintenance Safety..................5 Fire Prevention........................5 Safe Transport........................ -
Page 3: Important Safety Information
IMPORTANT SAFETY INFORMATION WARNING: Read and understand all instructions and safety information in this manual and on safety decals before assembling and/or operating the log splitter. Failure to understand and follow all instructions and safety information may result in serious injury or death. Persons who have not read the manual should never operate the log splitter. -
Page 4: General Safety
IMPORTANT SAFETY INFORMATION GENERAL SAFETY • ALWAYS keep the operator’s manual in the canister for reference. Review the manual periodically and whenever questions arise. • ALWAYS keep all bystanders and pets a minimum of 10 feet away from your work area when operating the log splitter. -
Page 5: Maintenance Safety
IMPORTANT SAFETY INFORMATION MAINTENANCE AND SAFETY • The mechanical and hydraulic systems of the log splitter require careful inspection. Be sure to replace any damaged hydraulic hoses or components immediately to ensure safe operation of the log splitter. • NEVER check for leaking hydraulic fluid by using your hands. Leaking hydraulic fluid under pressure can potentially penetrate the skin causing SERIOUS INJURY or even DEATH. -
Page 6: Package Contents
PACKAGE CONTENTS ‐ 6 ‐ ... -
Page 7: Assembly Instructions
ASSEMBLY INSTRUCTIONS TOOLS REQUIRED Screw Driver Hammer Band Cutter 13mm, 17mm and 24mm Wrenches Large Adjustable Wrench STEP 1: Attach the Wheel Stand Assembly to the Beam Assembly 1.1 Remove the valve handle fix pin from the valve, then reinstall the pin with the handle in a vertical position. - Page 8 STEP 3: Attach the Support Leg 3.1 Attach the support leg (#24) to the square tube on the beam assembly, then insert the handle (#23) into the hole in the direction shown in the figure. Finally, insert the R pin (#51) from the bottom up into the hole to secure the leg.
- Page 9 STEP 5: Attach the Cylinder Cover and the Hydraulic Hose 5.1 Pull the cylinder assembly back until the two mounting ears on the cylinder snap into the groove, then re-install the cylinder cover (#3) into its’ original position and tighten it with the hex bolt M8x16 (#41), the lock washer Ø8 (#48) and the flat washer Ø8 (#43).
- Page 10 STEP 7: Add Engine Oil 7.1 Make sure the log splitter is on a flat, level surface. 7.2 Remove the oil fill cap/dipstick before adding the engine oil. 7.3 Refer to the separate owner’s engine manual to determine the amount of SAE10W-30 engine oil needed;...
- Page 11 STEP 8: Add Gasoline to the Engine 8.1 Use only clean, fresh, regular unleaded gasoline with a minimum 87 octane rating. 8.2 DO NOT mix oil with gasoline. 8.3 Remove the fuel cap and slowly add gasoline to the tank. DO NOT overfill the tank and always allow approximately ¼...
- Page 12 WARNING DO NOT remove the hydraulic oil fill cap when the engine is running or hot. Hot oil can escape and cause severe burns. Always allow the log splitter to cool completely before removing the hydraulic oil cap. High fluid pressure and very hot temperatures are created in the hydraulic log splitters. Hydraulic fluid can escape through a pin-size hole opening, producing enough force to puncture skin and cause severe blood poisoning.
-
Page 13: Controls And Features Identification
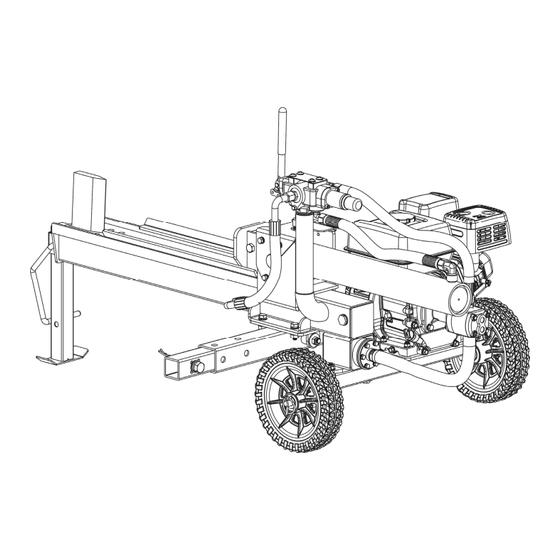
CONTROLS AND FEATURES IDENTIFICATION The diagram below identifies the major components and features of the log splitter described in this manual. ... -
Page 14: Operating Instructions
OPERATING INSTRUCTIONS WARNING Read and understand all instructions and safety information in this manual and on safety decals before assembling or operating the log splitter. Failure to understand instructions and safety information could result in serious injury or death. Do not allow anyone to operate the log splitter who has not read this manual. - Page 15 6. The log splitter must have at least seven feet of clearance from combustible material. For safe operation the log splitter must be on a dry and level surface with stable footing. Do not use the log splitter on mud, ice, brush or snow. Always maintain a clear, dry work zone when using the log splitter as failure to do so at all times may result in serious bodily injury or death.
- Page 16 12. Keep hands clear from the wedge and crush hazard areas. CRUSH WARNING The wedge can cut through skin, break bones and cause serious bodily injury. Keep both hands away from the wedge and beam slide. Serious accidents can happen when other people are allowed inside the work zone. Keep everyone besides the operator out of the work zone while operating the control lever.
-
Page 17: Maintenance And Storage
Maintenance and Storage CAUTION Improper maintenance and storage of the log splitter may void your warranty. MAINTENANCE 1. Before performing maintenance, the log splitter must be placed in maintenance mode. Turn off the engine and move the control lever forward and backwards to release any hydraulic pressure. 2. -
Page 18: Troubleshooting
TROUBLESHOOTING WARNING: Before attempting troubleshooting or to service the log splitter, read and follow all safety instructions to avoid serious injury to the operator or bystanders from moving parts that can crush, cut, burn or release high pressure hydraulic fluid. Problem Cause Remedy... - Page 19 TROUBLESHOOTING Problem Cause Remedy Engine stalls during 1. Low horsepower/weak 1. See an authorized service splitting engine. dealer. 2. Overloaded cylinder. 2. Do not attempt to split wood against the grain; see authorized service dealer. Engine will not turn 1.
- Page 20 TROUBLESHOOTING Problem Cause Remedy Engine runs 1. Unit running with CHOKE 1. Move the choke lever to OFF erratically applied. position. 2. Spark plug wire is loose. 2. Connect and tighten the spark 3. Blocked fuel line or stale plug wire.
-
Page 21: Specifications
SPECIFICATIONS Maximum Splitting Force ................9 Tons Cycle Time ................... 14 Seconds (Note: Cycle time may vary given mechanical and environmental factors; the published cycle time is for ideal conditions) Cylinder Bore Size ................2.75” x 18.3” Hydraulic Oil .......... AW32, AW46 and Universal Hydraulic Oil Hydraulic Capacity .............. -
Page 22: Drawing And Parts List
DRAWING AND PARTS LIST ‐ 22 ‐ ... - Page 23 DRAWING AND PARTS LIST Ref# Drawing No. Description MS12A-00001 10-2.75” Flat Free Tire LS0900-04000 Cylinder LSE12-00003 Cylinder Cover LS12-00006-DX Valve B Joint LSA22-00009-DX Connector LS12J-00011-DX Connector LS12-09000 Single Handle Control Valve LS0900-00003 Hydraulic Hose (valve-cylinder) LSP25-13001-DX Oil Bolt 9901-16X2.5 O Ring Ø16x2.5 LSP25-17002-DX 9110-08010-DX...
- Page 24 Ref# Drawing No. Description LS0900-07001 Gear Pump LS12-04000-DX Oil Filter Mounting Plate LS12-00011 Oil Filter 9101-08016-DX8.8 Hex Bolt M8x16 LS12-00010 Rubber Washer 9301-08000-DX Flat Washer Ø8 LS12J-00010-DX Straight Connector TS600-00009-DX O Lock Ring 9101-10065—DX8.8 Hex Bolt M10x65 9302-10000-DX Large Flat Washer Ø10 9306-08000-DX Lock Washer Ø8 9010-08040-DX8.8...
-
Page 25: Limited Warranty
LIMITED WARRANTY Duration of the Warranty For 3 years from the date of purchase, YTL International will replace or repair defects in material and workmanship for the original purchaser of the log splitter. For 2 years, the engine is covered under the engine manufacturer’s warranty. For 1 year from the date of purchase, YTL International will replace the hydraulic system component parts.
Need help?
Do you have a question about the YTL-590-111 and is the answer not in the manual?
Questions and answers