Table of Contents
Advertisement
Quick Links
Advertisement
Table of Contents

Summary of Contents for Smith Saturn DAB
- Page 1 Smith-Style Saturn DAB CD Radio Instruction Manual...
-
Page 2: Table Of Contents
Contents Controls & Interface ……………………………………………………………………………………… Using the Saturn DAB CD radio ……………………………………………………………………….. 4 Setting the Alarm ……………………………………………………………………………………………. 5 Pre-Setting Stations ………………………………………………………………………………………… 5 Using the EQ …………………………………………………………………………………………………..6 Using DAB+/DAB/FM………………………………………………………………………………………… 6 Adjusting Settings ……………………………………………………………………………………………. 8 Time and Language ………………………………………………………………………………………….. 9 Reset and Software Versions ………………………………………………………….……………….. 10 CD Operation ……………………………………………………………………………………………………... -
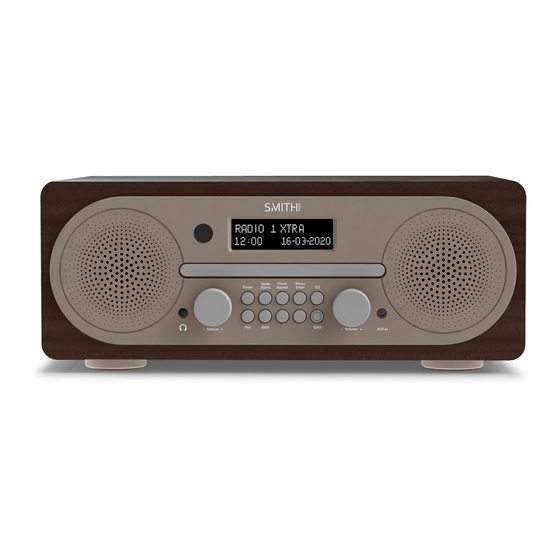
Page 3: Controls & Interface
Controls & Interface 1. IR Receiver 9. Aux IN 2. LCD Screen 10. Left Speaker 3. CD Tray 11. Right Bass Port 4. Right Speaker 12. DC Jack 5. Headphone OUT 13. USB Playback 6. Station Dial 14. Antenna 7. Controls 15. -
Page 4: Using The Saturn Dab Cd Radio
Using the Saturn DAB CD Radio NOTES: It is best to leave a CD inside the unit even when it is not in use. This prevents dust accumulation on the optical lens. Dirty or scratched CD may cause the music to skip. Clean or replace the CD if this happens. -
Page 5: Setting The Alarm
compact disc. BEFORE OPERATION NOTES ON SET: BEWARE OF CONDENSATION When water vapour comes into contact with the surface of cold material, water drops are produced. If condensation occurs, correct operation may not be possible or the unit may not function correctly. -
Page 6: Using The Eq
Storing a preset Press POWER button to switch on the radio. Select the desired waveband. Tune to the required station using the Station Dial. Press and hold PRESET button to enter the preset menu, and then turn Station Dial to select the reset number you want to save the station to. - Page 7 indicated with a question mark in front of their name). If reception was not good for the original scan (for example the antenna was not up), • this may result in an empty or incomplete list of available stations. If you have poor reception of some stations causing the audio to break up, you may wish •...
-
Page 8: Adjusting Settings
Note: this removes all the invalid stations indicated in the station list with a “?” in front of the station name. Search Scan and tuning - FM Carefully extend the telescopic aerial fully and press the POWER button to switch on your radio. -
Page 9: Time And Language
press ENTER button to confirm. System Setting The system settings allow you to tailor the radio with a variety of options to suit you. To access the system settings from any mode, Select MENU -> System -> Then select from the multiple options. -
Page 10: Reset And Software Versions
Reset and Software Version Factory Reset: (To access Factory Reset, Press and hold the MENU button, then using the SKIP + / SKIP - as arrow keys and ENTER to select, Choose SYSTEM then FACTORY RESET) A factory reset clears all user defined settings, replacing them with the original default values, so time/date, preferences/settings, DAB station list and preset stations are all lost. -
Page 11: Usb, Bluetooth And Aux-In
played continuously. Play Randomly: Press REPEAT button repeatedly and select “Shuffle”. The whole disc will be played randomly. Normal Play: Press REPEAT button repeatedly and select “Normal Play”. The disc will be played sequenced. SKIP AND SEARCH MODE 1. During Play or Pause mode, tap the SKIP FORWARD or SKIP BACKWARD button to go to the next track or go back to the beginning of the current track. -
Page 12: Technical Specifications
Technical Specifications Power requirement mains (via adaptor): AC 100-240V, 50/60Hz Frequency Coverage: FM: 87.5-108MHz DAB: 174.928 - 239.200MHz Circuit Features Loudspeaker: 2x 66mm Full-Range Drivers Output power: 4W (RMS) Earphone socket: 3.5mm dia. Stereo Aerial system: FM: Telescopic Aerial DAB: Telescopic Aerial... -
Page 13: Important Safety Information
Important Safety Information Read these instructions. Keep these instructions. 3. Heed all Warnings. 4. Follow all instructions. 5. Do not clean the apparatus near or with water. 6. Clean only with a dry cloth. 7. Do not block any ventilation openings. Install in accordance with the manufacturer’s instructions. - Page 14 ADDITIONAL WARNINGS The apparatus shall not be exposed to dripping or splashing and no objects filled with liquid, such as vases, shall be placed on apparatus. Main plug is used to disconnect device and it should remain readily operable during intended use. In order to disconnect the apparatus from the main mains completely, the mains plug should be disconnected from the main socket outlet completely.
-
Page 15: General Information
You will get extra 2 years warranty period by registered your product within 30 days after purchase. Please fill in required information on the warranty card and email back to cs@smith- style.com within 30 days of purchase. - Page 16 The manufacturer disclaims any liability for the incidental or consequential damages. - The guarantee is in addition to and does not diminish your statutory or legal rights. Guarantor: Smith-Style Consumer Products Company Ltd. Unit 5, KBF House, 55 Vitoria Road, RH15 9LH...
Need help?
Do you have a question about the Saturn DAB and is the answer not in the manual?
Questions and answers