Table of Contents
Advertisement
Quick Links
Advertisement
Table of Contents

Related Manuals for Activa BARBECUE 11245


Summary of Contents for Activa BARBECUE 11245
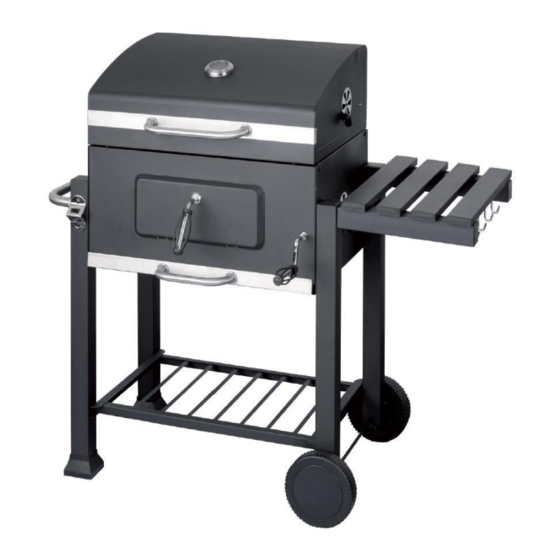
- Page 1 Art. Nr.: 11245 Angular Assembly and operating instructions Item no.: 11245 Barbecue Trolley Angular Before you start using this device, please read these installation and instructions carefully. Keep these operating instructions in a safe place for future reference. Page 1 of 17...
-
Page 2: Table Of Contents
Art. Nr.: 11245 Angular 1. Table of contents 1. Table of contents ....................2 2. Intended Use ....................2 3. Environment and disposal measures ............2 4. Safety instructions ..................3 5. Assembly Preparation ..................4 6. Exploded View ....................5 7. Parts List ......................6 8. Assembly Material ...................6 9. -
Page 3: Safety Instructions
Art. Nr.: 11245 Angular 4. Safety instructions Warning! Do not operate the grill in enclosed and/or habitable spaces, z. e.g., buildings, tents, caravans, mobile homes and boats. Only use outdoors! ATTENTION! There is a danger to life due to carbon monoxide poisoning. -
Page 4: Assembly Preparation
Art. Nr.: 11245 Angular 5. Assembly Preparation ca. 60 min. Set-up time • Read the assembly instructions carefully and follow the assembly steps. • Allow sufficient time for the assembly. • Create a working area of approx. 2 - 3 m². -
Page 5: Exploded View
Art. Nr.: 11245 Angular 6. Exploded View Page 5 of 17... -
Page 6: Parts List
Art. Nr.: 11245 Angular 7. Parts List Description Pcs. Description Pcs. Thermometer Regulation Valve Handle for Lid Warming Grid Round Cooking Grid Grill Grids Exterior Grill Charcoal Tray Support for Charcoal Tray Connection Hand Crank Crank for Grill Charcoal Tray... -
Page 7: Assembly
Art. Nr.: 11245 Angular 9. Assembly Step 1 A: M6x12 4 Pieces Assemble the side panels (14 and 34) with the front panel (33) and the back panel (32). Step 2 D: M5x10 2 Pieces E: Nut M5 2 Pieces Screw the regulation valves (3) into both side walls. - Page 8 Art. Nr.: 11245 Angular Step 3 A: M6x12 8 Pieces Mount the two wheel supports (16 and 18) and the two support legs (26 and 27) on the grill body. Make sure that the holes are correctly positioned and aligned.
- Page 9 Art. Nr.: 11245 Angular Step 5 A: M6x12 4 Pieces Mount the bottom shelf (24) between the support legs and wheel supports. Step 6 C: M6x70 2 Pieces Place the grill in the upright position and attach the transport handle (29) to the stand legs.
- Page 10 Art. Nr.: 11245 Angular Step 7 A: M6x12 4 Pieces Attach the support for the grill charcoal tray (9), as well as the connection for the hand crank (10) to the front panel, Step 8 A: M6x12 4 Pieces screw the charcoal tray (8) to the support.
- Page 11 Art. Nr.: 11245 Angular Step 9 Guide the crank handle (11) through the hole to the connection. Step 10 B: M6x35 4 Pieces Screw the hinges (30) to the grill body. Page 11 of 17...
- Page 12 Art. Nr.: 11245 Angular Step 11 H: Washer Ø6 2 Pieces F: Wing Nut M6 1 Piece A: M6x12 2 Pieces Slide the cover (15) onto the handle (17). Insert both through the opening in the door. Use the wing screw and the washer to mount the lock (13) on the handle.
- Page 13 Art. Nr.: 11245 Angular Step 13 A: M6x12 2 Pieces B: M6x35 4 Pieces D: M6x10 2 Pieces E: Nut M5 2 Pieces Mount the regulating valves (3) in the lid as well. Screw the handle (4) to the front of the lid.
- Page 14 Art. Nr.: 11245 Angular Step 15 I: Stud 2 Pieces J: SplitPin2 Pieces Place the lid on the grill body and connect the hinge with pin and split pin. Step 16 A: M6x12 2 Pieces Screw the handle for ash boxes (21) to the ash box (23).
- Page 15 Art. Nr.: 11245 Angular Step 17 First insert the warming rack (5) into the holes in the lid at the top. Then insert the two brackets at the bottom into the grill body. Step 18 Finally, place the grill grids (7) and the round grill grid (6) in the grill.
-
Page 16: Instructions For Lighting The Device
Art. Nr.: 11245 Angular Instructions for Lighting the Device 1. The fuel container has a capacity of approx. 2.0 kg. 2. Before first use, the grill must be heated up and the fuel must glow for at least 30 minutes. -
Page 17: Disposal
Art. Nr.: 11245 Angular Disposal After decommissioning the device, it must be disposed of in an environmentally friendly manner. Follow the local regulations for disposal. The device is mainly made of steel and various other materials. Metallic materials are generally considered to be recyclable without restriction. Separate com- ponents for recycling by the following categories, for example: ➢...
Need help?
Do you have a question about the 11245 and is the answer not in the manual?
Questions and answers