Advertisement
Quick Links
Advertisement

Subscribe to Our Youtube Channel
Related Manuals for LYRIC Graffiti


Summary of Contents for LYRIC Graffiti
- Page 1 Graffiti OWNER’S HANDBOOK ASSEMBLY & MAINTENANCE...
- Page 2 Please take some time to read this owner’s manual carefully before putting together and using your Lyric Cycle to become familiar with the features and con- /LYRICCYLES trols of the bike as well as the correct care and maintenance.
- Page 3 TABLE OF CONTENTS Operations Warnings Assembly Warning Quick Start Guide Bike Diagram Electrical System Overview Battery 8-11 Controller and Motor Display Throttle and Pedal Sensor Lighting and Brakes Start Up and Operations 16-17 Maintenance 18-20 Service Intervals 21-22 Belt Drive Adjustment Brakes and Wheel Maintenance Replacement Part Specifications Bike Measurements...
- Page 4 U S A G E W A R N I N G Your new Lyric Electric bike is a powerful electric vehicle that can cause injuries or even death to you, your passengers, and others around you if used improperly. In some cases, Please learn to ride your new electric bike carefully and safely and re- spect the rules of the pathways, trails, and roads of your local areas.
- Page 5 A S S E M B LY W A R N I N G : Incorrect assembly, maintenance, or use of your ebike can cause component or performance failure, loss of control, serious injury, or death. Even if you’re an experienced bike rider, you must read and understand the entire manual and any documentation provided for subcomponents or accessories before riding.
- Page 6 Before your first ride, it is your responsibility as the owner of a • Check the brake rotors to ensure all bolts are tight Lyric Cycle to check a number of key things before your first ride. • Check Battery Charge Level We suggest checking the items in the quick start steps before •...
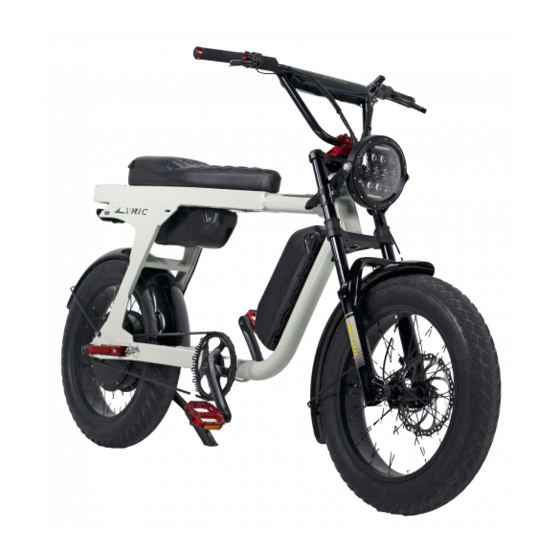
- Page 7 GET TO KNOW YOUR GRAFFITI 1 - Eggrider V2 Display 7 - Passenger 2 - Brake Levers 5 - Veer Belt Drive 8 - Removable Battery 3 - Headlight Switch 6 - Kickstand 9 - Hub Motor...
- Page 8 OVERVIEW OF ELECTRICAL COMPONENTS In this section we will go over all of the components that make up All of the components of your new Lyric Electric Bike have been your bikes electircal system. The components that will be reviewed carefully selected to function together.
- Page 9 • Weight of the rider The battery in your Lyric Cycle is made of Lithium Polymer cells • Number, size, and slope of hills on the ride which have been the tried and tested technology in powertools, •...
- Page 10 READING BATTERY LEVEL CHARGING YOUR BATTERY Your Graffiti uses the Eggrider V2 display which works in harmony Ensure the battery is fully charged before your first ride. To connect with your motor controller to read information from your batteries your charger to your battery, locate the charge port on the side of the to give you information about your remaining battery power.
- Page 11 BATTERY BALANCING REMOVING YOUR BATTERIES Your battery should be balanced when you first receive your bike You can easily remove your batteries from your bike with a sim- and for the first three times you charge your battery. This is a pro- ple operation.
- Page 12 5th or 6th charge as a rebalance • If charge levels are below 80% after The remaining battery percentage on dual battery models will de- charger completes charging contact Lyric pend on whether you have both batteries turned on. Battery percent- Cycles...
- Page 13 This motor drives the bike forward from the rear wheel using ies. Your Graffiti uses a 50A continuous sine wave controller with large magnets. Lyric Graffiti uses a direct-drive hub as it is the 90A peak capability. The controller is the central place where all lowest maintenance type of motor for an electric bike.
- Page 14 DISPLAY The Lyric Graffiti uses the Eggrider V2 display. This is a com- pact, high performance display that allows you to adjust some of the parameters of your ride as well as track and log your rides through the Eggrider mobile app (download available - Search...
- Page 15 PEDAL SENSOR THROTTLE Your Lyric Graffiti has 2 different methods to engage the electric The Throttle can be found on the handlebar next to the right motor, the Pedal/Cadence Sensor and the Throttle. The Pedal/ grip. This is a thumb actuated lever that will activate the motor...
- Page 16 The Graffiti is not wired for turn signals. If you choose to wire turn signals onto your bike this will void your warranty as we can’t gau- Regenerative brakes will provide 5-10% of your charge back rentee the wiring of additional peripherals, lights and switches.
- Page 17 Begin pedaling the bike or press the throttle to begin for- ward motion of the bike. The Off-Road setting on your Lyric Graffiti is a powerful mode that is not meant for use in most municipal areas WARNING: Engaging the pedal assist feature, especially (bike paths, trails, roads).
- Page 18 WEIGHT LIMIT OF YOUR BIKE CARRYING A PASSENGER Your Lyric Graffiti has a weight capacity of 325lbs including both the Respecting the weight limits of the bike, you can choose to carry a bike and rider. This weight limit is due to the safe operating load for passenger.
- Page 19 This is espe- handlebar was installed. Turn the handlebar fully to the left and cially true of the Lyric Graffiti because of the higher top speed which right and make sure the cables and wires don’t impede steering.
- Page 20 BEFORE EVERY RIDE Wheels & Tires Before every ride or every 40–72 km (25–45 miles), follow the safe- • Ensure tires are holding air and inflated to 12-20 PSI ty checklist in the table below. If you find anything wrong with your •...
- Page 21 Motor & Throttle P A R T S M A I N T E N A N C E • Ensure the hub motor is spinning smoothly and is in good work- ing order. • Ensure the power cable running to the hub motor is securely Riding your bike when any component’s useful life is sur- screwed together and undamaged.
- Page 22 SERVICE OVERVIEW SERVICE INTERVALS Regular maintenance of any bike is key to ensuring the best possible WEEKLY, 160–320 KM (100–200 MILES) performance and reducing wear and tear on systems. Ideal service intervals vary depending on use conditions. We generally recom- •...
- Page 23 200 72-87 Add or Reduce air based on the chart to The front suspension on your Lyric Graffiti is and air adjustable 170 68-80 the left (Rider weight in LBS and shock fork with adjustable rebound. Proper adjustment of the fork along...
- Page 24 ADJUST THE BELT DRIVE Adjust Belt Alignment Your Lyric Graffiti has an innovative carbon belt drive system by Veer Your belt needs to have appropriate alignment with the rear Cycle. Belt drives last 4-5 times longer than a chain under normal cog.
- Page 25 REPLACING TIRES • Logan Pads: Available through Lyric Cycles The tires on your Lyric Graffiti are a 20” bicycle fat tire. You can • Shimano D02S: Metal pads - Strong and last long but pro- choose to use tires from 3” to 4.25” wide. Please do not use mo- duce more noise torcycle tires on your Lyric Graffiti.
- Page 26 Batteries 52V 17.5ah (BMS must be 50A continuous) Drivetrain Veer cogs and belt (can be changed to 7-speed drivetrain, not offered through Lyric Cycles but can be found aftermarket though will not be covered under warranty) Belt Veer Split Belt (Non-standard size only available through Lyric Cycles)
- Page 27 GRAFFITI MEASUREMENTS ITEM DESCRIPTION MEASUREMENT ITEM DESCRIPTION MEASUREMENT Handlebar Width 29” 737mm Seat Height 31.5” 800mm Overall Height 43” 1090mm Bottom Bracket Height 10.5” 270mm Overall Length 69.5” 1740mm Seat Length 25.5” 650mm Wheelbase 50” 1270mm Rear Rack Length 6.75”...
- Page 28 LYRIC CYCLES Customer Support lyriccycles.com Squamish, BC V8B 0V7 +18884407789 / info@lyriccicles.com lyriccycles.com...
Need help?
Do you have a question about the Graffiti and is the answer not in the manual?
Questions and answers