Advertisement
Available languages
Available languages
Quick Links
Assembly Instructions, Montageanleitung, Notice D'assemblage, Montážní návod
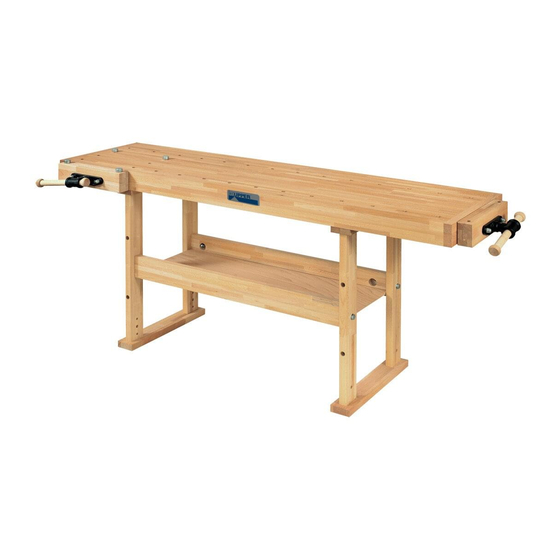
A-1500, A-1700, A-2000
Attention/Achtung/Attention/Pozor:
ENG
Workbench is made of high quality beech wood guaranteeing maximum resistance and long service life of the bench. Like all solid
wood products it must not be left in areas of high humidity or damp that will cause natural movement. Recommended
humidity level max. 60%.
If you bought workbench without surface treatment, we recommend you to finish the bench by colourless varnish or oil including
the bottom of workbench. Please treat your bench with a varnish or oil within 1 months of assembly. Varnish (oil) prevents
absorption of surrounding moisture. Don´t forget to repeat surface treatment each year.
To increase the rigidity of your workbench ensure that you glue the joints (please read Hint 1 and 2) and bolt the bench in
position. Wood is a natural product, check and tighten all screws and bolts every 6 monhts.
DE
Die Hobelbank ist aus hochwertigem Buchenholz hergestellt. Maximale Beständigkeit und lange Lebensdauer ist garantiert. Die
Hobelbank nicht in feuchter Umgebung benutzen. Empfohlene Luftfeuchtigkeit max. 60%.
Wenn Sie die Hobelbank ohne Oberflächenversiegelung gekauft haben, empfiehlt es sich, die Bank mit farblosem Lack oder Öl zu
lackieren. Bitte behandeln Sie Ihre Hobelbank innerhalb von 1 Monate nach dem Zusammenbau mit einem Lack oder Öl. Das
verhindert das Eindringen von Feuchtigkeit. Den Vorgang bitte 1x pro Jahr wiederholen.
Um die Stabilität der Hobelbank zu erhöhen empfiehlt es sich, die Bank auf dem Boden festzuschrauben. Alle 6 Monate bitte alle
Schrauben nachziehen.
FR
L'établi est fabriqué à partir de bois de hêtre de haute qualité garantissant une résistance maximale et une longue durée de vie.
L'établi ne doit pas être laissé dans des conditions humides qui provoqueront des mouvements dans le bois. Niveau d'humidité
recommandé max. 60%.
Si vous avez acheté un établi sans traitement de surface, nous vous recommandons de le finir avec un vernis ou une huile
incolore, y compris le fond de l'établi. Veuillez traiter votre banc avec un vernis ou de l'huile dans le mois suivant l'assemblage.
Le vernis (huile) empêche l'absorption de l'humidité environnante. Ne pas oublier de répéter le traitement de surface tous les
ans .
Pour augmenter la stabilité de votre établi, nous vous recommandons de boulonner le banc au sol.
Tout les 6 mois serrez toutes les vis et tous les boulons.
CZ
Výrobek je zhotoven z vysoce kvalitní bukové spárovky, která zaručuje dlouhou životnost a užitnou hodnotu. Výrobek nesmí být
vystaven dlouhodobému přímému působení vody či zvýšené vlhkosti, která může způsobit rozpínavost použitého dřeva.
Doporučena vlhkost maximálně 60 %.
Pokud jste si objednali hoblici bez povrchové úpravy, je nezbytné ji do 1 měsíce po montáži natřít bezbarvým olejem (nejlépe
lněným) případně lakem včetně spodní části hoblice. Nátěr zamezí absorbování okolní vlhkosti. Povrchovou úpravu aplikujte
alepoň 1x ročně.
Pro zvýšení stability ukotvěte hoblici k podlaze.
Minimálně jednou za 6 měsíců, utáhněte veškeré šroubové spoje.
PARTS
PACKING 1
PACKING 2
DATE
Friedrich Küpper GmbH, Friedrich-Küpper-Weg, 54570 Berlingen, Germany, http://www.friedrich-kuepper.de
Advertisement

Related Manuals for kupper A-1500


Summary of Contents for kupper A-1500
- Page 1 Assembly Instructions, Montageanleitung, Notice D'assemblage, Montážní návod A-1500, A-1700, A-2000 Attention/Achtung/Attention/Pozor: Workbench is made of high quality beech wood guaranteeing maximum resistance and long service life of the bench. Like all solid wood products it must not be left in areas of high humidity or damp that will cause natural movement. Recommended humidity level max.
-
Page 2: Dimensions, Abmessungen
Dimensions, Abmessungen (Manufactruring tolerance 1cm, Fertigungstoleranz 1 cm) A-1500 LxWxH (without vices) - 1340x500x850mm LxWxH (incl. vices) - 1500x650x850mm Top thickness - 30mm Apron depth - 90mm Front vice = Side vice (size/span) - 360x55mm / 130mm Weight - 47kg LxBxH (ohne Zangen) - 1340x500x850mm LxBxH (inkl. -
Page 3: Parts List
Parts List Hardware List Bench Top M12x100 Bolt Front leg with bench dogs holes M12 Nut Back leg Washer Top rail support with hole for screw 6x40mm Bolt Base 5x50mm Screw Middle Stretchers 6x30mm Bolt Centre Shelf Wrench ends Wooden jaw Dowel 10x40mm Spindel (vice) Bench dogs... - Page 4 Hint: Don´t fill up holes by glue. Just smear (dive) dowels and insert them into the holes Hint: Before assembly of tool shelf, decide, if you want to have deeper or shallower shelf. Grooves down = deep shelf Grooves up = shallow shelf Before screwing of vice jaws (8), be sure that jaws are parallel with bench top (1).
- Page 5 Parts List Hardware List Hobelbank Arbeitsplatte M12x100 Schraube Vorderes Tischbein mit Löcher für bankhaken M12 Mutter Hinteres Tischbein Scheibe Plattenträger mit Löcher für Holzschraube 6x40mm Schraube Bodenplatte 5x50mm Holzschraube Querbalken 6x30mm Schraube Regalboden Hebelkopf Klemmbacke Dübel 10x40mm Schraubstock Rundbankhaken Schraubstockhebel Kleber (nicht aufgeführt) X = Bohrungen für die Querbalken, wenn ein Schrank mitverwendet wird !!! ACHTUNG !!! Wenn Sie diese Werkbank mit einem Schrank kaufen, prüfen Sie zuerst die Anleitung des Schrankes.
- Page 6 1. Bodenplatte (5), Plattenträger (4), hinteres Tischbein (3) und vorderes Tischbein (2) mit vorgebohrten Dübel-Löchern nach innen bereitlegen (Abbildung 1). Befestigen Sie die Bodenplatte und den Plattenträger mit dem vorderen und hinteren Tischbein mit 4 Dübeln (18) und Klebestoff (20) (Abbildung 1).
- Page 7 Parts List Hardware List Dessus de banc M12x100 le boulon le pied avant avec les trous M12 écrou le pied arrière la rondelle le support haut 6x40mm le boulon la base 5x50mm Vis à bois des traverses 6x30mm le boulon l'étagère Clé...
- Page 8 1. Placez la base (5), le support haut (4), le pied arrière (3) et le pied avant avec les trous pour les valets (2), les trous pour tourillons vers l'intérieur comme montré en Fig.1. Insérez les tourillons (18) en les collants (biberon de colle (20) comme montré...
- Page 9 Dílce hoblice Montážní součástky Plát Šroub M12x100 Přední noha s dírou Matka M12 Zadní noha Podložka Nosník Šroub 6x40mm Bačkora Vrut 5x50mm Spojka Šroub 6x30mm Police Zakončení klíče do vřetene Příložka Kolík 10x40mm Vřeteno HV515 Truhlářský poděrák Klíč do vřetene Lepidlo (není...
- Page 10 1. Montáž podnoží: slepte bačkoru (č.5), nosník (č.4), přední nohu s dírou pro poděráky (č.2) a zadní nohu (č.3) pomocí kolíků (č.18) a lepidla (č.20) dle obr. 1. POZOR: do otvoru pro kolíky dejte přiměřené množství lepidla. Stejný postup opakujte pro sestavení druhého podnoží. Podnoží nechte min. 30 minut zachnout.
Need help?
Do you have a question about the A-1500 and is the answer not in the manual?
Questions and answers