Table of Contents
Advertisement
Quick Links
THIS GAS-FIRED APPLIANCE IS FOR COMMERCIAL USE AND NOT FOR HOUSEHOLD USE.
PURCHASER OF THIS GAS APPLIANCE SHOULD POST INSTRUCTIONS IN A PROMINENT LOCATION.
TO BE FOLLOWED IN THE EVENT THE USER SMELLS GAS.
THIS INFORMATION IS AVAILABLE FROM YOUR LOCAL GAS SUPPLIER.
FOR YOUR SAFETY
Keep gasoline and other flammable vapors and liquids away from this or any other appliance.
Keep this gas-fired appliance and the surrounding area free of combustibles.
Keep the vent holes on the top and back of this unit free of obstructions to provide proper airflow for
combustion and ventilation.
1
Advertisement
Table of Contents

Subscribe to Our Youtube Channel
Related Manuals for Autodoner 3PGM

Summary of Contents for Autodoner 3PGM
- Page 1 THIS GAS-FIRED APPLIANCE IS FOR COMMERCIAL USE AND NOT FOR HOUSEHOLD USE. PURCHASER OF THIS GAS APPLIANCE SHOULD POST INSTRUCTIONS IN A PROMINENT LOCATION. TO BE FOLLOWED IN THE EVENT THE USER SMELLS GAS. THIS INFORMATION IS AVAILABLE FROM YOUR LOCAL GAS SUPPLIER. FOR YOUR SAFETY Keep gasoline and other flammable vapors and liquids away from this or any other appliance.
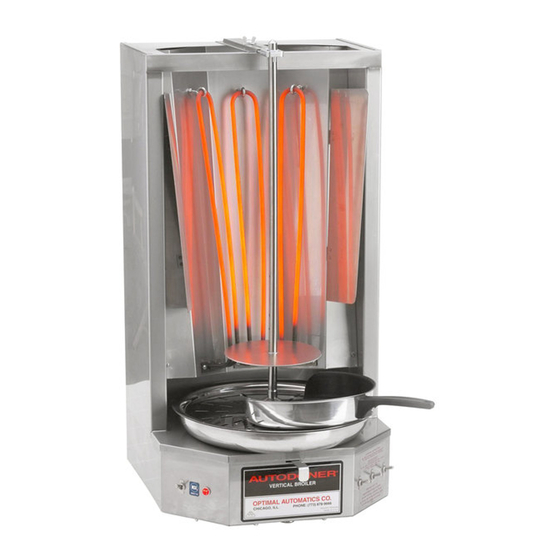
- Page 2 INCLUDED IN BOX #11601 Skewer Complete with Meat Base #12000 Catch Pan #11700 Drip Pan #11710 Drip Pan Cover ...
- Page 3 INSTALLATION This appliance is for counter‐top placement under a ventilating hood for fume removal. Installation shall not be closer than 6” from sidewall and 3” from rear wall. Installation must be by a licensed plumber or gas fitter and be in accordance with the National Fuel Gas Code, ANSI Z223.1, NFPA #54‐2002 Sec. 10.3.5.2, and National Electrical Codes, ANSI, NFPA # 70‐1981. Before connection to gas supply, check tag on rear of unit. This appliance may be set‐up for use with LP Gas, in which case, you should use an external regulator designed for use with LP gas, set an 11” W.C. In addition, hoses and couplings to fit ½” FPT that are suitable for LP gas should be used. These are available from your local LP Gas distributor. On units’ labeled (NAT) natural gas, use a flexible gas connector (1/2” MPT) to connect gas line in facility to the ½” FPT at the back of the Autodoner. The gas line should be equipped with a shut off valve. No external regulator is needed; these units are equipped with a factory set regulator for Natural Gas. The appliance is equipped with a three‐prong (grounding) plug for your protection against shock hazard. It should be plugged directly into a properly grounded three‐prong receptacle. Do not cut or remove the grounding prong from this plug. This appliance when installed must be electrically grounded in accordance with local codes. TO LIGHT PILOTS & BURNERS Turn the gas valve knob on front of unit clockwise to “OFF” position. Open gas flow to gas line and wait 1 minute. Light the pilot at lower part of burners. The pilot should stay on all the time. Turn the gas valve knob counter‐ clockwise to “ON” position to light the main burner. TO SHUT DOWN To lower or shut‐off main burner, turn gas valve knob clockwise (OFF). To shut‐off pilot, close gas valve on gas line. Do not attempt to re‐light burner without waiting 5 minutes. COOKING AND HANDLING INSTRUCTIONS (FOR GYROS, DONER KEBAB, & SHAWARMA) As you well know, when dealing with raw meat, strict adherence to accepted cooking directions is mandatory. The following directions covering the cooking and serving of Meat Cones, which comes from Public Health sources all over the country, will provide you with all the information you need to serve your customers a consistent delicious and safe sandwiches. ...
- Page 4 They may be protected by covering them with aluminum foil. The motor bearing is permanently lubricated, and it does not require maintenance. No other maintenance is required. 120 Stanley St., Elk Grove Village, IL 60007 Toll Free Phone: 888-878-9611 Fax: 847-439-9115 www.autodoner.com...
- Page 5 #12840 Motor Switch #12820 Flange Bearing #16530 - Gas Knob #12800 Motor 120v with Fan #12900 - Heat Shield - Set (Standard) #10803 - 3PGM Burner #12850 Indicator Light 120v #11630 Skewer Holder Clip #12950 Handle Nut #11640 Skewer Stand #12010 Gyros Knife 14"...
Need help?
Do you have a question about the 3PGM and is the answer not in the manual?
Questions and answers
Hi is it possible to make the motor rotate the other way? To reverse the rotation?