Table of Contents
Advertisement
Quick Links
Advertisement
Table of Contents

Subscribe to Our Youtube Channel
Related Manuals for Smartwares SHS-54000

Summary of Contents for Smartwares SHS-54000
- Page 1 Wireless Weather Station Manual (SHS-45000EU)
-
Page 2: Table Of Contents
Table of contents Quick Start Procedure ................ 3 Introduction ..................4 Features .................... 5 Contents of Complete Weather Station Kit ........7 Installing your weather station ............9 Setting up the Remote Weather Sensors .......... 9 ... -
Page 3: Quick Start Procedure
Quick Start Procedure Installing your weather station is quick and easy! 1. Insert batteries in the main console unit and power up the display with the adapter. 2. Pair the remote sensors (thermometer, wind meter, rain meter) with the main console with the following procedure: a. -
Page 4: Introduction
Introduction Congratulations on your purchase of the Wireless Weather Station. The weather station consists of a main console unit as well as an assortment of remote sensors which collect and transmit a wide range of weather data, including outdoor temperature, humidity, wind speed and direction, rain amount and rain rate. -
Page 5: Features
Features Weather Forecast Sunny, Partly Cloudy, Cloudy, Slight Rain, Heavy Rain, Snow and Unstable Weather conditions Pressure Current or historical pressure (mBar/ hPa, mmHg or inHg) Altitude or sea level pressure adjustment for atmospheric pressure compensation Pressure trend indication Sea-level pressure history for the last 24 days Sea-level pressure history bar chart Moon phase 12 steps of moon symbols... - Page 6 (DST, zone time offset, latitude, longitude) Remote temperate and relative humidity, with trend indication Indoor and outdoor temperature and relative humidity display (ºC or ºF) Temperature and relative humidity trend indication Dew point display Max and Min memory for temperature and relative humidity Comfort level indicator Analyzes current environmental conditions (Comfort, Wet and Dry) Rainfall measurement...
-
Page 7: Contents Of Complete Weather Station Kit
Contents of Complete Weather Station Kit Before installing your weather station, please check that the following items are complete: Hardware Components Fittings Main Console Unit AC/DC 7.5V output adaptor Thermo-Hygro Sensor Rain Sensor: -Funnel shaped Lid 4 screws with Battery Hatch for securing -Sensor Base unit to... - Page 8 Anemometer (Wind Sensor): 4 screws -Wind Cups for securing -Wind Vane unit to - Anemometer arm vertical - Anemometer base surface...
-
Page 9: Installing Your Weather Station
Installing your weather station Setting up the Remote Weather Sensors To pair the remote sensors with the main console unit, first connect the AC/DC adaptor with the main console and press the ‘ON’ button to power up. Keep the sensors nearby. The procedure for pairing a sensor to the main console is as follows: 1. -
Page 10: Setting Up The Thermo-Hygro Sensor(S)
placing the console unit in the following areas: Direct sunlight and surfaces which radiate and emit heat. • Near heating and ventilation devices, such as heating ducts or air • conditioners. Areas with interference from wireless devices (such as cordless •... -
Page 11: Setting Up The Solar Powered Wind Meter
5. Place the rain sensor in a location such that precipitation can fall directly into the sensor, ideally 2-3 ft above the ground. 6. It may be secured into place by using the four screws provided. 7. The sensor must be accurately level for optimum performance. To check if the sensor is level, remove the lid and check if the ball bearing inside is at the midpoint of the leveler. - Page 12 The wind direction measurement is calibrated in the factory. If you find the wind direction to be inaccurate, it is possible to calibrate the wind meter with the following procedure: a. Insert the batteries b. Point the wind vane towards the north. Use a compass or map if necessary.
-
Page 13: Using Your Weather Station
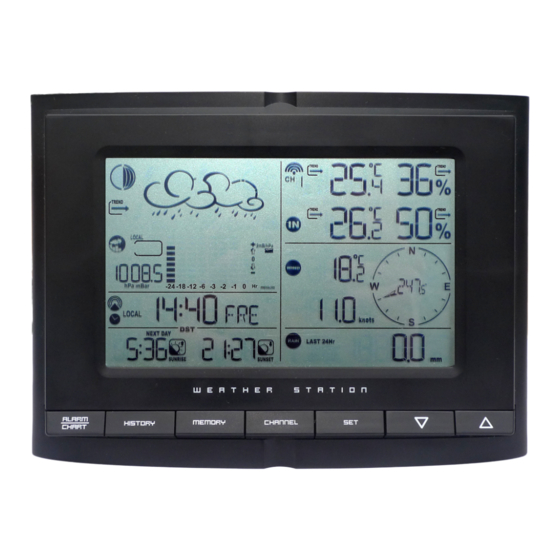
Using your Weather Station Buttons UP (+) - Switches to next mode in anti-clockwise direction - Increment for setting parameters DOWN (-) - Switches to next mode in clockwise direction - Decrement for setting parameters - Rotates display for current mode - Press and hold to enter setup or change units - Confirmation for setting parameters MEMORY (MEM) -
Page 14: Navigating Between Different Modes
Navigating between Different Modes There are 6 modes available on the main console unit, and each one displays a different category of data. When display is in a certain mode, its corresponding icon will start flashing. To navigate between the different modes from the main console unit, press UP (+) to cycle through the modes in a clockwise direction or DOWN (-) to cycle through the modes in an anti-clockwise direction. - Page 15 Sunrise/Sunset Mode Sunrise and sunset times • Longitude and Latitude of local area • Temperature and Humidity Mode Temperature and humidity trend and readings for indoor and selected • channel Comfort level • Dew point • Temperature alerts •...
- Page 16 Rain Mode Precipitation amount for last hour, last 24 hour, yesterday, last week • and last month Rainfall alert • Wind Mode Wind Chill • Temperature at place of anemometer • Wind direction • Wind speed • Wind gust • Alert for wind speed and wind gust speed •...
-
Page 18: Using The Different Weather Modes
Using the Different Weather Modes Pressure and Weather Forecast Mode This part of the display indicates the current pressure, sea level pressure, weather forecast, moon phase and pressure trend. A number of historical statistics can also be viewed, such as the sea-level pressure values for the last 24 hours, moon phase for the previous and next 39 days, as well as a pressure/ temperature/ humidity history bar-chart. - Page 19 Note: After initial start-up the altitude cannot be adjusted again until the main console unit is restarted. Viewing Pressure and Altitude Data In Pressure and Weather Forecast Mode, each press of SET rotates display between: Sea level pressure • Local pressure •...
- Page 20 Press MEMORY (MEM) to confirm your selection. 6. Upon completion the display will be returned to Pressure and Weather Forecast Mode. Viewing the Sea Level Pressure History 1. In all modes, pressing HISTORY will toggle the sea level pressure display. 2.
-
Page 21: Understanding The Weather Forecast Display
Understanding the Weather Forecast Display Display Weather Forecast Status Sunny Partly Cloudy Cloudy Rain Unstable Weather Snow NOTE: - The accuracy of a general pressure-based weather forecast is about 70%. - The weather forecasts. It may not necessarily reflect the current situation. - The “Sunny”... - Page 22 Understanding the Moon Phase Diagram Clock and Alarm Mode The main console unit can be configured to display the time, calendar or UTC time. There are three time alarms available on the console unit: Single alarm: activated once at specified time Weekday alarm: activated everyday from Monday to Friday at specified time Pre-alarm: activated at specified time interval (Fixed 30 min) ahead of weekday alarm, if channel 1 temperature falling to +2 ºC or below.
- Page 23 either button for fast advance. Press SET to confirm your selection. Repeat the above instructions to set year, month, day, calendar display format (day/month or month/day), time display format (12 hr/ 24 hr), local hour and local minutes. 5. Upon completion the display will return to normal Clock and Alarm Mode.
- Page 24 Press UP (+) or DOWN (-) to adjust value. Press and hold either button for fast advance. Press ALARM/CHART to confirm your selection. 3. Set Alarm Minutes: Press UP (+) or DOWN (-) to adjust value. Press and hold either button for fast advance.
- Page 25 Press and hold UP (+). If RC reception is activated, a triangular tower icon will start flashing beside the clock icon. If RC reception is deactivated, the triangular tower icon will disappear. Icon RC Reception Strength Undefined data (Flashing) Reception failed for 24 hours Weak signal, but can be decoded Strong signal Note: The radio controlled signal for time (DCF 77) is transmitted from the central atomic clock...
- Page 26 Accessing Sunrise/Sunset Mode From the main console unit: Press UP (+) or DOWN (-) until the sunrise and sunset icons on the lower left of the display start flashing. Setting up the Location Data 1. In Sunrise/Sunset Mode, press and hold SET to enter location data setup.
- Page 27 2. Press UP (+) or DOWN (-) to adjust date. Press and hold either button for fast advance. 3. The corresponding sunrise and sunset times will be displayed for the selected date. 4. Press MEMORY (MEM) or SET to return display to Sunrise/Sunset Mode.
- Page 28 from sounding constantly due to small fluctuations near the alert value. This means that after the temperature reaches the alert value, it will have to fall below the alert value plus the hysteresis to deactivate the alert. Accessing Temperature and Humidity Mode From the main console unit: Press UP (+) or DOWN (-) until the IN icon on the upper right of the display starts flashing.
- Page 29 Setting up the Temperature Alerts 1. In Temperature and Humidity Mode, press ALARM/CHART to select alarm which you wish to configure. Press and hold ALARM/CHART until channel temperature and ▲or▼ icon starts flashing in the display. 2. Set Value for Temperature Alert: Press UP (+) or DOWN (-) to adjust value.
- Page 30 Icon Status Searching for remote sensor signals Corresponding remote sensor successfully linked Communication error between remote sensor and main console Activating Main Console Unit to Search for All Remote Sensor Signals The main console unit may be manually activated to search for signals from all remote sensors.
- Page 31 Last month • Tip: For an estimation of the rain rate, the Last Hour rainfall value can be understood as “inch/hr” or “mm/hr”. Resetting the Rainfall Statistics Memory In Rain Mode, press and hold MEMORY (MEM) to reset all rainfall statistics. Setting Units for Rain Display (inch or mm) In Rain Mode, press and hold SET to convert units between mm and inches.
- Page 32 Wind Mode The wind direction is shown by an animated compass display. Its angle can be displayed as compass points (i.e. NW) or in bearings from the north (i.e. 22.5º). The upper left of the wind display can be set to indicate the temperature at the anemometer or the temperature adjusted with a wind chill factor.
- Page 33 Viewing Wind Statistics In Wind Mode, each press of MEMORY (MEM) rotates wind speed display between: - Current wind speed - Daily maximum wind speed (“DAILY MAX” is displayed) - Gust speed (“GUST” is displayed) - Daily maximum gust speed (“GUST DAILY MAX” is displayed) Resetting the Wind Statistics Memory In Wind Mode, press and hold MEMORY (MEM) to reset all wind statistics.
-
Page 34: Maintenance
Maintenance Changing Batteries The battery statuses of the sensors are checked every hour. If the low battery indicators light up, replace the batteries for the corresponding unit immediately. Changing Batteries for the Remote Sensors 1. Replace the batteries following the setup instructions for the corresponding sensor. -
Page 35: Troubleshooting
Troubleshooting “The display shows “0.00” for weather parameter(s)” The display will show “0.00” when the wireless link is lost with the remote sensor. Check or replace the batteries for the corresponding sensor. If the above does not solve the problem, check the wireless transmission path from the corresponding sensor to the main console unit and change their locations if necessary. - Page 36 4. Do not tamper with the unit's internal components. Doing so will invalidate the warranty on the unit and may cause unnecessary damage. The unit contains no user-serviceable parts. 5. Only use fresh batteries as specified in the user's manual. Do not mix new and old batteries as the old ones may leak.
-
Page 37: Appendix
Appendix City Codes US and Canadian Cities Zone Zone City Code Offset City Code Offset Atlanta, Ga. Memphis, Tenn. Austin, Tex. Miami, Fla. Baltimore, Md. Milwaukee, Wis. Birmingham, Ala. Minneapolis, Minn. Boston, Mass. Montreal, Que., Can. Calgary, Alba., Can. Nashville, Tenn. Chicago, IL New Orleans, La. - Page 38 Zone Zone City Code Offset City Code Offset Seattle, Wash. Vancouver, B.C., Can. St. Louis, Mo. Washington, D.C. Tampa, Fla. Vancouver, Canada Toronto, Ont., Can.
- Page 39 World Cities Time Time City Code Zone City Code Zone Addis Ababa, Ethiopia Cairo, Egypt Adelaide, Australia Calcutta, India (as Kolkata) Algiers, Algeria Cape Town, South Africa Amsterdam, Netherlands Caracas, Venezuela Ankara, Turkey Chihuahua, Mexico Asunción, Paraguay Copenhagen, Denmark Athens, Greece Córdoba, Argentina Bangkok, Thailand Dakar, Senegal...
- Page 40 Zone Zone Kinshasa, Congo Oslo, Norway Kuala Lumpur, Malaysia Panama City, Panama La Paz, Bolivia Paris, France Lima, Peru Perth, Australia Lisbon, Portugal Prague, Czech Republic Liverpool, England Rangoon, Myanmar London, England Reykjavík, Iceland Lyon, France Rio de Janeiro, Brazil Madrid, Spain Rome, Italy Manila, Philippines...
- Page 41 DST definition SA = Australian DST. SB = South Brazilian DST. Changes annually. SC = Chile DST SE = Standard European DST. SG = Egypt DST SH = Havana, Cuba DST SI = Iraq and Syria DST SK = Irkutsk & Moscow DST SM = Montevideo, Uruguay DST SN = Namibia DST SP = Paraguay DST...
-
Page 42: Technical Specifications
Technical Specifications Weather Station Receivers Receiver (Supply=6.0V, Ta=23°C) and Sensor unit (Supply=3.0V, Ta=23°C) RF Transmission Frequency 868 MHz RF Reception Range Thermo-hygro Sensor 50 meters maximum (Line of Sight) Wind Sensor, Rain Sensor 50 meters maximum (Line of Sight) Barometric Pressure Range 500 hpa to 1100hpa (At sea level ) (374.5 mmHg to 823.8 mmHg ) - Page 43 Wind Speed Accuracy +/- ( 2mph + 5% ) Wind Speed Starting Threshold 3mph Wind/Gust Speed Disply Update Interval 33 seconds Wind/Gust Sampling Interval 11 seconds 1h/24h/yesterday Rainfall Range 0.0 to 1999.9 mm ( 78.73 inch ) Last week/ last month Rainfall Range 0 to 19999 mm ( 787.3 inch ) Temperature Sensing Cycle (indoor) Humidity Sensing Cycle (indoor)
Need help?
Do you have a question about the SHS-54000 and is the answer not in the manual?
Questions and answers