Advertisement
Quick Links
6 CORPORATE PARKWAY
,
.
GOOSE CREEK SC 29445
.
.
www quoizel com
PACKAGE CONTENTS
Description
Part
Mirror Hanger
A
B
Lock Screw
Hanger Nail
C
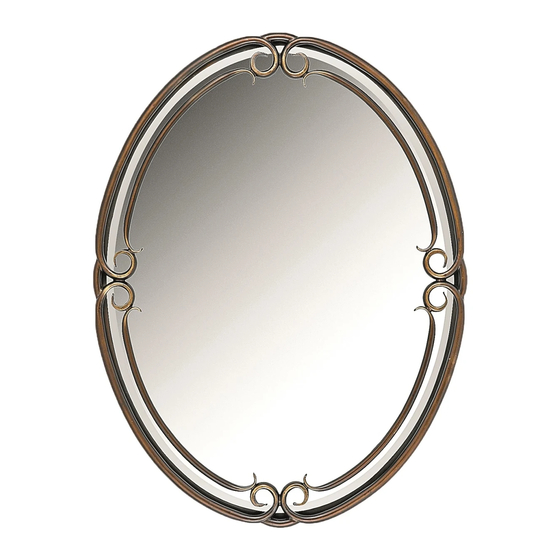
Mirror
D
Crossbar with 3 holes
E
Crossbar with 1 hole
F
Mirror Frame
G
!
WARNINGS AND CAUTIONS
CAUTION:
●
These instructions are provided for your safety. It is very important that they are read completely before
the installation of your fixture.
PREPARATION
●
Before beginning installation of product, make sure all parts are present. Compare parts with package
contents list and diagram above. If any part is missing or damaged, do not attempt to assemble, install or
operate the product. Contact customer service for replacement part.
●
Estimated Assembly Time : 15
●
Tools Required for Assembly (not included) : Flathead screwdriver Phillips screwdriver, pliers.
PREPARATION
STEP 1
:
*
Quoizel recommends 2 people for each step.
.
a Place the Mirror Frame onto a flat working surface with the
back facing you. Carefully locate the Mirror onto the Mirror
Frame.
.
b Locate Crossbars onto the Mirror Frame as shown and
match the holes on them onto the Mounting Holes on the
Mirror Frame. Please be sure that 2 holes are against the
another crossbar while you assemble the Crossbar with 3
holes.
.
c Thread the Lock Screws into the Mounting Holes on the
Mirror Frame and hand tighten until snug to secure them
together.
INSTRUCTION SHEET IS DH44030
STYLE NUMBER DH44030PN
Quantity
2pcs
4pcs
4pcs
1pc
1pc
1pc
1pc
D
E
F
-
30 minutes
1 OF 3
:
ISSUED 1-2009
A
B
C
,
Mounting Hole
Mirror
Mirror Frame
-
Lock Screw
Crossbar with 1 hole
Crossbar with 3 holes
G
Advertisement

Summary of Contents for Quoizel DH44030PN
- Page 1 Tools Required for Assembly (not included) : Flathead screwdriver Phillips screwdriver, pliers. PREPARATION STEP 1 Lock Screw Quoizel recommends 2 people for each step. Mounting Hole a Place the Mirror Frame onto a flat working surface with the back facing you. Carefully locate the Mirror onto the Mirror Frame.
- Page 2 ASSEMBLY INSTRUCTIONS STYLE NUMBER DH44030PN FOR VERTICAL STEP 2 a Lift and position where the Mirror will reside on the wall "C” surface and with a tape measure, mark distance from floor Hanging Hole to the bottom edge of the frame with a pencil. Mark should be located at a point representing ½...
- Page 3 ASSEMBLY INSTRUCTIONS STYLE NUMBER DH44030PN FOR HORIZONTAL STEP 6 Crossbar with 3 Holes a Lift and position where the Mirror will reside on the wall surface and with a tape measure, mark distance from floor to the bottom edge of the frame with a pencil. Mark should be located at a point representing ½...