Table of Contents
Advertisement
Quick Links
USER MANUAL
GUIDE DE L'UTILISATEUR
MANUAL DEL USUARIO
MMV700 Series MegaMouth
™
LOW SPEED JUICER AND NUTRITIONAL SYSTEM
Série MMV700 MegaMouth
™
EXTRACTEUR DE JUS À VITESSE FAIBLE ET SYSTÈME ALIMENTAIRE
MegaMouth
de la serie MMV700
™
SISTEMA DE NUTRICIÓN COMPACTO Y EXTRACTOR DE JUGO A BAJA VELOCIDAD
www.OmegaJuicers.com
011317
Advertisement
Table of Contents

Related Manuals for Omega MegaMouth MMV700S


Summary of Contents for Omega MegaMouth MMV700S
- Page 1 USER MANUAL GUIDE DE L’UTILISATEUR MANUAL DEL USUARIO MMV700 Series MegaMouth ™ LOW SPEED JUICER AND NUTRITIONAL SYSTEM Série MMV700 MegaMouth ™ EXTRACTEUR DE JUS À VITESSE FAIBLE ET SYSTÈME ALIMENTAIRE MegaMouth de la serie MMV700 ™ SISTEMA DE NUTRICIÓN COMPACTO Y EXTRACTOR DE JUGO A BAJA VELOCIDAD www.OmegaJuicers.com 011317...
- Page 2 Omega thanks you for supporting us for over 50 years! Join us on Twitter @OmegaAppliances &/or on Facebook @OmegaJuicers PRODUCT REGISTRATION, VISIT: www.omegajuicers.com/omega-warranty-registration RECIPES, VISIT: www.omegajuicers.com/recipes CUSTOMER SERVICE: Call 1-800-633-3401 or visit: www.omegajuicers.com/contact-omega-juicers After using your Omega, we kindly ask you to rate the machine on www.OmegaJuicers.com...
-
Page 3: Table Of Contents
TABLE OF CONTENTS Safety First Know Your Omega 04-06 Assembling Your Omega Appliance 07-09 Operating Instructions & Tips 10-11 Ingredient Tips When Using Juice Screen 12-14 Ingredients Preparation 15-16 Disassembling & Cleaning Cleaning the Silicone Parts Using the Cleaning Tool... -
Page 4: Safety First
19. It is recommended to regularly inspect the appliance. Do not use the appliance if the power supply cord, plug or appliance becomes damaged in any way. Return the entire appliance to the nearest authorized Omega Service Center for examination and/or repair. -
Page 5: Know Your Omega
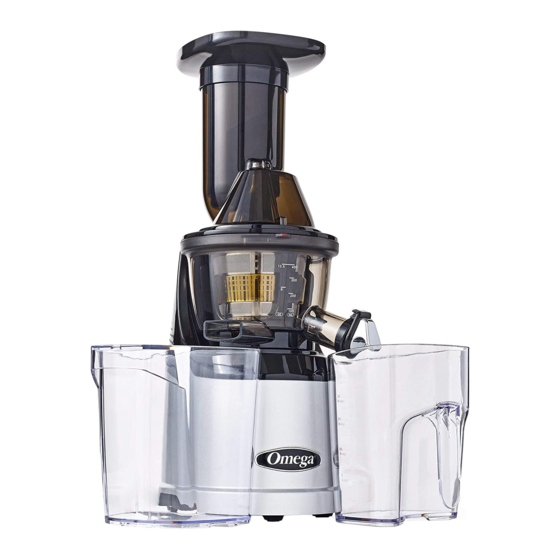
KNOW YOUR OMEGA Feeder Tube Blank Cone Drum Lid Rotation Wiper Juicing Bowl Cleaning Tool Detachable Juice Tap Juice Cup Base Pulp Cup Auger Cleaning Brush Juice Screen... -
Page 6: Assembling Your Omega Appliance
ASSEMBLING YOUR OMEGA APPLIANCE BEFORE FIRST USE Before using your Omega Appliance for the first time, remove packaging material and labels. Ensure the appliance is switched off and the power cord is unplugged. Wash the parts in warm, soapy water with a soft cloth. Rinse and dry thoroughly. Do not place parts in the dishwasher. - Page 7 ASSEMBLING YOUR OMEGA APPLIANCE STEP 1 Top-set assembly 1. Assemble the juice screen into the rotation wiper then place this assembly in to the • • juicing bowl ensuring the red dot on the juice screen is aligned with the red dot the juicing bowl.
- Page 8 ASSEMBLING YOUR OMEGA APPLIANCE TIP: For easy assembly hold the drum lid by grabbing the feeding tube and turn clockwise as shown in the illustration. 4. Place the drum lid on the juicing bowl. Align the down arrow on the drum lid with the OPEN mark on the base and turn to the CLOSE position.
-
Page 9: Operating Instructions & Tips
OPERATING INSTRUCTIONS STEP 1 After preparing the ingredients, plug the power cord into a wall outlet. NOTE: • Do not touch the power cord with wet hands. It may cause electrical shock, short-circuit, or fire. • Check the safety of the wall outlet. STEP 2 Press the FORWARD button to operate. - Page 10 OPERATING INSTRUCTIONS STEP 3 Insert the prepared ingredients one piece at a time. NOTE: • Fibrous leafy vegetables (celery, kale, etc.): – Separate each stem. Cut the outer stems that are thick and tough to 4 inches (10 cm) long or less. –...
- Page 11 OPERATING INSTRUCTIONS STEP 5 After juice and pulp are completely extracted, switch the unit OFF. NOTE: • If the remaining ingredients in the juicing bowl have not been extracted completely, the drum lid may not open easily. After each extraction, run the juicer for an additional 30 seconds to let the juicer extract the remaining pulp.
-
Page 12: Ingredient Tips When Using Juice Screen
This can reduce performance and even damage the juicer. Omega’s Low Speed Juicer is an innovative product that uses a patented low speed masticating technology to efficiently extract the juice from ingredients. The juicer is designed to obtain the best result from ingredients with firm composition and with high... -
Page 13: Ingredients Preparation
INGREDIENTS PREPARATION Juice Yield: • For the optimal extraction and maximum juice yield, cut the ingredients following the guidelines given in this section. • Insert ingredients slowly monitoring how the ingredients are extracted. The juice yield may vary depending on the juicing speed. Soft fruits and vegetables (e.g. - Page 14 INGREDIENTS PREPARATION How to Use the • Juicing with the juice cap closed allows mixed juice creations JUICE Cap: with different fruits, vegetables and liquids. • After juicing, close the juice cap to block excess juice from dripping, especially when disassembling the juicing bowl off the base.
- Page 15 INGREDIENTS PREPARATION Ingredients with small seeds (e.g. raspberry, pomegranate, grape): Slowly insert ingredients with small seeds to prevent the seeds from clogging the juice screen. Insert ingredients slowly For best result, juice with to minimize the amount ingredients with higher of leftover seeds in the amount of fluid (e.g.
- Page 16 INGREDIENTS PREPARATION Fibrous and/or tough leafy ingredients (e.g. celery, kale, pineapple): Fibrous ingredients like celery and kale should be cut into small lengths before juicing. 10 cm When juicing leafy If leafy ingredients It’s best to juice with ingredients like celery and wrap around the ingredients with higher kale, do not collect more...
-
Page 17: Disassembling & Cleaning
DISASSEMBLING AND CLEANING STEP 1 Switch OFF and unplug the power cord from the wall outlet. NOTE: • Extract all the remaining pulp in the juicing bowl before stopping the juicer. • For easier clean up, operate the juicer for an additional 30 seconds after the juice is extracted. - Page 18 DISASSEMBLING AND CLEANING STEP 5 Place the juicing bowl under running water. TIP: • The round brush can clean the juice spout of the juicing bowl. STEP 6 Under running water, clean the outside of the auger with a dish scrub. Use the tip of the cleaning brush to push out any residue in the crevices on the bottom of the auger.
-
Page 19: Cleaning The Silicone Parts
CLEANING THE SILICONE PARTS TIP: • Clean the rotation wiper under running water. Thoroughly dry after cleaning. Before assembling the top-set, ensure that the compression silicone and silicone ring are firmly inserted. NOTE: • If the compression silicone and silicone ring are not firmly inserted, juice may leak from the bottom of the juicing bowl. -
Page 20: Using The Cleaning Tool
USING THE CLEANING TOOL TIP: • The cleaning tool makes clean-up quick and easy. Dry completely after cleaning. STEP 1 Hold the cleaning tool with one hand and insert the juice screen into the cleaning tool. NOTE: • Insert the juice screen until you hear a click. STEP 2 Under running water, rotate the cleaning tool and the juice screen in opposite directions to clean. -
Page 21: Using The Blank Cone
USING THE BLANK CONE Before use, make sure the silicone cover is placed correctly. STEP 1 To assemble the top set, place the auger and the blank cone in the juicing bowl and close the lid. 1. Insert the blank cone into the juicing bowl •... -
Page 22: Using The Smoothie Strainer (Optional)
USING THE SMOOTHIE STRAINER SMOOTHIE STRAINER SOLD SEPARATELY STEP 1 To assemble the top set, place the auger and the smoothie strainer in the juicing bowl and close the lid. 1. Insert the rotation wiper and the smoothie strainer • into the juicing bowl while aligning the red dots Auger of the smoothie strainer and the juicing bowl. -
Page 23: Troubleshooting
TROUBLESHOOTING WHEN THERE IS NO POWER TO THE JUICER: • Check if the power cord is properly plugged in. • Check if the drum lid and the juicing bowl are properly assembled. • Check if the top-set and the body are properly assembled. •... - Page 24 TROUBLESHOOTING THE DRUM LID WILL NOT CLOSE: • Make sure the auger is pushed all the way in to the juice screen in order for the drum lid to close properly. • If the auger is not properly in position, the drum lid may not close. THE EXTRACTED PULP IS VERY MOIST: •...
- Page 25 • Do not juice ingredients with high contents of vegetable/animal oil. • If vegetable/animal oil gets on the auger or the juice screen, this can affect the performance of the juicer and could result in damaged parts. CONTACT US: Customer Service: 1-800-633-3401 Online: www.OmegaJuicers.com/contact-omega-juicers...
-
Page 26: Specifications
SPECIFICATIONS Model Name MMV700 Series Rated Voltage 120 V Rated Frequency 60 Hz Amps Motor 240W Weight 14.77 lb. (6.7 kg) Product Dimensions 8.5” Width (217 mm) 6.37” Depth (162 mm) 18.5” Height (469 mm) Also Available International 220 V / 50-60 Hz MMV702... -
Page 27: Notes
NOTES...
Need help?
Do you have a question about the MegaMouth MMV700S and is the answer not in the manual?
Questions and answers