Table of Contents
Advertisement
Quick Links
Advertisement
Chapters
Table of Contents

Summary of Contents for poolstar POOLEX NANO ACTION
- Page 1 EXIT swimming pool with dome 590cm 610cm 510cm 610cm...
- Page 2 NANO ACTION Installation and user manual Installations und Gebrauchsanleitung Installatieen en gebruikershandleiding www.poolstar.fr...
- Page 3 Warning This heat pump contains a flammable refrigerant R32. Any intervention on the refrigerant circuit is prohibited without a valid autho- rization. Before working on the refrigerant circuit, the following precautions are neces- sary for safe work. 1. Work procedure The work must be carried out according to a controlled procedure, in order to mini- mize the risk of presence of flammable gases or vapors during the execution of the works.
- Page 4 Thank you Dear Customer, Thank you for your purchase and for your confidence in our products. These are the result of many years of research in the field of design and production of heat pumps for swimming pools. Our aim is to provide you with an exceptional high performance quality product. We have produced this manual with the utmost care so that you get maximum benefit from your Poolex heat pump.
- Page 5 PLEASE READ CAREFULLY These installation instructions are an integral part of the product. They must be given to the installer and retained by the user. If the manual is lost, please consult the website: www.poolex.fr The instructions and recommendations contained in this manual should be read carefully and understood since they provide valuable information concerning the heat pump’s safe handling and operation.
-
Page 6: Table Of Contents
Contents 1. General.............................4 General Terms of Delivery ....................4 Safety instructions ......................4 Water treatment .........................5 2. Description ..........................6 Package contents ......................6 General characteristics ......................6 Technical specifications .....................7 Unit dimensions .........................8 Exploded view ........................9 3. Installation ..........................10 Location ...........................10 Installation layout ......................11 Hydraulic connection ....................... -
Page 7: General
1. General General Terms of Delivery All equipment, even if shipped ‘free of carriage and packing’, is dispatched at the consignee’s own risk. The person responsible for receiving the equipment must carry out a visual inspection to identify any damage to the heat pump during transport (refrigerant system, body panels, electrical control box, frame). -
Page 8: Water Treatment
1. General During use To avoid serious injuries, never touch the fan when it is operating. Keep the heat pump out of the reach of children to avoid serious injuries caused by the heat exchanger’s blades. Never start the equipment if there is no water in the pool or if the circulating pump is stopped. Check the water flow rate every month and clean the filter if necessary. -
Page 9: Description
2. Description Package contents Heat pump Poolex Nano Action R32 2 hydraulic inlet/outlet connectors 32/38mm diameter This installation and user manual 4 anti-vibration pads General characteristics A Poolex heat pump has the following features: CE certification and complies with the RoHS European directive. -
Page 10: Technical Specifications
2. Description Technical specifications 3 kW 4 kW 5 kW Heating power (W) 2800 4 200 5 010 26°C Consumption (W) Water 26°C COP (Coeff. of performance) 4,83 5,19 5,03 Heating power (W) 2210 3 100 4 030 15°C Consumption (W) 1 000 Water 26°C... -
Page 11: Unit Dimensions
2. Description Unit dimensions 比例 1.000 Dimensions in mm Nano Action 3 kW / 4 kW / 5 kW 10 | EN... -
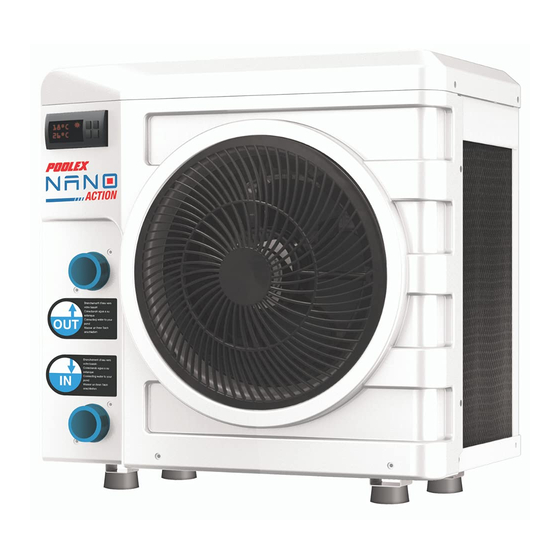
Page 12: Exploded View
2. Description Exploded view Fan support Heat exchanger Base frame Fan motor Support Control panel Compressor Front panel Evaporator Fan protective grille pressure switch hp/bp Top panel Left side panel EN | 11... -
Page 13: Installation
3. Installation The heat pump is very easy to install, only water and power need to be connected during installation. Location The heat pump should be located at least 2.5 meter away from the swimming pool. Pool >2.5m 比例 1.000 Please comply with the following rules concerning the choice of heat pump location. -
Page 14: Installation Layout
3. Installation Installation layout TOWARDS THE POOL Automated treatment system POOL Filtration + Pump FROM THE POOL 比例 1.000 The filter located upstream of the heat pump must be regularly cleared so that the water in the system is clean, thus avoiding the operational problems associated with dirt or clogging in the filter. -
Page 15: Use
4. Use Control panel Power LED ON/OFF button Up (+) button Defrost LED Select button Down (-) button 14 | EN... -
Page 16: Heating Mode
4. Use Heating Mode WARNING: Before starting, ensure that the filtration pump is operating correctly. Step 1 : Press to switch on your pump. Step 2 : Using buttons select the required temperature. EXAMPLE: If the current temperature is 15°C, default setting temperature is 27° required temperature is 30°C. Current water Required temperature... -
Page 17: Status Values And Advanced Settings
4. Use Status values and advanced settings WARNING: This operation is used to assist servicing and future repairs. The default settings should only be modified by an experienced professional person. The system’s settings can be checked and adjusted via the remote control by following these steps Step 1 : Keep pressing until you enter the settings verification mode. - Page 18 4. Use Parameters table Adjustment Factory N° Description Remarks range setting Water intake temperature -19~99°C Actual data Water outlet temperature -19~99°C Actual data Ambient air temperature -19~99°C Actual data Setting temperature 15~40°C 27°C Adjustable Defrost auto-activation time 10~80 min 40 min Adjustable Maximum defrost duration 10~40 min...
-
Page 19: Operation
5. Operation Operation Conditions of use For the heat pump to operate normally, the ambient air temperature must be between 8°C and 43°C. Recommendations prior to start-up Before activating the heat pump, please: Check that the unit is stable. Control the proper functioning of your electrical installation. Check that the hydraulic connections are tight and that there is no leakage of water. -
Page 20: Maintenance And Servicing
6. Maintenance and servicing Maintenance, servicing and winter storage WARNING: Before undertaking maintenance work on the unit, ensure that you have disconnected the electrical power supply. Cleaning The heat pump’s casing must be cleaned with a damp cloth. The use of detergents or other household products could damage the surface of the casing and affect its properties. -
Page 21: Repairs
7. Repairs WARNING: Under normal conditions, a suitable heat pump can heat the water in a swimming pool by 1°C to 2°C per day. It is therefore quite normal to not feel any temperature difference in the system when the heat pump is working. A heated pool must be covered to avoid any loss of heat. -
Page 22: Recycling
8. Recycling Recycling the heat pump Your heat pump has reached the end of its life and you wish to dispose of it or to replace it. Do not throw it in the rubbish bin. A heat pump must be disposed of separately with a view to its reuse, recycling or upgrading. It contains substances that are potentially hazardous to the environment but which will be eliminated or neutralized by recycling. -
Page 23: Warranty
Poolstar company. The guaranteed parts shall be replaced or repaired at Poolstar’s discretion. Defective parts must be returned to our workshops to be covered during the warranty period. The warranty does not cover labor costs or unauthorized replacements. -
Page 24: Appendices
A. Appendices / Anhänge / Bijlage Wiring diagrams / Schaltpläne / Bedradingsschema EN | 23... - Page 25 BITTE AUFMERKSAM LESEN Diese Wärmepumpe enthält ein brennbares Kältemittel R32. Eingriffe in den Kältemittelkreislauf sind ohne gültige Genehmigung verboten. Vor Arbeiten am Kältemittelkreislauf sind folgende Vorsichtsmaßnahmen für sicheres Arbeiten erforderlich. 1. Arbeitsablauf Die Arbeiten müssen nach einem kontrollierten Verfahren durchgeführt werden, um das Risiko des Vorhandenseins von brennbaren Gasen oder Dämpfen während der Ausführung der Arbeiten zu minimieren.
- Page 26 Danksagung Sehr geehrter Kunde, Vielen Dank für Ihren Kauf und das damit verbundene Vertrauen in unsere Produkte. Unsere Produkte sind das Ergebnis einer jahrelangen Forschungsarbeit auf dem Gebiet der Konstruktion und Fertigung von Schwimmbecken-Wärmepumpen. Wir haben den Anspruch, Ihnen ein qualitativ hochwertiges Produkt mit hervorragenden Leistungseigenschaften zu liefern. Die vorliegende Anleitung wurde mit größter Sorgfalt erstellt und soll Ihnen dabei helfen, die Vorzüge Ihrer Poolex-Wärmepumpe bestmöglich zu nutzen.
- Page 27 BITTE AUFMERKSAM LESEN Die vorliegenden Installationsanweisungen sind ein integraler Bestandteil des Produkts. Sie müssen dem Installateur ausgehändigt und vom Nutzer aufbewahrt werden. Falls Sie die Anleitung verlieren sollten, verweisen wir auf die Website: www.poolex.de Alle in der vorliegenden Anleitung enthaltenen Anweisungen und Empfehlungen müssen sorgfältig gelesen und zur Kenntnis genommen werden, da sie wichtige Informationen zur sicheren Hand- habung und Bedienung der Wärmepumpe beinhalten.
- Page 28 Inhalt 1. Allgemeines ..........................4 Allgemeine Lieferbedingungen ................... 4 Sicherheitshinweise ......................4 Wasseraufbereitung ......................5 2. Beschreibung ..........................6 Lieferumfang ........................6 Allgemeine Merkmale ......................6 Technische Daten ......................7 Abmessungen ........................8 Explosionsdarstellung ......................9 3. Installation ..........................10 Aufstellort .........................10 Installationsschema ......................11 Hydraulikanschluss ......................11 Elektroanschluss ......................11 4.
-
Page 29: Allgemeines
1. Allgemeines Allgemeine Lieferbedingungen Der Versand der Ware erfolgt frachtfrei und einschließlich Verpackung auf Risiko und Gefahr des Empfängers. Der Empfänger muss eine Sichtprüfung durchführen, um eventuell an der Wärmepumpe entstandene Transportschäden (Kühlsystem, Abdeckplatten, Schaltkasten, Montagerahmen) zu identifizieren. Etwaige Transportschäden sind auf dem Lieferschein des Spediteurs schriftlich zu vermerken. -
Page 30: Wasseraufbereitung
1. Allgemeines Verwendung Während der Ventilator in Betrieb ist, darf er keinesfalls berührt werden, da es andernfalls zu schwere Verletzungen kommen kann. Sorgen Sie dafür, dass die Wärmepumpe für Kinder unzugänglich ist, um schwere Verletzungen durch die Rotoren des Wärmetauschers zu vermeiden. Starten Sie das Gerät niemals, wenn sich kein Wasser im Schwimmbecken befindet oder wenn die Umwälzpumpe nicht läuft. -
Page 31: Beschreibung
2. Beschreibung Lieferumfang Wärmepumpe Poolex Nano Action Hydraulische Anschlüsse für Wasserzu- und -ablauf Durchmesser 32 / 38mm Installations- und Gebrauchsanleitung 4 Vibrationsdämpfer Allgemeine Merkmale Merkmale der Poolex-Wärmepumpe: Zertifizierung gemäß CE- und RoHS-Richtlinie. Hohe Energieeffizienz mit bis zu 80 % weniger Verbrauch im Vergleich zu einem konventionellen Beheizungssystem. -
Page 32: Technische Daten
2. Beschreibung Technische Daten 3 kW 4 kW 5 kW Heizleistung (W) 2800 4 200 5 010 Luft 26°C Wasser Leistungsaufnahme (W) 26°C COP (Leistungszahl) 4,83 5,19 5,03 Heizleistung (W) 2210 3 100 4 030 Luft 15°C Wasser Leistungsaufnahme (W) 1 000 26°C COP (Leistungszahl) -
Page 33: Abmessungen
2. Beschreibung Abmessungen 比例 1.000 Abmessungen in mm Nano Action 3 kW / 4 kW / 5 kW 10 | DE... -
Page 34: Explosionsdarstellung
2. Beschreibung Explosionsdarstellung Ventilator-Rahmenkonstruktion Wärmetauscher Gestell Ventilator-Motor Rahmenkonstruktion Bedienfeld Kompressor Frontplatte Verdampfer Ventilator-Schutzgitter Drucksensor Deckplatte Abdeckplatte links DE | 11... -
Page 35: Installation
3. Installation Die Wärmepumpe ist sehr einfach zu installieren, nur Wasser und Strom müssen während der Installation angeschlossen werden. Aufstellort Die Wärmepumpe sollte mindestens 2,5 Meter vom Schwimmbecken entfernt sein. Schwimmbecken >2.5m 比例 1.000 Halten Sie bei der Wahl des Aufstellorts Ihrer Wärmepumpe bitte die folgenden Richtlinien ein. -
Page 36: Installationsschema
3. Installation Installationsschema ZUM SCHWIMMBECKEN Automatisches Aufbereitungssystem SCHWIMMBECKEN Filtrierung + Pumpe VOM SCHWIMMBECKEN 比例 1.000 Der der Wärmepumpe vorgeschaltete Filter muss regelmäßig gereinigt werden, damit das zirkulierende Wasser sauber ist und etwaige Funktionsprobleme aufgrund einer Verschmutzung oder Verstopfung des Filters vermieden werden. Hydraulikanschluss Schritt 1 Schritt 2... -
Page 37: Verwendung
4. Verwendung Bedienfeld Power LED An / aus Schalter LED auftauen Selektieren 14 | DE... -
Page 38: Heizbetrieb
4. Verwendung Heizbetrieb WICHTIGER HINWEIS: Stellen Sie eingangs sicher, dass die Filterpumpe korrekt funktioniert. Schritt 1 : Drücken Sie , um die Pumpe einzuschalten. Schritt 2 : Wählen Sie mithilfe der Pfeile die gewünschte Temperatur aus. BEISPIEL: Wenn die aktuelle Temperatur 15°C beträgt, ist der Standardwert 27°C und die gewünschte Temperatur ist 30°C. -
Page 39: Statuswerte Und Erweiterte Einstellungen
4. Verwendung Statuswerte und erweiterte Einstellungen WICHTIGER HINWEIS: Dieser Vorgang dient dazu, künftige Wartungs- und Reparaturarbeiten zu erleichtern. Die Standardeinstellungen sollten nur von erfahrenem Fachpersonal geändert werden. Die Systemparameter können über die Fernbedienung überprüft und eingestellt werden. Befol- gen Sie hierzu die nachfolgenden Schritte. Schritt 1 : Drücken Sie so oft, bis sich das Gerät im Modus zur Bestätigung der Einstellungen befindet. - Page 40 4. Verwendung Parametertabelle Einstell- Anmerkun- Werksein- Beschreibung bereich stellung Wasservorlauftemperatur -19~99°C Ist-Werte Wasserrücklauftemperatur -19~99°C Ist-Werte Umgebungstemperatur der Luft -19~99°C Ist-Werte Standardtemperatur 15~40°C 27°C Einstellbar Auto-Aktivierungszeit des Abtauvorgangs 10~80 min 40 min Einstellbar Maximale Dauer des Abtauvorgangs 10~40 min 30 min Einstellbar Einstellung der Temperaturabweichung für den Neustart 1~10°C...
-
Page 41: Betrieb
5. Betrieb Betrieb Betriebsbedingungen Damit die Wärmepumpe normal funktioniert, muss die Umgebungstemperatur der Luft zwischen 8°C und 43 °C liegen. Empfehlungen für das Vorgehen vor dem Einschalten Gehen Sie folgendermaßen vor, bevor Sie die Wärmepumpe in Betrieb nehmen: Überprüfen Sie, ob das Gerät standsicher ist. Kontrollieren Sie die ordnungsgemäße Funktion Ihrer Elektroinstallation. -
Page 42: Wartung Und Pflege
6. Wartung und Pflege Wartung, Pflege und Einwinterung WICHTIGER HINWEIS: Vor Beginn von Wartungsarbeiten am Gerät müssen Sie das Gerät unbedingt von der Stromversorgung trennen. Reinigung Das Gehäuse der Wärmepumpe muss mit einem feuchten Tuch gereinigt werden. Tenside und andere Haushaltsreiniger können die Gehäuseoberfläche beschädigen und ihre Eigenschaften beeinträchtigen. -
Page 43: Betriebsstörungen Und Fehler
7. Dépannage WICHTIGER HINWEIS: Unter normalen Bedingungen kann eine geeignete Wärmepumpe das Wasser in einem Schwimmbecken um 1 bis 2 °C pro Tag erwärmen. Es ist daher durchaus normal, wenn Sie keinen Temperaturunterschied im System spüren können, während die Wärmepumpe arbeitet. Um Wärmeverlust zu vermeiden, muss ein beheiztes Schwimmbecken abgedeckt werden. -
Page 44: Recycling
8. Recycling Recyceln der Wärmepumpe Ihre Wärmepumpe hat das Ende ihres Produktlebenszyklus erreicht. Sie möchten sie nun abgeben oder ersetzen. Bitte entsorgen Sie sie nicht über den Hausmüll. Die Wärmepumpe muss getrennt entsorgt werden, um der Wiederverwendung, dem Recycling oder einer Nachrüstung zugeführt werden zu können. Sie enthält potenziell umweltschädliche Substanzen, die durch das Recycling eliminiert oder neutralisiert werden. -
Page 45: Garantie
9. Garantie Allgemeine Garantiebedingungen Die Firma Poolstar übernimmt gegenüber dem Erstkäufer für einen Zeitraum von drei (2) Jahren eine Garantie für sämtliche Material- und Fertigungsfehler an der Wärmepumpe Poolex Nano Action. Für den Kompressor beträgt die Garantiezeit fünf (5) Jahre. -
Page 46: Anhänge
A. Anhänge Schaltpläne... - Page 47 Waarschuwingen Deze warmtepomp bevat een ontvlambaar koelmiddel R32. Elke ingreep in het koudemiddelcircuit is verboden zonder een geldige autorisatie. Voordat u aan het koelcircuit werkt, zijn de volgende voorzorgsmaatregelen nodig voor veilig werken. 1. Werkprocedure Het werk moet volgens een gecontroleerde procedure worden uitgevoerd om het risico van de aanwezigheid van brandbare gassen of dampen tijdens de uitvoering van de werken tot een minimum te beperken.
- Page 48 Dank u Geachte klant, Dank u voor de aanschaf van deze pomp en voor het gestelde vertrouwen in onze producten. Onze producten zijn het resultaat van vele jaren van onderzoek op het gebied van ontwerp en productie van warmtepompen voor zwembaden. Ons doel is altijd om u te voorzien van een bui- tengewoon hoogwaardig product.
- Page 49 LEES DEZE HANDLEIDING ZORGVULDIG Deze installatie-instructies vormen een integraal onderdeel van het product. Ze moeten beschikbaar gesteld worden aan de installateur en door de gebruiker worden bewaard Indien de handleiding onverhoopt verloren gaat, raadpleeg dan de website: www.poolex.nl De aanwijzingen en aanbevelingen in deze handleiding moeten zorgvuldig gelezen en begrepen worden, aangezien ze waardevolle informatie bevatten over de veilige hantering en het gebruik van de pomp.
- Page 50 Inhoud 1. Algemeen ..........................4 Algemene leveringsvoorwaarden ..................4 Veiligheidsinstructies ......................4 Waterbehandeling .......................5 2. Beschrijving ..........................6 Inhoud van de verpakking ....................6 Algemene eigenschappen ....................6 Technisch specificaties ......................7 Afmetingen..........................8 Opengewerkte tekening ......................9 3. Installatie ..........................10 Locatie ..........................10 Indeling van installatie ..................... 11 Hydraulische aansluiting ....................
-
Page 51: Algemeen
1. Algemeen Algemene leveringsvoorwaarden Alle uitrusting wordt verzonden voor het eigen risico van de geadresseerde, zelfs in het geval van franco verzending en verpakking. De persoon die verantwoordelijk is voor het in ontvangst nemen van de uitrusting moet deze visueel controleren op eventuele beschadigingen tijdens het transport (koelsysteem, panelen, elektrische regelkast, frame). -
Page 52: Waterbehandeling
1. Algemeen Tijdens gebruik Om ernstig letsel te voorkomen mag de ventilator terwijl deze in bedrijf is nooit worden aange- raakt. Houd de pomp buiten het bereik van kinderen om ernstig letsel door de bladen van de warmtewis- selaar te voorkomen. Start de uitrusting nooit als het zwembad leeg is of als de circulatiepomp is gestopt. -
Page 53: Beschrijving
2. Beschrijving Inhoud van de verpakking Warmtepomp Poolex Nano Action 2 hydraulische inlaat-/uitlaataansluitingen 32/38mm diameter Deze installatie- en gebruikershandleiding 4 antitrilkussens Algemene eigenschappen Een Poolex-warmtepomp heeft de volgende kenmerken: CE-certificaat en voldoet aan de Europese RoHS-richtlijn. Hoge prestaties met maximaal 80% energiebesparing vergeleken met een conventioneel verwarmingssysteem. - Page 54 2. Beschrijving Technische specificaties 3 kW 4 kW 5 kW Verwarmingsvermogen (W) 2800 4 200 5 010 Lucht 26°C Stroomverbruik (W) Water 26°C COP (prestatiecoëfficiënt) 4,83 5,19 5,03 Verwarmingsvermogen (W) 2210 3 100 4 030 Lucht 15°C Stroomverbruik (W) 1 000 Water 26°C COP (prestatiecoëfficiënt)
-
Page 55: Afmetingen
2. Beschrijving Afmetingen 比例 1.000 Afmetingen in mm Nano Action 3 kW / 4 kW / 5 kW 10 | NL... -
Page 56: Opengewerkte Tekening
2. Beschrijving Opengewerkte tekening Ventilatorsteun Warmtewisselaar Voetplaat Ventilatormotor houvast Bedieningspaneel Compressor Voorpaneel Verdamper Beschermrooster ventilator drukschakelaar Bovenpaneel Linker paneel NL | 11... -
Page 57: Installatie
3. Installatie De warmtepomp is zeer eenvoudig te installeren; stroomvoorziening en water is alles wat nodig is tijdens de installatie. Locatie De warmtepomp moet minimaal 2,5 meter van het zwembad verwijderd zijn. Zwembad >2.5m 比例 1.000 Houd u aan de volgende voorschriften voor uw keuze van de pomplocatie. De toekomstige locatie van de eenheid moet gemakkelijk bereikbaar zijn voor bediening en onderhoud. -
Page 58: Indeling Van Installatie
3. Installatie Indeling van installatie NAAR ZWEMBAD TOE Automatisch behandelsysteem ZWEMBAD Filtratie + Pomp VANAF HET ZWEMBAD 比例 1.000 Het filter stroomopwaarts van de warmtepomp moet regelmatig worden gereinigd, zodat het water in het systeem schoon is en problemen in verband met een vervuild of verstopt filter worden voorkomen. -
Page 59: Gebruik
4. Gebruik Bedieningspaneel Power LED ON/OFF button Up (+) button Defrost LED Select button Down (-) button 14 | NL... - Page 60 4. Gebruik Verwarmingsbedrijf WAARSCHUWING: Controleer alvorens te starten of de filterpomp goed functioneert. Stap 1 : Druk op om de pomp aan te zetten. Stap 2 : Gebruik de knoppen om de gewenste temperatuur in te stellen. VOORBEELD: De huidige temperatuur is 15°C, de ingestelde standaardtemperatuur is 27°, de gewenste temperatuur is 30°C.
-
Page 61: Statuswaarden En Geavanceerde Instellingen
4. Gebruik Statuswaarden en geavanceerde instellingen WAARSCHUWING: Deze handeling dient als hulp bij het onderhoud en toekomstige repa- raties. De standaardinstellingen mogen slechts door een ervaren professional worden gewijzigd. De instellingen van het systeem kunnen via de afstandsbediening worden gecontroleerd en aangepast, door deze stappen te volgen Stap 1 : Blijf drukken totdat u de verificatiemodus voor de instellingen invoert. - Page 62 4. Gebruik Parametertabel Instelling af Beschrijving Instelbereik Opmerkingen fabriek Waterinlaattemperatuur -19~99°C Echte data Wateruitlaattemperatuur -19~99°C Echte data Omgevingstemperatuur -19~99°C Echte data Standaardtemperatuur 15~40°C 27°C Instelbaar Automatische activeringstijd ontdooiing 10~80 min 40 min Instelbaar Maximale duur ontdooiing 10~40 min 30 min Instelbaar Aanpassing van temperatuurverschil voor herstarten 1~10°C...
-
Page 63: Bediening
5. Bediening Bediening Gebruiksvoorwaarden Om normaal te kunnen functioneren moet de omgevingstemperatuur voor de warmtepomp tussen 8°C en 43°C zijn. Aanbevelingen vóór opstarten Voordat u de warmtepomp opstart moet u het volgende doen: Controleren of de eenheid stabiel is. Controleren of uw elektrische installatie goed functioneert. Controleren of de hydraulische aansluitingen goed vastzitten en of er geen sprake is van water-lekkage. -
Page 64: Onderhoud En Service
6. Onderhoud en service Onderhoud, service en winteropslag WAARSCHUWING: Koppel de eenheid los van de stroomvoorziening voordat u onderhoudswerkzaamheden aan de eenheid uitvoert. Reiniging De behuizing van de warmtepomp moet met een vochtige doek worden gereinigd. Het gebruik van oplosmiddelen of andere huishoudelijke producten kan het oppervlak van de behuizing potentieel beschadigen en de eigenschappen ervan aantasten. -
Page 65: Reparaties
7. Reparaties WAARSCHUWING: In normale omstandigheden kan de warmtepomp het water in een zwembad met 1°C tot 2°C per dag verwarmen. Het is daarom normaal om geen temperatuurverschil te kunnen voelen terwijl de warmtepomp in bedrijf is. Een verwarmd zwembad moet worden afgedekt om warmteverlies te voorkomen. Storingen en defecten In het geval van een probleem geeft het scherm van de warmtepomp een foutcode weer in plaats van temperatuurindicaties. -
Page 66: Recyclen
8. Recyclen De warmtepomp recyclen Uw warmtepomp heeft het einde van zijn levensduur bereikt en u wenst de pomp te verwijderen of te vervangen. Doe uw pomp niet bij het huishoudelijk afval. Een warmtepomp moet afzonderlijk worden afgevoerd met het oog op hergebruik, recyclen of opwaar-deren. -
Page 67: Garantie
9. Garantie Algemene garantievoorwaarden De Poolstar Company biedt de oorspronkelijke eigenaar op de Poolex Nano Action warmtepomp twee (2) jaar garantie tegen materiaalgebreken en fabricagefouten. De compressor is gegarandeerd voor een periode van vijf (5) jaar. De titaan buizenwarmtewisselaar heeft een garantie van tien (10) jaar tegen chemische corrosie, maar de garantie geldt niet in het geval van schade door bevriezing. -
Page 68: Bijlage
A. Bijlage Bedradingsschema... - Page 69 TEC H NI C AL AS S I S TA NC E TECH NI S C HE HI L FE TEC H NI S C HE A S S I S T E NTI E www.poolex.fr www.poolstar.fr 10.2020...
- Page 70 NANO ACTION Manuel d’installation et d’utilisation Manual de usuario y instalación Manuale d’installazione e d’uso www.poolstar.fr...
- Page 71 Avertissements Cette pompe à chaleur contient un Gaz frigorigène R32 inflammable. Toute intervention sur le circuit frigorigène est interdite sans une habilitation en cours de validité. Avant toute intervention sur le circuit frigorigène, les précautions suivantes sont nécessaires pour un travail en toute sécurité. 1.
- Page 72 Remerciements Cher client, Nous vous remercions pour votre achat et pour la confiance que vous accordez à nos produits. Nos produits sont le résultat d’années de recherche dans le domaine de la conception et de la production de pompe à chaleur pour piscine. Notre ambition, vous fournir un produit de qualité aux performances hors normes.
- Page 73 À LIRE ATTENTIVEMENT Ces instructions d’installation font partie intégrante du produit. Elles doivent être remises à l’installateur et conservées par l’utilisateur. En cas de perte du manuel, veuillez vous référer au site : www.poolex.fr Les indications et avertissements contenus dans le présent manuel doivent être lus avec attention et compris car ils fournissent d’importantes informations concernant la manipulation et le fonctionnement de la pompe à...
- Page 74 Sommaire 1. Généralité..........................4 Conditions générales de livraison ..................4 Consignes de sécurité ......................4 Traitement des eaux ......................5 2. Description ..........................6 Contenu du colis ........................6 Caractéristiques générales ....................6 Caractéristiques techniques ....................7 Dimensions de l’appareil ....................8 Vue éclatée ........................9 3.
-
Page 75: Généralité
1. Généralité Conditions générales de livraison Tout matériel, même franco de port et d’emballage, voyage aux risques et périls de son destina- taire. La personne chargée de la réception de l’appareil doit effectuer un contrôle visuel pour constater tout dommage éventuel subi par la pompe à chaleur durant le transport (circuit frigorifique, carrosserie, armoire électrique, châssis). -
Page 76: Traitement Des Eaux
1. Généralité Lors de l’utilisation Ne jamais toucher au ventilateur en état de marche sous peine de graves blessures. Ne pas laisser la pompe à chaleur à la portée des enfants, sous peine de graves blessures causées par les ailettes de l’échangeur de chaleur. Ne jamais mettre l’unité... -
Page 77: Description
2. Description Contenu du colis La pompe à chaleur Poolex Nano Action R32 2 raccords hydrauliques entrée / sortie de 32/38mm de diamètre Ce manuel d’installation et d’utilisation 4 Patins anti-vibrations Caractéristiques générales Une pompe à chaleur Poolex c’est avant tout : Un dispositif certifié... -
Page 78: Caractéristiques Techniques
2. Description Caractéristiques techniques 3 kW Puissance de chauffage (W) 3 010 4 200 5 010 26°C Consommation (W) 26°C COP (Coeff. de performance) 5,61 5,50 5,50 Puissance de chauffage (W) 2 210 3 100 4 030 15°C Consommation (W) 1 000 26°C COP (Coeff. -
Page 79: Dimensions De L'appareil
2. Description Dimensions de l’appareil 比例 1.000 Dimensions en mm Nano Action 3 kW / 4 kW / 5kW 10 |... -
Page 80: Vue Éclatée
2. Description Vue éclatée Grille de protection ventilateur Boîtier de commande électrique Panneau avant Évaporateur Panneau de contrôle Compresseur Panneau de contrôle Cadre de montage Échangeur de chaleur Support du ventilateur Capteur de débit Moteur du ventilateur Détendeur Hélice du ventilateur Panneau gauche Châssis Panneau supérieur... -
Page 81: Installation
3. Installation La pompe à chaleur est très facile à installer, et ne nécessite que le raccord au circuit hydraulique et une alimentation électrique. Emplacement La pompe à chaleur doit être placée à au moins 2,5 mètres du bassin. Piscine >2.5m 比例... -
Page 82: Raccordement Hydraulique
3. Installation Schéma d’installation VERS LA PISCINE Système de traitement automatisé PISCINE Filtration + Pompe DEPUIS LA PISCINE 比例 1.000 Le filtre situé en amont de la pompe à chaleur doit être nettoyé régulièrement pour que l’eau du circuit soit propre et ainsi éviter les problèmes de fonctionnement liés à la saleté ou au colmatage du filtre. -
Page 83: Utilisation
4. Utilisation Panneau de contrôle Voyant ON/OFF ON/OFF Haut (+) Voyant dégivrage Selection Bas (-) 14 |... -
Page 84: Mode Chauffage
4. Utilisation Mode Chauffage ATTENTION : Avant de commencer, assurez-vous que la pompe de filtration fonctionne correctement. Étape 1 : Appuyez sur pour mettre votre pompe en marche. Étape 2 : À l’aide des touches sélectionnez la température souhaitée. EXEMPLE : Si la température actuelle est de 15°C, la valeur par défaut est de 27°... -
Page 85: Valeurs D'état Et Paramètres Avancées
4. Utilisation Valeurs d’état et paramètres avancées ATTENTION : Cette opération sert à faciliter l’entretien et les réparations futures. Seul un professionnel expérimenté est habilité à modifier les paramètres par défaut. Les paramètres du système peuvent être vérifiés et ajustés au moyen de la télécommande en suivant les étapes suivantes Étape 1 : Restez appuyé... - Page 86 4. Utilisation Parameters table Plage de Paramètre N° Description Commentaire réglage usine Données Température d’entrée d’eau -19~99°C réelles Données Température de sortie d’eau -19~99°C réelles Données Température de l’air ambiant -19~99°C réelles Température par défaut 15~40°C 27°C Réglable Temps d’auto-activation du dégivrage 10~80 min 40 min Réglable...
-
Page 87: Mise En Service
5. Mise en service Mise en service Conditions d’utilisation Pour que la pompe à chaleur fonctionne normalement, la température ambiante de l’air doit être comprise entre 8°C et 43°C. Consignes préalables Avant la mise en service de la pompe à chaleur, veuillez : Vérifiez que l’appareil est stable. -
Page 88: Maintenance Et Entretien
6. Maintenance et entretien Maintenance, entretien et hivernage ATTENTION : Avant d’entreprendre des travaux de maintenance sur l’appareil, assurez- vous d’avoir coupé l’alimentation électrique. Nettoyage Le boîtier de la pompe à chaleur doit être nettoyé avec un chiffon humide. L’utilisation de détergents ou d’autres produits ménagers pourraient dégrader la surface du boîtier et en altérer ses propriétés. -
Page 89: Dépannage
7. Dépannage ATTENTION : Dans des conditions normales, une pompe à chaleur adaptée permet de réchauffer l’eau du bassin de 1°C à 2°C par jour. Il est donc tout a fait normal de ne pas ressentir une différence de température en sortie de circuit lorsque la pompe à chaleur fonctionne. -
Page 90: Recyclage
8. Recyclage Recyclage de la pompe à chaleur Votre appareil est en fin de vie et vous souhaitez vous en débarrasser ou le remplacer. Ne le jetez pas à la poubelle. Une pompe à chaleur doit faire l’objet d’une collecte sélective en vue de sa réutilisation, de son recyclage ou de sa revalorisation. -
Page 91: Garantie
9. Garantie Conditions générales de garantie La société Poolstar garantit au propriétaire d’origine les défauts matériels et les défauts de fabrica- tion de la pompe à chaleur Poolex Nano R32 pendant une période de deux (2) ans. Le compresseur est garanti pendant une période de cinq (5) ans L’échangeur à... -
Page 92: Annexes
A. Annexes Schémas de câblage de la carte électronique | 23... - Page 93 Avvertenze Questa pompa di calore contiene un refrigerante infiammabile R32. Qualsiasi intervento sul circuito frigorifero è vietato senza una valida autorizzazione. Prima di lavorare sul circuito del refrigerante, sono necessarie le seguenti precauzioni per un lavoro sicuro. 1. Procedura di lavoro Il lavoro deve essere eseguito secondo una procedura controllata, al fine di minimizzare il rischio di presenza di gas o vapori infiammabili durante l’esecuzione dei lavori.
- Page 94 Gracias Estimado cliente, Gracias por adquirir este artículo y por confiar en nuestros productos, que son el fruto de muchos años de investigación en el campo del diseño y la producción de bombas de calor para piscinas. Nuestro propósito es ofrecerle un producto de una calidad y un resultado excepcionales. Hemos elaborado este manual con sumo cuidado para que pueda sacar el máximo provecho a su bomba de calor Poolex.
- Page 95 LÉALO CON ATENCIÓN Estas instrucciones de instalación forman parte esencial del producto y deben entregarse al instalador. Una vez instalado el producto, el usuario deberá guardarlas. En caso de perder el manual, consulte el sitio web: www.poolex.fr Las instrucciones y recomendaciones recogidas en este manual deben leerse con atención y com- prenderse, puesto que contienen información muy útil sobre el funcionamiento y la manipulación segura de la bomba de calor.
- Page 96 Índice 1. Generalidades..........................4 Condiciones generales de entrega ..................4 Instrucciones de seguridad ....................4 Tratamiento del agua ......................5 2. Descripción ..........................6 Contenido del paquete .......................6 Características generales ....................6 Especificaciones técnicas ....................7 Dimensiones de la unidad ....................8 Vista en despiece ......................9 3.
-
Page 97: Generalidades
1. Generalidades Condiciones generales de entrega Todo el equipo, aun cuando se transporte «franco de porte y embalaje», se entrega por cuenta y riesgo del destinatario. El responsable de la recepción del equipo debe llevar a cabo una inspección visual para detectar cualquier daño sufrido por la bomba de calor durante su transporte (sistema de refrigeración, paneles de la carcasa, caja de control eléctrico, marco, etc.). -
Page 98: Tratamiento Del Agua
1. Generalidades Durante el uso Para evitar lesiones graves, no toque nunca el ventilador mientras esté en funcionamiento. Mantenga la bomba de calor fuera del alcance de los niños para evitar las lesiones graves que pueden ocasionar las cuchillas del intercambiador del calor. Jamás encienda el equipo si la piscina está... -
Page 99: Descripción
2. Descripción Contenido del paquete Bomba de calor Poolex Nano Action R32 2 conectores hidráulicos de entrada/salida 32 / 38 mm de diámetro Este manual de usuario y de instalación 4 almohadillas antivibraciones Características generales Una bomba de calor Poolex tiene las siguientes características: Certificación CE y cumplimiento con la directiva europea RoHS. -
Page 100: Especificaciones Técnicas
2. Descripción Especificaciones técnicas 3 kW 4 kW 5 kW Calefacción (W) 3 010 4 200 5 010 Aire 26°C Consumo (W) Agua 26°C 5,61 5,50 5,50 (Coeficiente de rendimiento) Calefacción (W) 2210 3 100 4 030 Aire 15°C Consumo (W) 1 000 Agua 26°C... -
Page 101: Dimensiones De La Unidad
2. Descripción Dimensiones de la unidad 比例 1.000 Dimensiones en mm Nano Action 3 kW / 4 kW / 5 kW 10 |... - Page 102 2. Descripción Dimensiones de la unidad Rejilla de protección del ventilador Caja de control eléctrico Panel frontal Evaporador Panel de control Compresor Panel de control Bastidor de montaje Intercambiador de calor Soporte del ventilador Sensor de flujo Motor del ventilador Interruptor de flujo Cuchilla del ventilador Panel izquierdo...
-
Page 103: Instalación
3. Instalación La bomba de calor es muy fácil de instalar y solo requiere la conexión al circuito hidráulico y una fuente de alimentación. Localización La bomba de calor debe colocarse al menos a 2,5 metros de la piscina. Piscina >2.5m 比例... -
Page 104: Esquema De La Instalación
3. Instalación Esquema de la instalación HACIA LA PISCINA Sistema de tratamiento automático PISCINA Filtración + Bomba DESDE LA PISCINA 比例 1.000 El filtro ubicado antes de la bomba de calor debe limpiarse regularmente para que el agua del sistema esté limpia y evitar de este modo problemas de funcionamiento derivados de la suciedad o el atascamiento del filtro. -
Page 105: Uso
4. Uso Panel de control ON / OFF Sup. (+) Indicatore di alimentazione Selección Basso (-) Indicatore di sbrinamento 14 |... -
Page 106: Modo De Calentamiento
4. Uso Modo de calentamiento ADVERTENCIA: Antes de empezar, compruebe que la bomba de filtración funciona correcta- mente. Paso 1 : Pulse para encender la bomba. Paso 2 : Utilizando los botones seleccione la temperatura requerida. EJEMPLO: Si la temperatura actual es de 15°C, el valor predeterminado es 27°C y la temperatura deseada es de 30°C. -
Page 107: Valores De Estado Y Configuraciones Avanzadas
4. Uso Valores de estado y configuraciones avanzadas ADVERTENCIA: Esta operación se utiliza para ayudar a los servicios de mantenimiento y futuras reparaciones. Las configuraciones por defecto solo deberían ser modificadas por un profesional con experiencia. Las configuraciones del sistema pueden comprobarse y ajustarse desde el mando a distancia siguiendo estos pasos: Paso 1 : Mantenga pulsado el botón hasta que llegue al modo de verificación de configuración. - Page 108 4. Uso Tabla de parámetros Rango de Configura- Comentar- N° Descripción ción de ajuste fábrica Temperatura del agua de entrada -19~99°C Datos reales Temperatura del agua de salida -19~99°C Datos reales Temperatura ambiente -19~99°C Datos reales Temperatura predeterminada 15~40°C 27°C Ajustable Hora de activación automática del ciclo de deshielo Ajustable...
-
Page 109: Funcionamiento
5. Funcionamiento Funcionamiento Condiciones de uso Para que la bomba de calor pueda funcionar con normalidad, la temperatura ambiente debe oscilar entre 8°C y 43°C. Recomendaciones previas a la puesta en marcha Antes de activar la bomba de calor: Compruebe que la unidad está bien estable. Verifique el correcto funcionamiento de su instalación eléctrica. -
Page 110: Mantenimiento Y Servicio Técnico
6. Mantenimiento y servicio Mantenimiento, servicio técnico y almacenamiento en invierno ADVERTENCIA: Antes de realizar ningún trabajo de mantenimiento en la unidad, compruebe que la cortado la alimentación eléctrica. Limpieza Limpie la carcasa de la bomba de calor con un paño húmedo. El uso de detergentes u otros pro- ductos de uso doméstico podrían dañar la superficie de la carcasa y afectar a sus propiedades. -
Page 111: Reparaciones
7. Reparaciones ADVERTENCIA: En condiciones normales, una bomba de calor adecuada puede calentar el agua de una piscina entre 1°C y 2°C diarios. Por tanto, es completamente normal no notar ninguna diferencia térmica en el sistema cuando la bomba de calor está en funcionamiento. -
Page 112: Reciclaje
8. Reciclaje Reciclaje de la bomba de calor Su bomba de calor ha llegado al final de su vida útil y usted desea desecharla o sustituirla. No la deposite en el cubo de la basura. Una bomba de calor debe desecharse por separado con vistas a su reutilización, reciclaje o renovación. -
Page 113: Garantía
9. Garantía Condiciones generales de la garantía La empresa Poolstar ofrece al propietario original una garantía de dos (2) años contra materiales defectuosos y defectos de fabricación de la bomba de calor Poolex Nano R32. El compresor está garantizado durante un periodo de cinco (5) años. - Page 114 A. Annexes / Apéndices / Appendici Schémas de câblage de la carte électronique / Diagramas de cableado / Schemi di cablaggio | 23...
- Page 115 Avvertenze Questa pompa di calore contiene un refrigerante infiammabile R32. Qualsiasi intervento sul circuito frigorifero è vietato senza una valida autorizzazione. Prima di lavorare sul circuito del refrigerante, sono necessarie le seguenti precauzioni per un lavoro sicuro. 1. Procedura di lavoro Il lavoro deve essere eseguito secondo una procedura controllata, al fine di minimiz- zare il rischio di presenza di gas o vapori infiammabili durante l’esecuzione dei lavori.
- Page 116 Ringraziamenti Gentile cliente, La ringraziamo per il Suo acquisto e per la Sua fiducia nei nostri prodotti. Essi sono il risultato di anni di ricerche nella progettazione e produzione di pompe di calore per piscine. Il nostro scopo è di fornirLe un prodotto di qualità con prestazioni fuori dal comune. Abbiamo preparato questo manuale con la massima cura affinché...
- Page 117 LEGGERE ATTENTAMENTE Le presenti istruzioni per l’installazione sono parte integrante del prodotto. L’utente deve fornirle all’installatore e conservarle. In caso di perdita del manuale, consultare il sito: www.poolex.fr Le indicazioni e avvertenze contenute nel presente manuale vanno lette attentamente e comprese poiché...
- Page 118 Sommario 1. Aspetti generali........................4 Condizioni generali di consegna ..................4 Istruzioni di sicurezza ......................4 Trattamento dell’acqua .......................5 2. Descrizione ..........................6 Contenuto della confezione ....................6 Caratteristiche generali ......................6 Caratteristiche tecniche .....................7 Dimensioni dell’apparecchio ....................8 Disegno esploso .........................9 3. Installazione ..........................10 Ubicazione ........................10 Schema d’installazione ....................
-
Page 119: Aspetti Generali
1. Aspetti generali Condizioni generali di consegna Tutto il materiale, anche franco trasporto e imballaggio, viaggia a rischio e pericolo del destinata- rio. La persona responsabile della ricezione dell’apparecchio deve effettuare un controllo visivo per individuare eventuali danni subiti dalla pompa di calore durante il trasporto (circuito refrigerante, carrozzeria, scatola dei comandi elettrica, telaio). -
Page 120: Trattamento Dell'acqua
1. Aspetti generali Durante l’uso Al fine di evitare gravi lesioni, non toccare mai il ventilatore quando è in moto. Tenere la pompa di calore fuori dalla portata dei bambini al fine di evitare gravi lesioni provocate dalle pale dello scambiatore di calore. Non mettere mai in moto l’apparecchio se non c’è... -
Page 121: Descrizione
2. Descrizione Contenuto della confezione La pompa di calore Poolex Nano Action R32 2 raccordi idraulici ingresso/ uscita 32 / 38 mm di diametro Il presente manuale d’installazione e d’uso 4 pattini antivibrazioni Caratteristiche generali La pompa di calore Poolex ha le seguenti caratteristiche: Un dispositivo con certificazione CE conforme alla direttiva europea RoHS. -
Page 122: Caratteristiche Tecniche
2. Descrizione Caratteristiche tecniche 3 kW Potenza termica (W) 3 010 4 200 5 010 Aria 26°C Consumo (W) Acqua 26°C COP (Coeff. di prestazione) 5,61 5,50 5,50 Potenza termica (W) 2210 3 100 4 030 Aria 15°C Consumo (W) 1 000 Acqua 26°C... -
Page 123: Dimensioni Dell'apparecchio
2. Descrizione Dimensioni dell’apparecchio 比例 1.000 Dimensioni in mm Nano Action 3 kW / 4 kW / 5 kW 10 | IT... -
Page 124: Disegno Esploso
2. Descrizione Disegno esploso Griglia di protezione del ventilatore Centralina elettrica Pannello anteriore Evaporatore Pannello di controllo Compressore Pannello di controllo Telaio di montaggio Scambiatore di calore Supporto del ventilatore Sensore di flusso Motore del ventilatore Flussostato Pala del ventilatore Pannello sinistro Telaio Pannello superiore... -
Page 125: Installazione
3. Installazione La pompa di calore è molto facile da installare e richiede solo il collegamento al circuito idraulico e un alimentazione elettrica Ubicazione La pompa di calore deve essere posizionata ad almeno 2,5 metri dalla piscina. Piscina >2.5m 比例 1.000 Osservare le seguenti regole per scegliere l’ubicazione della pompa di calore Il luogo in cui verrà... -
Page 126: Schema D'installazione
3. Installazione Schema d’installazione VERSO LA PISCINA Sistema di trattamento automatizzato automatisé PISCINA Filtrazione + Pompa DALLA PISCINA 比例 1.000 Il filtro a monte della pompa di calore deve essere pulito regolarmente affinché l’acqua del circuito sia pulita e, in tal modo, si evitino problemi di funzionamento dovuti alla sporcizia o all’intasamento del filtro. -
Page 127: Uso
4. Uso Pannello di controllo ON/OFF Indicador de encendido Selezione Indicador de descongelamiento 14 | IT... -
Page 128: Modalità Riscaldamento
4. Uso Modalità riscaldamento ATTENZIONE: Prima di iniziare, accertarsi che la pompa di filtrazione funzioni correttamente. Passo 1 : Premere per mettere in moto la pompa. Passo 2 : Con i tasti selezionare la temperatura desiderata. ESEMPIO: Se la temperatura attuale è di 15°C, il valore predefinito è di 27°C e la temperatura desiderata è di 30°C. -
Page 129: Valori Di Stato E Impostazioni Avanzate
4. Uso Valori di stato e impostazioni avanzate ATTENZIONE: Questa operazione serve a facilitare l’assistenza e le riparazioni future. Solo un professionista esperto è abilitato a modificare le impostazioni predefinite. Le impostazioni del sistema possono essere controllate e regolate con il telecomando, seguen- do questi passi Passo 1 : Tenere premuto fino ad arrivare alla modalità... - Page 130 4. Uso Tabella delle impostazioni Impostazi- Campo di Osservazi- N° Descrizione one di regolazione fabbrica Temperatura d’ingresso dell’acqua Dati effettivi -19~99°C Temperatura di uscita dell’acqua Dati effettivi -19~99°C Temperatura dell’aria ambiente Dati effettivi -19~99°C Temperatura predefinita 15~40°C 27°C Regolabile Tempo di auto-attivazione dello sbrinamento Regolabile 10~80 min 40 min...
-
Page 131: Messa In Servizio
5. Messa in servizio Messa in servizio Condizioni d’uso Affinché la pompa di calore funzioni normalmente, la temperatura ambiente dell’aria deve essere compresa tra 8°C e 43°C. Raccomandazioni preliminari Prima della messa in servizio della pompa di calore: Accertarsi che l’apparecchio sia stabile. Verificate il corretto funzionamento della sua installazione elettrica. -
Page 132: Manutenzione E Assistenza
6. Manutenzione e assistenza Manutenzione, assistenza e sbrinamento ATTENZIONE: Prima di effettuare la manutenzione sull’apparecchio, accertarsi di averlo staccato dall’alimentazione elettrica. Pulizia L’alloggiamento della pompa di calore deve essere pulito con un panno umido. L’uso di detergenti e altri prodotti domestici potrebbe danneggiare la superficie dell’alloggiamento e alterarne le proprietà. -
Page 133: Riparazioni
7. Riparazioni ATTENZIONE: In condizioni normali, una pompa di calore adeguata scalda l’acqua della vasca di 1°C fino 2°C al giorno. È, quindi, del tutto normale non avvertire una differenza di temperatura nel sistema quando la pompa di calore è in moto. Una piscina riscaldata deve essere coperta per evitare dispersioni di calore. -
Page 134: Riciclaggio
8. Riciclaggio Riciclaggio della pompa di calore L’apparecchio è a fine vita e si desidera gettarlo o sostituirlo. Non gettarlo nel cestino della spazzatura. Una pompa di calore deve essere smaltita a parte per essere eventualmente riutilizzata, riciclata o adeguata. Contiene sostanze potenzialmente nocive per l’ambiente ma che vengono eliminate o neutralizzate dal riciclaggio. -
Page 135: Garanzia
9. Garanzia Condizioni generali di garanzia La società Poolstar fornisce al proprietario originario una garanzia di due (2) anni contro i difetti nei materiali e di fabbricazione della pompa di calore Poolex Nano R32. Il compressore ha una garanzia di cinque (5) anni. -
Page 136: Appendici
A. Annexes / Apéndices / Appendici Schémas de câblage de la carte électronique / Diagramas de cableado / Schemi di cablaggio | 23... - Page 137 AS S I S T ANC E TE C H NI QU E S ER VI CI O TÉ C NI C O AS S IS TENZA TE C N IC A www.poolex.fr www.poolstar.fr 10.2020...
- Page 138 User manual Gebrauchsanweisung Gebruikshandleiding Mode d’emploi Pool ladder 48in 122 cm Important safety rules: Before installing and using this product read, understand, follow all instructions carefully and keep it for future reference! Wichtige sicherheitsregeln: Bevor Sie dieses Produkt installieren und verwenden lesen, verstehen und beachten Sie sorgfältig alle anweisungen, und für künftige bezugnahme aufbewahren! Belangrijke veiligheidsvoorschriften: Voor installatie en gebruik, zorg dat u alle...
- Page 139 English Deutsch Nederlands Français MSP-30112-V02...
- Page 140 1.0 Part reference NOTE: Drawing for illustration purpose only. Actual product may vary. Not to scale. Before assembling your p, layout and review the contents to become familiar with all the parts you will be using during the assembly: HINWEIS: Die Zeichnungen dienen nur der Illustration. Das tatsächliche Produkt könnte etwas anders aussehen.
- Page 141 MSP-30112-V02...
- Page 142 MSP-30112-V02...
- Page 143 ① ⑧ ⑩ ② ⑨ ⑮ ⑭ ⑮ ⑯ MSP-30112-V02...
- Page 144 ⑮ ⑭ ⑯ ⑮ MSP-30112-V02...
- Page 145 2.0 Introduction Congratulations on choosing a EXIT Toys Pool Ladder! Have fun, be active and play outdoors..That’s what keeps driving us to develop innovative, quality toys for cool kids and parents. We do everything possible to develop safe products for children. As our products are classed as toys, we comply with the toughest consumer safety regulations.
- Page 146 3.0 Guidelines for safe use WARNING: Failure to follow these warnings may result in broken bones, entrapment, paralysis, drowning or other serious injuries. 1). Supervise children and those with disabilities at all times. 2). Always assist children when they use the ladder to avoid falls and/or serious injury.
- Page 147 4.0 Care and usage 1). Store ladder in safe and dry place. 2). Never store any materials on ladder. 3). Keep ladder clean and free of all foreign materials. 4). Do periodic maintenance on screws, when the ladder is not in use, put some anti- rust oil on them.
- Page 148 2.0 Einführung Glückwunsch zur Wahl des EXIT Toys Pool Ladder! Amüsier dich, sei aktiv und spiele im Freien! Für diesen Spaß entwickeln wir innovative und hochwertige Spielzeuge für coole Kids. Wir tun alles in unserer Macht stehende, um sichere Produkte für Kinder zu entwickeln.
- Page 149 3.0 Sicherheitsanweisungen WARNUNG: Die Nichtbeachtung dieser Warnungen kann zu Knochenbrüchen, Einklemmen, Lähmungen, Ertrinken oder anderen schweren Verletzungen führen. Wichtige sicherheitvorschriften Lesen und befolgen Sie alle Anweisungen, bevor Sie das Produkt in Betrieb nehmen! 1). Lassen Sie Kinder und Menschen mit Behinderung nie unbeaufsichtigt. 2).
- Page 150 4.0 Pflege und Gebrauch 1). Bewahren Sie die Treppe an einem sicheren und trockenen Ort auf. 2). Lagern Sie keine Materialien auf der Treppe. 3). Halten Sie die Treppe sauber und frei von Fremdkörpern. 4). Führen Sie regelmäßige Wartungsarbeiten an den Schrauben durch. Wenn die Leiter nicht verwendet wird, tragen Sie etwas Rostschutzöl auf.
- Page 151 2.0 Introductie Gefeliciteerd met de aanschaf van uw Pool Ladder van EXIT Toys! Pret maken, actief leven en buiten spelen..Dat is onze motivatie om innovatief en kwalitatief speelgoed te ontwikkelen voor coole kinderen. We doen er alles aan om producten te ontwikkelen die veilig zijn voor kinderen. Aangezien onze producten worden geclassificeerd als speelgoed, voldoen we aan de strengste normen op het vlak van consumentveiligheid.
- Page 152 3.0 Belangrijke veiligheidvoorschriften WAARSCHUWING: Het negeren van deze waarschuwing kan resulteren in gebroken botten, verknelling, be- wusteloosheid, verdrinking of andere ongevallen. 1). Houd ten allen tijden toezicht op kinderen en gehandicapten. 2). Help kinderen altijd als ze de ladder gebruiken om valpartijen en/of ernstige verwondingen te voorkomen.
- Page 153 4.0 Verzorging en gebruik 1). Bewaar de trap op een veilige en droge plaats. 2). Bewaar geen materialen op de trap. 3). Houd de trap schoon en vrij van vreemde materialen. 4). Voer periodiek onderhoud uit op de schroeven, wanneer de ladder niet in gebruik is, plaatst u wat antiroestolie erop.
- Page 154 2.0 Introduction Vous venez de faire l’acquisition du EXIT Pool Ladder; nous vous en félicitons! S’amuser, être actif et jouer dehors..Nous faitons tout notre possible pour développer des produits sûr pour les enfants. Étant donné que nos produits sont classés comme étant des jouets, nous nous con- formons aux réglementations de sécurité...
- Page 155 3.0 Consignes de sécurité importantes AVERTISSEMENT: le non-respect de ces avertissements peut entraîner des fractures, un piégeage, une paralysie, une noyade ou d’autres blessures graves. 1). Surveillez les enfants et les personnes handicapées à tous les instants. 2). Pour éviter les chutes et les blessures, aidez toujours les enfants quand ils utilisent l’échelle.
- Page 156 4.0 Entretien et utilisation 1). Ranger l’échelle en endroit sûr et sec. 2). Ne ranger aucun autre matériel avec l’échelle. 3). Préserver l’échelle de tout autre matériau. 4). Pour la maintenance périodique des vis, lorsque l’échelle n’est 5). pas en cours d’utilisation, lubrifier les vis avec un peu d’anti-rouille. 6).
- Page 157 Contact: Dutch Toys Group Edisonstraat 83, 7006RB, Doetinchem , the Netherlands P.O. Box 369, 7000AJ, Doetinchem, the Netherlands info@exittoys.com www.exittoys.com EXIT is a registered trade mark of Dutch Toys Group MSP-30112-V02...
- Page 158 User manual Gebrauchsanweisung Gebruikshandleiding Mode d’emploi FRAME POOL 18FTX8.2FTX39/48IN 5.4X2.5X1/1.22m 13FTX6.5FTX39/48IN 4X2X1/1.22M Important safety rules: Before installing and using this product read, understand, follow all instructions carefully and keep it for future reference! Wichtige sicherheitsregeln: Bevor Sie dieses Produkt installieren und verwenden lesen, verstehen und beachten Sie sorgfältig alle anweisungen, und für künftige bezugnahme aufbewahren! Belangrijke veiligheidsvoorschriften: Voor installatie en gebruik, zorg dat u alle...
- Page 159 English Deutsch Nederlands Français MSP-30100-V03...
- Page 160 1.0 Part reference (4x2x1m) Part Quan�ty 1.1 Part reference PF2905B PF2910B (4x2x1.22m) PF2908B PF2906B PF2909B GN02826 PF2003B PF2005B liner 290312 290365 290367 290311 PF2006B *for 1.22m models MSP-30100-V03...
- Page 161 1.2 Part reference (5.4x2.5x1m) Part Quan�ty PF2907B 1.3 Part reference PF2901B PF2902B (5.4x2.5x1.22m) PF2001B PF2003B PF2005B liner 290312 290365 290367 290311 PF2006B *for 1.22m models MSP-30100-V03...
- Page 162 NOTE: Drawing for illustration purpose only. Actual product may vary. Not to scale. Before assembling your pool, layout and review the contents to become familiar with all the parts you will be using during the assembly: HINWEIS: Die Zeichnungen dienen nur der Illustration. Das tatsächliche Produkt könnte etwas anders aussehen.
- Page 163 3.0 Guidelines for safe use Using your Frame Pool as instructed in this manual will eliminate virtually all hazards. However, please bear in mind that children have a natural urge to play and that this may lead to unforeseen dangerous situations for which the manufacturer cannot be held responsible.
- Page 164 7). The safety of your children is up to you! The risk is greatest when children are younger than 5 years old. The accidents do not only happen to others! Be ready to face it! 8). Watch and act: - Supervision of children must be close and constant; - Designate one responsible for security;...
- Page 165 Stay away from drains & suction fittings Your hair,body & jewelry can get sucked into drain. You could be held under water & drown! 2.5m Zone 2 Zone 1 Zone 2 2.5m Zone 0 Zone 0 1.5m 2.0m 2.0m 1.5m table 1 4.0 Site selection WARNING: Pools installed on inadequately level surfaces are subject to leaking,...
- Page 166 It is absolutely essential to select a suitable site for your pool BEFORE attempting to fill it with any water. Please select a set-up site which strictly conorms to the following guidelines: Guide1. Ensure that the area is firm,flat(no bumps or mounds of earth) and extremely level, with a grade not exceeding 3°...
- Page 167 5.0 Set up the pool IMPORTANT:Do not start assembly if any pieces are missing. For replacement pieces call the Consumer Service telephone number in your area. The number of persons required for installation: 2 adult at least. Total installation time except the time for site preparation and water filling: 45 up to 60 minutes.
- Page 168 BEAM E BEAM D BEAM C For 4mx2mx99 cm (13’x6,5’x39”)/4mx2.07mx1.22m (13’x6,8’x48”), the combination is E-D-C BEAM C BEAM A BEAM A BEAM A Step4. Install the horizontal beams BEAM B For 5.4mx2.74mx1.22m (18’x9’x48”), the combination is C-A-A-A-B For the both sides sleeve of the pool: Slide combined beams into sleeve,the hole on the beams should face outwards.
- Page 169 6.0 Fill the pool with water WARNING: Do not leave pool unattended while filling with water. WARNING: If more than 5 ~ 10 cm (1~2inch) of water collects on any one side before you start filling in the center.The pool is not level enough,and most be corrected!You shall pull out the drain plug, release the water completely, disassemble the pool completely,locate the pool on a plane surface, repeat set up instructiion.
- Page 170 Step7. Disconnect the hose and drainage valve connector when finished. Step8. Replace the out drain plug on the inside of the pool. Step9. Be sure that the pool liner is completely dry before folding the pool for long-term storage. Leaving the pool exposed to sunlight for a few hours will clean and speed the drying process and make it easier to fold the pool for storage.
- Page 171 8.0 In-season pool maintenance and care WARNING: If applicable,the filter pump included with your pool is designed to remove dirt and other small particles from your pool water. However, to maintain pool water that is perfectly clear, algae free, and safe from harmful bacteria, it is VERY IMPORTANT TO ENGAGE IN A CONSISTENT REGIMEN OF CHEMICAL TREATMENT.
- Page 172 2. Never let chlorine come into direct contact with the pool liner until it has completely dissolved. This means that granular or tabulated chlorine is first dissolved in a bucket of water before applying to pool water,and likewise ,liquid chlorine is slowly and evenly poured into pool water from various locations around perimeter of pool.
- Page 173 9.0 Trouble shooting PROBLEM DESCRIPTION CAUSE REMEDY • Water turns blue, brown, or black • The chlorine is oxidizing minerals • Adjust pH to recommended level. COLORED when first treated with chlorine. in your water. This commonly occurs • Run filter until water is clear. WATER with water from different sources.
- Page 174 2.0 Einführung Glückwunsch zur Wahl des EXIT Toys Frame Pool! Amüsier dich, sei aktiv und spiele im Freien! Für diesen Spaß entwickeln wir innovative und hochwertige Spielzeuge für coole Kids. Wir tun alles in unserer Macht stehende, um sichere Produkte für Kinder zu entwickeln.
- Page 175 3.0 Sicherheitsanweisungen Achten Sie darauf, vor Installation und Benutzung des Pools alle Informationen in dieser Bedienungsanleitung sorgfältig zu lesen, zu verstehen und zu befolgen. Diese Warnungen, Anweisungen und Sicherheitsrichtlinien beziehen sich auf einige allgemeine Gefahren in Verbindung mit wasserbasierten Freizeitaktivitäten, sie können jedoch nicht sämtliche Gefahren und Risiken abdecken.
- Page 176 regelmäßig auf. Dies kann bei einem Notfall Leben retten; 3) Weisen Sie alle Poolbenutzer, einschließlich Kindern, an, was bei einem Notfall zu tun ist; 4) Springen Sie niemals kopfüber in flaches Wasser. Andernfalls drohen ernsthafte oder sogar lebensgefährliche Verletzungen; 5) Verwenden Sie den Pool nicht, wenn Alkohol oder Medikamente Ihre Fähigkeit zur sicheren Benutzung des Pools beeinträchtigen;...
- Page 177 Abstand zu Abflussrohren ERTRINKEN VERMEIDEN WARNUNG WARNUNG und Sauganschlüssen einhalten Ihre Haare, Körper und Schmuckstücke können Überwachen Sie sorgfältig Kinder, die in oder in der in den Abfluss gesaugt werden. Sie können Nähe dieses Pools sind. Kinder unter 5 Jahren sind unter Wasser gehalten werden und ertrinken.
- Page 178 aufgestellt werden, aber nicht weiter als die Länge der Filterpumpenleitung. Unter keinen Umständen darf eine Verlängerungsschnur verwendet werden, um den Anschlussbereich zu verlängern. Das wichtigste ist die Wahl eines geeigneten Aufstellungsortes für Ihren Pool, BEVOR Sie es mit Wasser befüllen. Wählen Sie einen Aufstellungsort, der den folgenden Richtlinen sehr genau entspricht: Anleitung 1.
- Page 179 5.0 Aufstellen des Pools WICHTIG: Beginnen Sie nicht mit der Montage, wenn Teile fehlen sollten. Rufen Sie den Kundendienst Ihrer Region an, wenn Sie Ersatzteile benötigen. Die für die Instal- lation benötigte Anzahl an Personen: Mindestens 2 Erwachsene. Die Installationszeit, abgesehen von der Zeit zur Vorbereitung des Aufstellungsortes und zum Befüllen mit Wasser: 45 ~ 60 Minuten Schritt 1.
- Page 180 BEAM E BEAM D BEAM C For 4mx2mx99 cm (13’x6,5’x39”)/4mx2.07mx1.22m (13’x6,8’x48”), the combination is E-D-C BEAM A BEAM A BEAM A BEAM C Schritt 4. Installieren Sie den Horizontalholm BEAM B For 5.4mx2.74mx1.22m (18’x9’x48”), the combination is C-A-A-A-B Für die lange und kurze Seitenmanschette des Pools: Schieben Sie Holmenkombination in die Manschette hinein, wobei das Loch in den Holmen nach außen weisen muss.
- Page 181 6.0 Befüllen des Pools mit Wasser. WARNUNG: Lassen Sie den Pool nicht unbeaufsichtigt stehen, während Sie ihn mit Wasser befüllen. WARNUNG: Wenn sich an einer Seite mehr als 2,5 ~ 5 cm Wasser ansammelt, bevor die Mitte aufgefüllt ist, steht der Pool nicht eben und muss richtig aufgestellt werden! Ziehen Sie den Abflussstöpsel heraus, lassen Sie das gesamte Wasser ab, demontieren Sie den gesamten Pool und stellen Sie den Pool durch erneute Errichtung anweisungsgemäß...
- Page 182 Schritt 9. Vergewissern Sie sich, dass die Poolverkleidung komplett trocken ist, bevor Sie den Pool für eine längerfristige Lagerung zusammenfalten. Wenn Sie den Pool ein paar Stunden dem Sonnenlicht aussetzen, beschleunigt sich der Trocknungsvorgang und es fällt leichter, den Pool für die Lagerung zusammenzufalten. (Versuchen Sie nie, einen Pool zu falten oder zu verstauen, der nicht komplett trocken ist, da dies zur Verbreitung von Schimmelpilz oder zur Schimmelbildung während der Lagerzeit des Pools führen könnte.)
- Page 183 8.0 Pflege des Pools während der Saison WARNUNG: Die zu Ihrem Pool gehörige Filterpumpe, sofern vorhanden, hat den Zweck,Schmutz und andere kleine Teilchen aus dem Badewasser zu entfernen. Um jedoch ein Badewasser zu bekommen, das stets sauber, frei von Algen und schädlichen Bakterien ist, ist es SEHR WICHTIG, EINEN KONSEQUENTEN PLAN FÜR DIE CHEMISCHE WASSERAUFBEREITUNG UMZUSETZEN.
- Page 184 und anderweitige kombinierte Verbindungen, welche die Klarheit des Wassers beeinträchtigen.Informieren Sie bei einem lokalen Händler für Poolbedarf nach bestimmten Details für den Einsatz von Chemikalien, teilen Sie ihm mit, wieviel Wasser Ihr Pool aufnimmt, und, falls gewünscht, geben Sie ihm eine Probe Ihrem Poolwasser.
- Page 185 8. Sobald Ihr Pool für die Saison mit Wasser aufgefüllt ist, achten Sie darauf, ob er sich aufgrund von Regen oder per Zufall übermäßig auffüllt. In diesem Fall ist es wichtig, das überschüssige Wasser sobald wie möglich abzulassen oder herauszuschöpfen. Wenn es sich um einen aufblasbaren Ringpool handelt, sollte der Wasserpegel niemals höher sein als der Unterrand des aufblasbaren Rings.
- Page 186 2.0 Introductie Gefeliciteerd met de aanschaf van uw Frame Zwembad van EXIT Toys! Pret maken, actief leven en buiten spelen..Dat is onze motivatie om innovatief en kwalitatief speelgoed te ontwikkelen voor coole kinderen. We doen er alles aan om producten te ontwikkelen die veilig zijn voor kinderen. Aangezien onze producten worden geclassificeerd als speelgoed, voldoen we aan de strengste normen op het vlak van consumentveiligheid.
- Page 187 3.0 Belangrijke veiligheidsvoorschriften Waarschuwing: Om meer plezier te beleven aan uw zwembad en de veiligheid van de mensen in en rond het zwembad te garanderen, is het belangrijk dat u de volgende veiligheids- en onderhoudsinstructies STRIKT NALEEFT. 1). VOOR het instellen of gebruik van het zwembad, is de eigenaar van het zwembad ervoor verantwoordelijk alle lokale en nationale wetten die betrekking hebben op de veiligheid van het bovengrondse zwembad.
- Page 188 - Er is meer toezicht vereist wanneer er verschillende personen in het zwembad aanwezig zijn. - Leer uw kinderen zo snel mogelijk zwemmen. - Maak de hals, armen en benen van het kind nat voordat het in het water gaat. - Leer EHBO, vooral specifiek gericht op kinderen.
- Page 189 Blijf uit de buurt VERDRINKING VOORKOMEN van afvoerbuizen en WAARSCHUWING WAARSCHUWING aanzuigaansluitingen Uw haar, lichaam en juwelen kunnen in de afvoer Houd nauwgezet toezicht op kinderen die zich in of worden gezogen. U kunt onder water worden dichtbij dit zwembad bevinden. Kinderen jonger dan gehouden en verdrinken.
- Page 190 Het is absoluut belangrijk dat u voor uw zwembad een geschikte locatie selecteert VOORDAT u probeert het met water te vullen. Selecteer een instellingslocatie die strikt voldoet aan de volgende richtlijnen: Richtlijn 1. Controleer of het gebied stevig, plat (geen hopen of kuilen van aarde) en extreem waterpas is, met een maximale hellingsgraad van 3°...
- Page 191 5.0 Het zwembad opzetten BELANGRIJK: Start de montage niet als er stukken ontbreken. Bel het nummer van de klantendienst in uw regio voor vervangstukken. Het aantal personen dat is vereist voor de installatie: minstens twee volwassenen. Totale installatieduur zonder de tijd voor de voorbereiding van de locatie en het bijvullen van water: 45 ~60 minuten.
- Page 192 BEAM E BEAM D BEAM C For 4mx2mx99 cm (13’x6,5’x39”)/4mx2.07mx1.22m (13’x6,8’x48”), the combination is E-D-C BEAM A BEAM A BEAM A BEAM C Stap4. Installeer de horizontale balken BEAM B For 5.4mx2.74mx1.22m (18’x9’x48”), the combination is C-A-A-A-B Voor de tunnels aan beide zijden Schuif gecombineerde balken in de tunnel.
- Page 193 6.0 Vul het zwembad met water WAARSCHUWING: Laat het zwembad niet onbewaakt achter tijdens het vullen met water. WAARSCHUWING: als er meer dan 2,5 - 5 cm water samenstroomt aan een van de zijden voordat het midden wordt gevuld, staat het zwembad niet waterpas genoeg en moet dat worden gecorrigeerd.
- Page 194 samenvouwt voor langdurige opslag. Als u het zwembad enkele uren blootgesteld laat aan zonlicht, wordt het gereinigd en verloopt het drogen sneller zodat het gemakkelijker wordt om het zwembad op te slaan voor opslag. (Probeer nooit een zwembad op te vouwen of op te beregen als het niet helemaal droog is. Anders kan dit leiden tot de vorming van schimmel terwijl het zwembad is opgeslagen.) Stap 10.
- Page 195 8.0 Seizons onderhoud en waterverzorging WAARSCHUWING: Indien toepasselijk, is de filterpomp die bij uw zwembad is geleverd, ontworpen voor het verwijderen van vuil en andere kleine deeltjes uit uw zwembadwater. Om er echter voor te zorgen dat het zwembadwater perfect zuiver, algenvrij en beschermd is tegen schadelijke bacteriën, is het HEEL BELANGRIJK EEN CONSISTENT SCHEMA VAN CHEMISCHE BEHANDELING TOE TE PASSEN.
- Page 196 3) Algiciden: deze chemische producten worden geformuleerd voor het verwijderen van algen. 4) “Shock” (Superchlorinator): Elimineert bepaalde organisch en andere gecombineerde stoffen die de waterhelderheid kan beïnvloeden. Om specifieke details over het gebruik van chemische producten te verkrijgen, raadpleegt u een lokale zwembadhandelaar en vermeldt u het volume water in uw specifiek zwembad en, indien gewenst, een staal van uw zwembadmonster.
- Page 197 letten dat uw zwembad niet overvol raakt doorregenwater of door het per ongeluk te veel vullen; In dat geval is het belangrijk zo snel mogelijk overtollig water af te laten of leeg te hozen. Als het een opblaasbaar ringbad is, mag het waterpeil nooit hoger zijn dan de onderste rand van de opblaasbare ring.
- Page 198 2.0 Introduction Vous venez de faire l’acquisition du EXIT Frame Pool; nous vous en félicitons! S’amuser, être actif et jouer dehors..Nous faitons tout notre possible pour développer des produits sûr pour les enfants. Étant donné que nos produits sont classés comme étant des jouets, nous nous con- formons aux réglementations de sécurité...
- Page 199 3.0 RÈGLES IMPORTANTES DE SÉCURITÉ AVERTISSEMENT: OPour augmenter l’agrément de votre piscine et protéger la sécurité des personnes dans et autour de la piscine, RESPECTEZ TOUJOURS STRICTEMENT les instructions de sécurité et de maintenance suivantes 1). Il est de la responsabilité du propriétaire de la piscine d’identifier et de respecter toutes les lois locales et nationales concernant la sécurité...
- Page 200 - La surveillance des enfants doit être rapprochée et constante ; - Désignez un seul responsable de la sécurité ; - Renforcez la surveillance lorsqu’il y a plusieurs utilisateurs dans la piscine ; - Apprenez à nager à vos enfants dès que possible ; - Mouillez nuque, bras et jambes avant d’entrer dans l’eau ;...
- Page 201 Restez à l'écart des dispositifs EMPÊCHER LES NOYADES AVERTISSEMENT AVERTISSEMENT d'évacuation et d'aspiration Vos cheveux, votre corps et vos bijoux peuvent Observez étroitement les enfants qui se trouvent dans être aspirés dans l'évacuation. Vous pourriez être ou à proximité de cette piscine. Les enfants de moins de 5 ans présentent le risque le plus élevé...
- Page 202 Il est absolument essentiel de sélectionner un site adapté pour votre piscine AVANT d’essayer de la remplir avec de l’eau. Veuillez sélectionner un site d’installation qui respecte strictement les directives suivantes : Guide1. Assurez-vous que la zone est ferme, plane (aucune bosse ou butte de terre) et extrêmement horizontale, avec une déclivité...
- Page 203 5.0 INSTALLER LA PISCINE IMPORTANT: Ne commencez pas le montage si des pièces sont manquantes. Pour des pièces de rechange, appelez le numéro de téléphone du Service client dans votre région. Le nombre de personnes nécessaire pour le montage: Au moins 2 personne. Le temps indicatif de rèalisation globale hors prèparation du terrain et hors mise en eau: 45 ~60 minutes.
- Page 204 BEAM E BEAM D BEAM C For 4mx2mx99 cm (13’x6,5’x39”)/4mx2.07mx1.22m (13’x6,8’x48”), the combination is E-D-C BEAM C BEAM A BEAM A BEAM A Étape4. INSTALLEZ LA POUTRE HORIZONTALE BEAM B Pour le manchon du côté long de la piscine : For 5.4mx2.74mx1.22m (18’x9’x48”), the combination is C-A-A-A-B Pour le manchon du côté...
- Page 205 6.0 REMPLIR LA PISCINE D’EAU AVERTISSEMENT: Ne laissez pas la piscine sans surveillance lors de son remplissage d’eau. AVERTISSEMENT: Si plus d’1 à 2 pouces d’eau s’accumule sur un côté avant que vous ne commenciez à remplir au centre. La piscine n’est pas assez horizontale, ce qui doit être corrigé...
- Page 206 la piscine pour un stockage à long terme. Laisser la piscine exposée à la lumière du soleil pendant quelques heures nettoie et accélère le processus de séchage et facilite le pliage de la piscine pour son stockage. (N’essayez jamais de plier ou de ranger une piscine qui n’est pas complètement sèche car cela pourrait entraîner une prolifération de moisissure pendant que la piscine est stockée).
- Page 207 8.0 MAINTENANCE ET SOIN DE L’EAU AVERTISSEMENT: Le cas échéant, la pompe filtrante incluse avec votre piscine est conçue pour retirer les saletés et les autres petites particules de l’eau de votre piscine. Cependant, pour maintenir l’eau de la piscine parfaitement claire, exempte d’algues et sans bactérie nocive, il est TRÈS IMPORTANT DE MENER UN RÉGIME CONSTANT DE TRAITEMENT CHIMIQUE.
- Page 208 4) « Choc » (Super chlorinateur) : Élimine certains composants organiques et d’autres combinaisons pouvant affecter la clarté de l’eau. Afin d’obtenir des détails spécifiques sur l’utilisation des produits chimiques, veuillez consulter un détaillant local de fournitures de piscines et lui fournir le volume d’eau spécifique de votre piscine et, si souhaité, un échantillon de l’eau de votre piscine.
- Page 209 6. Rappelez à votre famille et à vos amis de toujours arroser au tuyau ou de rincer les saletés ou l’huile solaire de leurs mains, leurs pieds et leur corps avant d’accéder à la piscine. 7. Il est nécessaire de contrôler les boulons et la quincaillerie de la piscine (par ex. tache de rouille) dès que possible.
- Page 210 10.0 GARANTIE LIMITÉE Nous garantissons tous les composants contenus dans cette piscine (à l’exception de l’unité de pompe filtrante) contre les défauts de matières et de fabrication dans le cadre d’une utilisation normale, pour une période de 90 jours à compter de la date d’achat pour le propriétaire initial uniquement.
- Page 211 Contact: Dutch Toys Group Edisonstraat 83, 7006RB, Doetinchem , the Netherlands P.O. Box 369, 7000AJ, Doetinchem, the Netherlands info@exittoys.com www.exittoys.com EXIT is a registered trade mark of Dutch Toys Group...
- Page 212 User manual Gebrauchsanweisung Gebruikshandleiding Mode d’emploi SWIMMING POOL DOME 13FTX6.5FT 5.4X2.5 18FTX8.2FT Important safety rules: Before installing and using this product read, understand, follow all instructions carefully and keep it for future reference! Wichtige sicherheitsregeln: Bevor Sie dieses Produkt installieren und verwenden lesen, verstehen und beachten Sie sorgfältig alle anweisungen, und für künftige bezugnahme aufbewahren! Belangrijke veiligheidsvoorschriften: Voor installatie en gebruik, zorg dat u alle...
- Page 213 1.0 Instructions English * * * * * * * * * Deutsch Nederlands * * * * * * * * * Français M8X43mm M6X12mm M8X15mm Swimming Pool Dome 5.4x2.5 Swimming Pool Dome 4x2 MSP-30101-V03 MSP-30101-V03...
- Page 214 MSP-30101-V03 MSP-30101-V03...
- Page 215 MSP-30101-V03 MSP-30101-V03...
- Page 216 M8x15mm MSP-30101-V03 MSP-30101-V03...
- Page 217 11.1 MSP-30101-V03 MSP-30101-V03...
- Page 218 11.2 12.1 MSP-30101-V03 MSP-30101-V03...
- Page 219 2.0 Introduction 12.2 Congratulations on choosing a EXIT Swimming Pool Dome! Have fun, be active and play outdoors..That’s what keeps driving us to develop innovative, quality toys for cool kids. We do everything possible to develop safe products for children. As our products are classed as toys, we comply with the toughest consumer safety regulations.
- Page 220 3.0 Safety Instructions In quiet weather (up to wind force 2) you may leave the Pole Dome partially open. With wind force up to 6 you may leave the Pool Dome completely open if so desired. Important Safety Instructions: make sure that you carefully read, understand and With wind force higher than 6 you must open the Pool Dome and anchor it.
- Page 221 3.0 Sicherheitsvorschriften 2.0 Einführung Wichtige Sicherheitsvorschriften: Sorgen Sie vor der Montage und Verwendung Glückwunsch zur Wahl des EXIT EXIT Swimming Pool Dome Pooldach! dafür, dass Sie alle Anweisungen sorgfältig lesen, verstehen und befolgen. Bewahren Sie dieses Dokument zum späteren Nachschlagen auf. Das Nichtbefolgen dieser Amüsier dich, sei aktiv und spiele im Freien! Vorschriften kann zu ernsten Verletzungen führen.
- Page 222 Achtung: lassen Sie das Pooldach niemals teilweise geöffnet unbewacht. 2.0 Introductie Achtung: Bei erwarteten schweren Windstößen, öffnen oder schließen Sie das Pooldach und verankern es. Gefeliciteerd met de aanschaf van uw Zwembad Overkapping (EXIT Swimming Pool Dome) van EXIT Toys! Bei ruhigem Wetter (bis Windstärke 2) können sie das Pooldach teilweise offen stehen lassen.
- Page 223 3.0 Veiligheidsvoorschriften Let op: laat de overkapping nooit onbeheerd deels geopend. Let op: Bij verwachte harde windstoten, op of sluit en veranker de overkapping. Belangrijke veiligheidsvoorschriften: voor installatie en gebruik, zorg dat u alle Bij rustig weer (tot windkracht 2) kunt de overkapping deels open laten staan. Bij instructies aandachtig leest, begrijpt, naleeft en bewaar dit document voor latere een windkracht tot 6 kunt u desgewenst de overkapping volledig geopend laten.
- Page 224 2.0 Introduction 3.0 Informations relatives à la sécurité Vous venez de faire l’acquisition du EXIT Swimming Pool Dome; nous vous en Informations importantes relatives à la sécurité : pour l'installation et l'utilisation félicitons! de l'abri de piscine EXIT Swimming Pool Dome, assurez-vous de lire, comprendre et respecter attentivement toutes les instructions et conservez ce document pour une S’amuser, être actif et jouer dehors..
- Page 225 Par temps calme (jusqu'à force 2 sur l'échelle de Beaufort) vous pouvez laisser l'abri partiellement ouvert. Jusqu'à force 6, vous pouvez choisir de laisser l'abri complètement ouvert. En cas de vent supérieur à force 6, vous devez ouvrir l'abri et l'ancrer.
- Page 226 Contact: Dutch Toys Group Edisonstraat 83, 7006RB, Doetinchem , the Netherlands P.O. Box 369, 7000AJ, Doetinchem, the Netherlands info@exittoys.com www.exittoys.com EXIT is a registered trade mark of Dutch Toys Group...
- Page 227 SFP7-16-NL HANDLEIDING ZANDFILTERPOMP 290729XX / 290730XX Other languages DE: age 1 : age 1...
- Page 228 Productspecificaties Model 290729XX 290730XX beschadigd is, moet het apparaat worden verwijderd. Maximale werkdruk <0.2bar (3psi) < 0.3bar(4.5psi) Spanning 12 V WAARSCHUWING: Om het risico op een elektrische schok te reduceren, moet u Effectief filtratiegebied 0.058m² (0.62ft²) 0.058m² (0.62ft²) geen verlengsnoer, timer, stekkeradapter of omvormer aansluiten op het filterhuis. Maximale stroomsnelheid 800 gallons/uur (3028/uur) 1000 gallons/uur (3785/uur) Zorg voor een vast stopcontact.
- Page 229 www.jilong.com SFP7-16-NL www.jilong.com SFP7-16-NL...
- Page 230 www.jilong.com SFP7-16-NL www.jilong.com SFP7-16-NL...
- Page 231 www.jilong.com SFP7-16-NL www.jilong.com SFP7-16-NL...
- Page 232 www.jilong.com SFP7-16-NL www.jilong.com SFP7-16-NL...
- Page 233 www.jilong.com SFP7-16-NL www.jilong.com SFP7-16-NL...
- Page 234 Opmerking: Tijdens de werking van de zandfilterpomp, moet u de drukwaarde van de manometer controleren. Het werkt over het algemeen normaal wanneer de druk van de aanbevolen zandfilterpomp lager is dan 0,2bar (3psi) (groen gebied). O p m e r k i n g : U m o e t e r v o o r z o r g e n d a t o n d e r h o u d a l l e e n b e g i n t n a d a t d e zandfilterpomp is losgekoppeld.
- Page 235 Diagnose van problemen en oplossingen Problemen Controleren Oplossingen Zorg ervoor dat het stroomsnoer in het De stroomstekker is niet geaarde metalen stopcontact met 3 goed aangesloten kernen is gestoken. De lekbeveiliging is Reset de circuitonderbreker. Als De motor kan niet normaal losgekoppeld het probleem blijft bestaan, kan het worden gestart...
- Page 236 SFP7-16-D HANDBUCH FÜR SANDFILTERPUMPE 290729XX / 290730XX...
- Page 237 Produ tspe ifi ationen sicheren Ort, sodass es nicht durch Rasenmäher und andere Geräte beschädigt wird. Modell 290729XX 290730XX WARNUNG: Das Netzkabel kann nicht ersetzt werden. Bei beschädigtem Maximaler Betriebsdruck <0.2bar (3psi) < 0.3bar(4.5psi) Netzkabel sollte das Gerät entsorgt werden. Spannung 12 V Effektiver Filterbereich...
- Page 238 www.jilong.com SFP7-16-D www.jilong.com SFP7-16-D...
- Page 239 www.jilong.com SFP7-16-D www.jilong.com SFP7-16-D...
- Page 240 www.jilong.com SFP7-16-D www.jilong.com SFP7-16-D...
- Page 241 www.jilong.com SFP7-16-D www.jilong.com SFP7-16-D...
- Page 242 www.jilong.com SFP7-16-D www.jilong.com SFP7-16-D...
- Page 243 Hinweis: Prüfen Sie während des Betriebs der andfilterpumpe die Druckmessung des Manometers. Wenn der Druck der Sandfilterpumpe weniger als 0,2 bar (grüner Bereich) beträgt, läuft sie normal. Hinweis: Beginnen Sie erst nach Trennung der Stromversorgung mit Wartungsarbeiten a n d e r S a n d f i l t e r p u m p e . A n d e r n f a l l s b e s t e h e n e r n s t h a f t e G e f a h r e n , w i e (lebensgefährliche) Verletzungen.
- Page 244 Problemdiagnostik und Lösungen Probleme Überprüfung Lösungen Stellen Sie sicher, dass das Netzkabel an eine 3-adrige geerdete Steckdose angeschlossen ist. Der Netzstecker ist nicht Setzen Sie den Trennschalter richtig angeschlossen zurück. Falls das Problem weiterhin Der Motor kann nicht Auslaufschutz ist getrennt auftritt, ist möglicherweise das normal gestartet werden Motor überhitzt oder...
- Page 245 SFP7-16-GB SAND FILTER PUMP MANUAL 290729XX / 290730XX...
- Page 246 Product specifications Model 290729XX 290730XX WARNING: To reduce the risk of electric shock, do not connect any extension Maximum operating <0.2bar (3psi) < 0.3bar(4.5psi) wire, timer, plug adapter or converter to the filter bod . lease provide a fi ed pressure outlet.
- Page 247 www.jilong.com SFP7-16-GB www.jilong.com SFP7-16-GB...
- Page 248 www.jilong.com SFP7-16-GB www.jilong.com SFP7-16-GB...
- Page 249 www.jilong.com SFP7-16-GB www.jilong.com SFP7-16-GB...
- Page 250 www.jilong.com SFP7-16-GB www.jilong.com SFP7-16-GB...
- Page 251 www.jilong.com SFP7-16-GB www.jilong.com SFP7-16-GB...
- Page 252 Note: During the operation of the sand filter pump, check the pressure reading of the manometer. G e n e r a l l y, w h e n t h e p r e s s u r e o f t h e recommended sand filter pump is less than 0.2bar (3psi) (green area) , it runs normally.
- Page 253 Diagnosis of Problems and Solutions roblems Checking Solutions T h e m o t o r c a n n o t b e ower plug not properl Make sure the power cord is inserted started normally inserted i n t o t h e 3 - c o r e g r o u n d e d m e t a l L e a k a g e p r o t e c t i o n receptacle.
Need help?
Do you have a question about the POOLEX NANO ACTION and is the answer not in the manual?
Questions and answers