Advertisement
Kirsch
Automation III
®
The Automation III Remote
has been redesigned with a
modern look while maintaining
its compatibility with the remote
housing and wall mount. Precisely
control your Automation III
window coverings throughout your
home with the touch of a button.
The following pages provide all
the details on how to set up and
operate both remote styles.
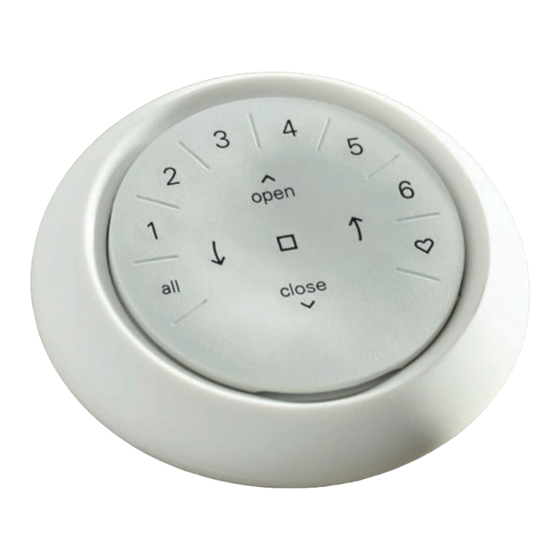
Key Components
AUTOMATION III REMOTE MODULE
REMOTE CONTROL GUIDE
INCLUDED
Table of Contents
Key Components . . . . . . . . . . . . . . .
Getting Started . . . . . . . . . . . . . . . . . . .
Programming . . . . . . . . . . . . . . . . . . . . .
Basic Operation . . . . . . . . . . . . . . . . . . .
Battery Replacement . . . . . . . . . . . . . .
Troubleshooting . . . . . . . . . . . . . . . . . .
OR
1
2
3
4
5
6
1
Advertisement
Table of Contents

Related Manuals for Kirsch Automation III

Summary of Contents for Kirsch Automation III
-
Page 1: Table Of Contents
Automation III ® REMOTE CONTROL GUIDE Table of Contents The Automation III Remote has been redesigned with a modern look while maintaining Key Components ....its compatibility with the remote Getting Started . -
Page 2: Getting Started
IMPORTANT: The Automation III Remote GETTING STARTED: First, activate the Getting Started will not operate a window covering until remote by pulling both plastic tabs from the window covering and remote have been the back battery compartment. added and configured to a Home in the Automation App. -
Page 3: Programming
REMOVING A WINDOW COVERING SETTING FAVORITE POSITIONS “RAISE TO WAKE” FEATURE FROM A GROUP Each Automation III window covering The remote’s LEDs will automatically turn 1. Open the Automation App has two FAVORITE positions. Each on whenever the remote is picked up. This and navigate to “More”... -
Page 4: Basic Operation
RIGHT ARROW to close the window covering and open the vanes, rotate the vanes to the right, tilt NOTE: Some Automation III window the louvers/slats up or fully raise the coverings o er variable operation from middle rail. -
Page 5: Battery Replacement
GROUPS and FAVORITES. The remote uses two CR 2032 batteries. 1. For the Automation III Remote, slide your thumb in the indentation, gently li and remove the remote module from the remote housing. -
Page 6: Troubleshooting
Electromagnetic Compatibility (EMC) Directive 2014/30/EU © 2022 Kirsch Custom Window Coverings. All rights reserved. All trademarks used herein are the and Radio Equipment Directive (RED) 2014/53/EU. A copy of the DoC can be property of Kirsch or their respective owners.
Need help?
Do you have a question about the Automation III and is the answer not in the manual?
Questions and answers