
Summary of Contents for ACOEM ATD- 300
- Page 1 ACOEM Acoustic Threat Detection ATD- 300 | ATD-301 User Manual POD FW 1.0.0.4 - SERVER V 1.0.0.0 December 2020 ACOEM | ATD-300/ATD-301 | User Manual FW 1.0.0.4...
-
Page 2: Table Of Contents
4.3. Network setting 4.4. Pod reboot 4.5. Pod installation Setting 4.6. Camera Setting 4.7. VMS Setting 4.8. ATD Server Settings 4.9. Settings Validation 4.9.1. Threat simulator 4.9.2. Demo mode ACOEM | ATD-300/ATD-301 | User Manual FW 1.0.0.4... - Page 3 5.2.3. Pod installation on the bracket 8. ATD SERVER SOFTWARE INSTALLATION 8.1. Introduction 8.2. Prerequisites Software Installation 8.2.1. Install Docker Engine 8.2.2. Install Docker Compose 8.3. ATD Server software installation 9. DATA SHEET ACOEM | ATD-300/ATD-301 | User Manual FW 1.0.0.4...
-
Page 4: Introduction
If this is not the case, please notify ACOEM or its approved representative without further delay. You are advised to keep the packaging in case you need to return your equipment for maintenance at ACOEM’s premises. -
Page 5: Safety Instruction
Indicates a potentially hazardous situation which, if not avoided, could result in death or serious injury. Indicates a potentially hazardous situation which, if not avoided, may result in minor or moderate injury. ACOEM | ATD-300/ATD-301 | ... -
Page 6: Safety Labels And Markings
● The instrument and its accessories should not be incinerated or thrown into the fire ● The instrument and its accessories must not be landfilled. ● The instrument and its accessories must neither be ground nor crushed. ACOEM | ATD-300/ATD-301 ... -
Page 7: Lighting Protection And Earthing
The operator need to use a Torx screw driver and the crimping tool for the ring tongue (these tools are not supplied with the equipement). Figure 1: ATD-300/ATD-301 grounding thread 2.5. Operating Environment ACOEM | ATD-300/ATD-301 | ... -
Page 8: Installation Caution
● Ensure the PoE power supply is connected to an outlet protected from shocks or possible damage. ● Keep cord away from heat, oil, sharp edges or moving parts. Damaged or entangled cords increase the risk of electric shock. ACOEM | ATD-300/ATD-301 | ... -
Page 9: Cleaning
Operation of this equipment in a residential area is likely to cause harmful interference in which case the user will be required to correct the interference at his own expense. ACOEM | ATD-300/ATD-301 ... -
Page 10: General Presentation
VMS to focus the operator on the threat. In normal circumstances, the pod pushes the sound level every second, with this simple indicator, it is easy to know if there is activity in a specific area. ACOEM | ATD-300/ATD-301 | ... -
Page 11: Overall Instrument Presentation
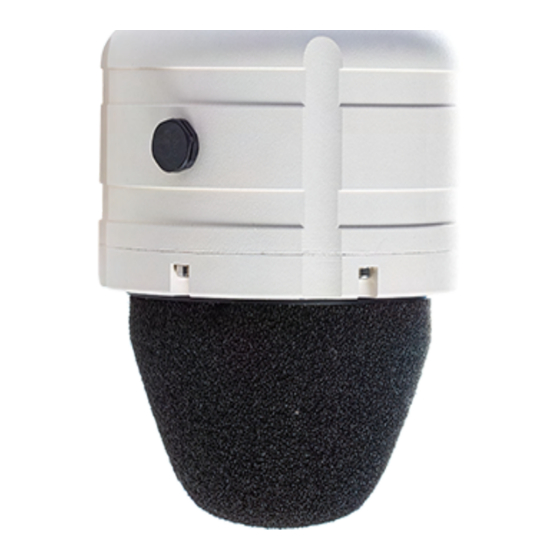
5. 2 horizontal grooves for the metallic strip fixation. 6. Breathing valve with a membrane which allows respiration but stop humidity. 7. Optional bird spykes. Figure 2: ATD-300/ATD-301 pod main parts ACOEM | ATD-300/ATD-301 | User Manual FW 1.0.0.4... -
Page 12: Network Architecture
In this case the pod will push the following to the server: ● Noise level every 1s ● State of Health every 15min ● Alarm in case of threat with raw signal (optional) Figure 3: ATD IT architecture ACOEM | ATD-300/ATD-301 | User Manual FW 1.0.0.4... - Page 13 ● The PTZ camera and the pod need to have the same time and date - It is recommended to use the same NTP server (local or external) ● VMS which accept generic http event ACOEM | ATD-300/ATD-301 ...
-
Page 14: Setup Guide
To power supply the pod, first connect the M12 X-Coded plug on the pod, and on the other end plug the RJ45 cable on a PoE injector (PoE/Data plug) or on a PoE switch. Figure 4: Power supply the ATD-300/ATD-301 pod ACOEM | ATD-300/ATD-301 ... -
Page 15: First Connection To The Pod
IP V6 address f a82::ba27:ebff:fed8:63e1 then the address to contact the pod is http://[fa82::ba27:ebff:fed8:63e1]:8080 Please note that the web page is on the port 8080. Figure 5: Web page to setup the ATD-300/ATD-301 pod ACOEM | ATD-300/ATD-301 | ... - Page 16 A second press on the S tatus m enu will open the pod status with the Serial number, connection status, Mode of the pod, Camera connection status and firmware version. Figure 6: Status web page ACOEM | ATD-300/ATD-301 | ...
- Page 17 Figure 7: The login web page on ATD-300/ATD-301 pod For security aspect, it is strongly recommended to modify the default password. Please note that If you lose the new password, you have to contact ACOEM support team to reset the password (...
- Page 18 ● On the User web page, type the new password on the 2 fields ● Press on the Ok button to save the password Figure 8: The User web page on ATD-300/ATD-301 pod to change the password ACOEM | ATD-300/ATD-301 ...
-
Page 19: Network Setting
The DHCP mode is enabled if the Static I Pv4 Address , the S tatic IPv4 Mask , the R outer Address and the D NS Address f ield are all empty. ACOEM | ... - Page 20 2. The I Pv6 Address is the static IPv6 address of the pod, it is important to store this IPv6 address to find the pod even if the IPv4 setting are incorrect 3. The M AC Address i s the fixed MAC address of the ethernet interface ACOEM | ATD-300/ATD-301 ...
- Page 21 4. You need to refresh the S ystem page to update the time of the pod 5. On the S tatus W eb page you can check if the pod is synchronized with the NTP server. The time synchronization can take several minutes after a reboot ACOEM | ATD-300/ATD-301 ...
-
Page 22: Pod Reboot
1. The reboot of the pod takes several minutes 2. A reboot is mandatory to apply the Server notification settings, the Pod installation mode setting, Network settings and NTP settings (on S ettings and S ystem pages) ACOEM | ATD-300/ATD-301 ... -
Page 23: Pod Installation Setting
All these parameters are located on S ettings p age, P od Installation settings section. Figure 12: Settings web page ACOEM | ATD-300/ATD-301 | ... - Page 24 ● The pod has 3 grooves on the body parts separate by 90°. The microphone 1 is located on the missing groove ● The Mic 1 is located by a small mark on the windscreen basement Figure 13: Mic 1 localisation on the pod (bottom view) ACOEM | ATD-300/ATD-301 | ...
- Page 25 To measure M ic 1 Orientation Alpha (°) use a compass or a smartphone for indicative measurement. On the following example the Alpha angle is equal to 64° To apply the new settings, push the A pply b utton on the pod web page. ACOEM | ATD-300/ATD-301 ...
- Page 26 If the pod is installed on a mast, then the I nstallation mode “1 - On a pole: 360° listening - Ground direction” has to be selected. In this mode, the pod surveys at 360° around him. Figure 15: Example of a pod installed on a mast ACOEM | ATD-300/ATD-301 ...
- Page 27 For the two last modes the connector has to be located on the wall side and never at the external side. Figure 16: Example of a pod installed on a wall To apply the setting, click on the S ave b utton and reboot the pod. ACOEM | ATD-300/ATD-301 | ...
-
Page 28: Camera Setting
The first step is to activate the Onvif mode, Select T rue on the O nvif activation menu. Complete the Camera IP, port and credential for the camera and U pdate the settings. ACOEM | ... - Page 29 o r if the O nvif mode i s F alse t he connection between pod and camera could not happen. In this case check the NTP server setting or activate the Onvif mode. If the camera is connected, you can finalized the setting on the S ettings page. ACOEM | ATD-300/ATD-301 ...
- Page 30 False o n the 1 80° Tilt Camera o ption Figure 19: Axis Q6215 - 180° Tilt camera exemple (Left picture) - Axis Q5525-E - 90° Tilt camera exemple (Right picture) ACOEM | ATD-300/ATD-301 ...
- Page 31 M ic 1 orientation Alpha (°) o n the settings, and never adjust the camera setting. ACOEM | ATD-300/ATD-301 ...
- Page 32 ● Camera to the Ground ⇒ Move the camera to the ground, at the vertical tilt level. Remark : ● You can use the T est Camera f unction during the setting process to validate the 0° Pan direction or the Tilt mode of your camera ACOEM | ATD-300/ATD-301 | ...
-
Page 33: Vms Setting
Please refer to the your VMS manual to define the URL and setup on the VMS the requested action for each type of alarm. The pod will send the specific alarm if a threat is detected. ACOEM | ATD-300/ATD-301 ... -
Page 34: Atd Server Settings
● Store the frame of each event for AI training This setting is not mandatory, and if you don’t need this feature, just let the field blank. Figure 22: Settings web page to setup the ATD server communication ACOEM | ATD-300/ATD-301 ... - Page 35 (the same command will be send for each type of threat) ● If the F rame record Server is blank then no Frame will be sent to the server. In this case no raw data are stored ACOEM | ATD-300/ATD-301 ...
-
Page 36: Settings Validation
To validate all the settings and the good behavior of the pod, two special functions are implemented on the M odes web page. Figure 23: Modes web page to check the ATD-300/ATD-301 setting ACOEM | ATD-300/ATD-301 ... -
Page 37: Threat Simulator
● The Sniper simulation threat will not move the camera ● Use only the implemented threat capability of your pod in the threat simulator. For this firmware version: Gunshot, Firecracker and Sniper ACOEM | ATD-300/ATD-301 | ... -
Page 38: Demo Mode
The E nd of the Demo Mode (UTC) i nform about the UTC time when the pod will reboot and restart on the ATD mode. Figure 24: Status web page for the ATD-300/ATD-301 demo mode ACOEM | ATD-300/ATD-301 ... -
Page 39: Fw Update
The Firmware file has to be a file with a .deb extension. Figure 26: Firmware file selected on the System page When the firmware file is selected you can press the S tart upload button to upload and update the firmware. ACOEM | ATD-300/ATD-301 | ... - Page 40 To apply the new firmware, you have to reboot the system. After the reboot, you can check on the Status page the actual Firmware version installed on the Figure 28: Firmware version installed on the ATD-300/ATD-301 ACOEM | ATD-300/ATD-301 ...
-
Page 41: Factory Menus
E nable f or D ebug recording status on the S tatus p age. The C alibration p age is only for maintenance to calibrate the microphone after repair. The ATD-300/ATD-301 no need calibration during its lifetime. ACOEM | ATD-300/ATD-301 ... -
Page 42: Pod Installation
The ATD-300/ATD301 has 2 horizontal grooves of 1mm deep and 12mm high allowing to maintain the metallic strips, and 3 vertical grooves to maintain the pod at a fixed position on the mast. Figure 30: Installation of the ATD-300/ATD-301 on a mast ACOEM | ATD-300/ATD-301 | ... - Page 43 ● Connect the Ethernet cable on the pod and fix the Ethernet cable on the mast to avoid any mouvement At the end of the installation please note the angle between the North and the Microphone 1 direction (ie §4.2). ACOEM | ATD-300/ATD-301 | ...
-
Page 44: Installation With Bracket
For long terme installation or for a wall installation a bracket has to be used to fix the pod. The bracket is an option and is not delivered in standard. Please contact the ACOEM sale service if you need a bracket. -
Page 45: Installation On A Wall
To fix the bracket on the wall use screw, steel bolt anchor or threaded rod with a diameter at least equal to 6mm and a washer with a external diameter at least equal to 14mm. Figure 33: Typical installation on the wall ACOEM | ATD-300/ATD-301 ... - Page 46 ● The fixation must be chosen to resist to climatic and environmental constraints ● The fixation must be tight enough to prevent any movement ● Connect the Ethernet cable on the pod and fix the Ethernet cable on the mast to avoid any mouvement ACOEM | ATD-300/ATD-301 | ...
-
Page 47: Pod Installation On The Bracket
● The pod has 3 grooves on the body parts separate by 90°. The microphone 1 is located on the missing groove ● The Mic 1 is located by a small mark on the windscreen basement Figure 34: Mic 1 localisation on the pod (bottom view) ACOEM | ATD-300/ATD-301 | ... - Page 48 Figure 36: Fixation of the pod on the bracket At the end of the installation please note the angle between the North and the Microphone 1 direction (ie §4.2). ACOEM | ATD-300/ATD-301 | ...
-
Page 49: Atd Server Software Installation
● RAM: At least 4Go ● Processor: Minimum 2GHz dual core processor x86/amd64 architecture Remark: ● This installation has to be done by qualified IT technician with Linux skill ACOEM | ATD-300/ATD-301 | User Manual FW 1.0.0.4... -
Page 50: Prerequisites Software Installation
You can test the installation with the following ssh command on the server: $ s udo d ocker run hello-world ACOEM | ATD-300/ATD-301 | User Manual FW 1.0.0.4... -
Page 51: Install Docker Compose
1 number by the public port (host) on " - : 80" 8 080 8 080 which the ATD server will listen ACOEM | ATD-300/ATD-301 | User Manual FW 1.0.0.4... - Page 52 $ s udo s ystemctl enable docker-compose-atd.service $ s udo s ystemctl start docker-compose-atd.service $ s udo s ystemctl status docker-compose-atd.service ACOEM | ATD-300/ATD-301 | User Manual FW 1.0.0.4...
-
Page 53: Data Sheet
Direct control of the camera by the pod DHCP mode or fixed IP with ONVIF protocol (need absolute move ONVIF camera with Profile S) Time synchronisation NTP protocol ACOEM | ATD-300/ATD-301 | User Manual FW 1.0.0.4...
Need help?
Do you have a question about the ATD- 300 and is the answer not in the manual?
Questions and answers