Advertisement
1. Interface Layout
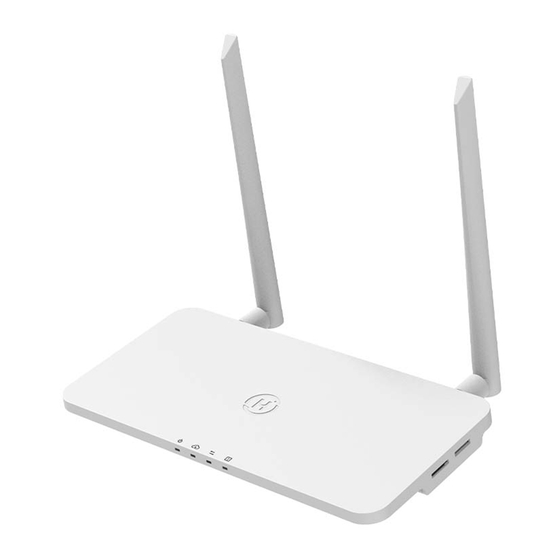
Item
A
B
C
DTU Communication Indicator (With Server)
D
DTU Communication Indicator (With MI)
E
F
G
H
I
J
K
L
M
2. Preparation
A) Download the Hoymiles Mobile Installer
App.
B) Check the box for the following items:
- Hoymiles DTU-Pro
- Two Antennas
- Adapter
- Bracket
- 5-Pin Plug
3. Installation
A) Take the two 2.4G antennas out of the box,
and screw the antennas into the Wi-Fi port
and 2.4G port.
B) Choose an installation location.
- Install on the top floor to increase signal strength.
- Install near the center of the PV array.
- Install at least 0.5 m above the ground and more than 0.8 m away from corners.
Note: Please do not install the DTU directly above metal or concrete to prevent signal interference.
C) Choose the installation method.
Option 1: Mount the DTU on the wall.
- Screw the bracket on the wall, please
use at least two screw holes (one on
each side) to affix the bracket (M4
screws need to be prepared by
installer).
Region: Global AP040226 REV1.2
Description
SD Card Slot
DTU Power Indicator
DTU Alarm Indicator
Wi-Fi Antenna (2.4G)
RS485
DRM Port (For Australia only)
Ethernet Port
USB Port
Reset Bottom
Power Port
2.4G Antenna
© 2020 Hoymiles Power Electronics Inc. All rights reserved.
DTU-Pro(Wi-Fi) Quick Installation Guide
C) Choose the way DTU-Pro connects to the Internet:
Use Wi-Fi or Ethernet. Prepare the following items if
needed:
- Ethernet Cable (if Ethernet option is selected)
- Hoymiles Installer App installed (if Wi-Fi option is
selected)
01
Advertisement
Table of Contents

Subscribe to Our Youtube Channel
Related Manuals for Hoymiles DTU-Pro(Wi-Fi)


Summary of Contents for Hoymiles DTU-Pro(Wi-Fi)
- Page 1 - Hoymiles DTU-Pro needed: - Two Antennas - Ethernet Cable (if Ethernet option is selected) - Adapter - Hoymiles Installer App installed (if Wi-Fi option is - Bracket selected) - 5-Pin Plug 3. Installation A) Take the two 2.4G antennas out of the box, and screw the antennas into the Wi-Fi port and 2.4G port.
- Page 2 To sheet _______ 5. Online Setup Create an online account to complete the DTU installation (refer to “Quick Installation Guide for S-Miles Cloud (Hoymiles Monitoring Platform) Online Registration” for detailed account creation steps). Note: For more setup details regarding the Export Management and the Local Installation Assistant, please acquire the related Operation Guide from Hoymiles Technical Service Center at service@hoymiles.com.
Need help?
Do you have a question about the DTU-Pro(Wi-Fi) and is the answer not in the manual?
Questions and answers