Advertisement
Quick Links
Advertisement

Related Manuals for Osram ams AS7050

Summary of Contents for Osram ams AS7050
- Page 1 Sensing is life AS7050 Evaluation Kit Quick Start Guide 07/03/2022...
- Page 2 AS7050 Evaluation Kit Quick Start Guide Contents AS7050 EVK Install Software How to Use AS7050 PC Software Logging Data FW Upgrade...
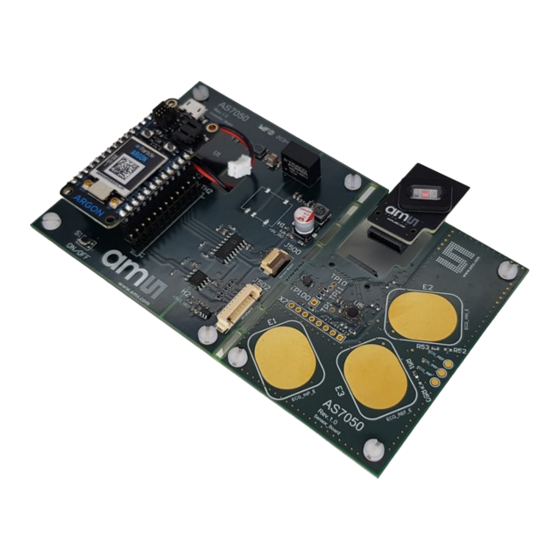
- Page 3 Contents of the AS7050 Evaluation kit AS7050 Evaluation kit parts Out of the Box • 1 – AS7050 EVK Mainboard • 2 – SMOD board SFH7072 with Optical stack • 3 – SMOD board SFH7074 with Optical stack • 4 –...
- Page 4 Contents of the AS7050 Evaluation kit Evaluation kits main parts • Key • 1 - OSRAM SFH 7072 LED/PD module • 2 - AS7050 Sensor • 3 - Three ECG Electrodes • 4 - Bluetooth Microcontroller module and USB connector •...
- Page 5 AS7050 PC Software Installation • To install, start the installer executable and follow the instructions as shown in Fig. 3 below (from left to right). Fig. 3: AS7050 Software Installation steps • Note: The EVK software is available for download here.
- Page 6 Setup Getting Started Optionally, connect electrodes to the connector on the back of the external electrodes. Connect the micro USB cable to the board and plug it into your computer. Afterwards, press the S1 button for one second to turn on the sensor board.
- Page 7 AS7050 PC Software Overview of GUI - Main menu - Connection window - Configuration Presets - Settings window - PD&LED(AGC) configuration - Start Measurements - Status window - Raw data of PPG/ECG signal – Measurement Type – Application settings – Application outputs –...
-
Page 8: Measurement Conditions
AS7050 EVK Finger Positioning on the Optical Stack & ECG Electrodes Put Fingers on the respective positions Fix The Optical Adapter Fig. 6: Finger positioning for PPG & ECG on the AS7050 Place the EVK on the table/flat surface. ... - Page 9 AS7050 SW Preset Configuration Files Features of Configuration files for EVK Name of Configuration File Features ECG 200 Hz, Gain 256 This is an optimized configuration preset for measuring ECG. Sampling Frequency: 200 Hz Total ECG gain: 4*64*1 = 256 High pass filter cutoff frequency (fc) = 0.33 Hz Low Pass filter: Bypassed HRM 20 Hz...
- Page 10 AS7050 PC Software Starting a HRM measurement Firstly, press the sensor button ”S1” for 1 second to power on the sensor. Afterward, select the correct COM port number BLE MAC address from the drop-down menu. Then, click the Connect button. When it is successfully connected, button on the left-hand side of the status bar (AS7050) will change color to green...
- Page 11 AS7050 PC Software Starting a SpO2 measurement Firstly, press the sensor button ”S1” for 1 second to power on the sensor. Afterward, select the correct COM port number BLE MAC address from the drop-down menu. Then, click the Connect button. When it is successfully connected, the button on the left-hand side of the status bar (AS7050) will change color to green...
- Page 12 AS7050 PC Software Starting a ECG Raw Data measurement Firstly, press the sensor button ”S1” for 1 second to power on the sensor. Afterward, select the correct COM port number BLE MAC address from the drop-down menu. Then, click the Connect button.
- Page 13 AS7050 PC Software Starting a HRM & ECG raw data measurement Firstly, press the sensor button ”S1” for 1 second to power on the sensor. Afterward, select the correct COM port number BLE number from the drop-down menu. Then, click the Connect button.
- Page 14 AS7050 Register Map Register Map Configuration • To check the current register Map, click on the tab File Register Map • In the Register Map window, oThe register values can be updated. oNew register values can be entered. oNew register values can be saved with a name.
- Page 15 AS7050 PC Software Saving and Loading Configuration • To load a configuration (JSON file), click on the tab File Load Configuration. This will open the Select Configuration File dialog box. Select the JSON configuration file you want to load, and click Open. Fig.
- Page 16 AS7050 PC Software Raw data logging and exporting • To save the measurement data, select Start Logging under the tab. The GUI prompts the user to select a file name and the data is saved in format. Optionally, the logging with a timestamp can be selected. This enables automatic...
- Page 17 Note: If the firmware update fails, wait 10 seconds and restart the board by pressing the S1 button. Fig. 17: Firmware update in progress • Note: The latest firmware is available for download (please contact the ams OSRAM support team (support_aws@ams-osram.com) for the download link)
- Page 18 Sensing is life...
Need help?
Do you have a question about the ams AS7050 and is the answer not in the manual?
Questions and answers