
Summary of Contents for C.B.S. SCIENTIFIC DGGE-1001
- Page 1 INSTRUCTION MANUAL Denaturing Gradient Gel Electrophoresis Systems DGGE-1001 DGGEK-1001 DGGE-2001 DGGEK-2001 DGGE-2401 DGGEK-2401 DGGE-4001 DGGEK-4001 DGGE-4801 DGGEK-4801 shown above: DGGEK-2401...
-
Page 2: Table Of Contents
TABLE OF CONTENTS Page Important User Information Section 1 General Information Introduction Specifications Safety Section 2 Description of parts Unpacking Components/Assembly Section 3 Instructions for Use Unit Set-up and Unpacking 8-11 Preparation/Cleaning of Glass Plates for Gel Casting Gel Casting Techniques 12-16 Vertical Gradient Formation Preparation of the Cassettes... -
Page 3: Important User Information
This product was produced utilizing the highest practical standards of materials, workmanship, and design. C.B.S. Scientific warrants that the product has been tested and will meet or exceed published specifications. This warranty is valid only if the product has been operated and maintained according to the instructions provided. - Page 4 Handhabung, Veränderung des Produktes durch den Benutzer, oder unzureichende Leistungen die sich risultato di condizioni al di fuori del controllo del fabbricante. La C.B.S. Scientific non sarà in ogni caso nicht im Verantwortungsbereich von C.B.S. Scientific befinden. C.B.S. Scientific kommt unter keinen responsabile per danni incidentali o consequenziali, incluso, senza limitazioni, perdite di profitto, perdita Umständen für folgende Schäden auf:...
-
Page 5: General Information
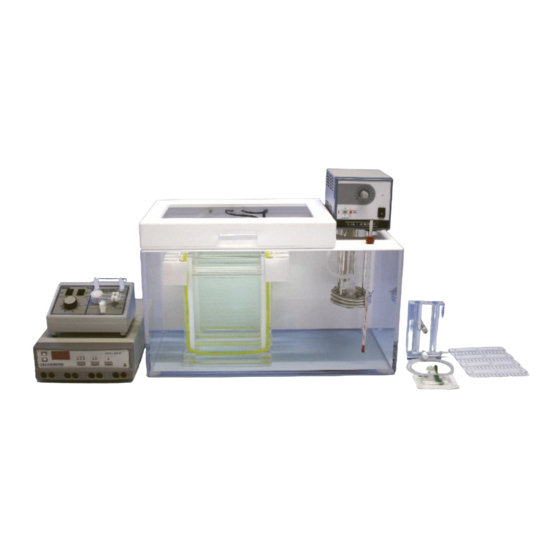
C.B.S. Scientific has designed five different DGGE Systems, which are reliable and easy-to-use. The DGGE-1001 is a 2gel system and features one dual gel cassette. The DGGE-2001 features two single gel cassettes. The DGGE-2401 has the same buffer tank as the DGGE-1001 and DGGE-2001 but features two dual gel cassettes, for a capacity of 4 gels per run. -
Page 6: Safety
Safety Power to the DGGE systems is to be supplied by an external DC voltage power supply that must be ground isolated so that the DC voltage output floats with respect to ground. For any power supply used, the maximum specified operating parameters for the units are: Maximum Limits 250 VDC voltage 30 watts power... -
Page 7: Description Of Parts
SECTION 2 Description of Parts 2.1 Unpacking Please verify that your DGGE or DGGEK system comes complete with the following components: • Lower Reservoir/Glass tank/safety interlock/ with 2 black leads inside lid • Heater/Stirrer/By-pass pump with clear plastic vapor shield •... -
Page 8: Unit Set-Up And Unpacking
SECTION 3 Instructions for Use Unit Set-up and Unpacking Instructions Unpack lower reservoir and place on level surface in an approved location Install Heater/Stirrer as shown below. Secure in place with thumbscrew. Be certain that the clear plastic vapor shield is between the bottom side of the heater control unit and the TOP surface of the tank lid. Small bore silicone tubing for buffer cycling is already attached to the manifold outlets. - Page 9 3.1 Unit Set-up and Unpacking Instructions-continued Install thermometer into red silicone stopper on lid. Moisten before inserting. See Figure below. Fig. 3-2 www.cbsscientific.com Tel# 858-755-4959...
- Page 10 3.1 Unit Set-up and Unpacking Instructions-continued 4. Position an appropriate power supply on a shelf above the tank. 5. Fill the tank with running buffer (see chart page 5) “ To obtain the correct level of buffer, place the cassettes in the tank and fill the tank until the level of buffer reaches the underside of the upper reservoir.
- Page 11 3.1 Unit Set-up and Unpacking Instructions-continued 10. Turn Heater/Stirrer “On” and set temperature to 60°C (Figure 3.2) Temperature Setting 60°C Fig. 3-4 www.cbsscientific.com Tel# 858-755-4959...
-
Page 12: Preparation/Cleaning Of Glass Plates For Gel Casting
3.2 Preparation/Cleaning of Glass Plate for Gel Casting Hand wash both plates with a high quality lab detergent followed by a complete rinsing with O. Air dry or use a lint-free tissue. Spray/wipe the chosen inner surfaces of the plate set with 95% ethanol and dry with lint-free tissue. - Page 13 3. Place the gasketed plate on the lab bench with the tubing side up, and extend the bottom of the plate over the edge of the bench, approximately ¾ of an inch. Place the spacers along side the inside edges of the gasket.
- Page 14 3.3 Gel Casting Techniques- continued B. Vertical gradient gel casting using GM-40 gradient maker and gravity flow. 1. Place the GM-40, gradient maker, on an elevated magnetic stirrer with a small “flea” stir bar in the cylinder (C-2) closest to the outlet. The gradient maker should be fitted with a leur valve, (V-2) and a 20ga needle with attached tubing to deliver acrylamide to the gel plate sandwich as shown in figure (3.5).
- Page 15 3.3 Gel Casting Techniques- continued C. Vertical gradient gel casting using using gradient maker (GM-40) and a mini-pump. 1. Alternatively, you may choose to use a “mini-pump” or other peristaltic pump to cast gels as shown in fig (3.6). If so, secure the gradient maker to a ring stand and connect the outlet tubing to the mini-pump tubing adapter.
- Page 16 D. Vertical gradient gel casting using GM-40 gradient maker, Mini-Pump and Multi-Gel Caster. 1. Clean the gel caster with soap and water and the glass plates with alcohol. 2. Place a separating sheet in the gel caster. 3. Place the back plate (non-eared) on the sheet. 4.
-
Page 17: Vertical Gradient Formation
3.4 Vertical Gradient Formation To determine the range of gradient appropriate for your fragment analysis, please read the enclosed paper by Myers, Sheffield and Cox, especially section 6.1.3 through 6.2.1 (pages 124 to 126). This gives you an excellent overview of the determination of melting behavior of your fragments. -
Page 18: Preparation Of The Cassettes
3.5 Preparation of the Cassettes 1. After polymerization rinse gel plate assembly with D.I. water to remove excess acrylamide or denaturants from plate exterior. 2. Remove comb and quickly transfer gel sandwich to cassette by removing all #2 clamps. LEAVE GEL WRAP IN PLACE. The Gel Wrap acts as a barrier and prevents perpendicular electrical fields from intenferring with outside lanes. -
Page 19: Buffer Cycling Connections
3.6 Buffer Cycling Connections Buffer Cycling Connections - Single Fig. 3-9a Buffer Cycling Connections – Two Single Cassettes www.cbsscientific.com Tel# 858-755-4959... - Page 20 Fig. 3-9b 3.6 Buffer Cycling Connections-continued. Buffer Cycling Connections- Dual Cassette Fig. 3-9c 1. Attach small bore tubing to barb fitting on cassettes. 2. Turn heater/stirrer on to fill upper reservoir; begin buffer cycling. www.cbsscientific.com Tel# 858-755-4959...
-
Page 21: Running The Gels
3.7 Running the Gels 1. Load samples at 1:1 with neutral dye. Load 5-10 ug Genomic DNA/well or 1-2 ug cloned (B-globin)/well. Determine concentration by O.D. 260. 2. Attach black power leads to cassettes 3. Close lid to engage safety interlock. Turn on power supply to 150V (40mA) constant Volts for 5-7 hours. -
Page 22: Removing The Gels
3.8 Removing the Gels 1. When run is completed, turn off power supply, disconnect recirculating tubes and power leads, remove cassettes, remove glass sandwiches from cassettes. 2. Using a wedge plate separator,cat. # WPS-100, pry plates apart and immerse gel/plate in buffer tray. -
Page 23: Perpeniduclar Gel Casting
3.9 Perpendicular Gel Casting NOTE: Prior to casting, mark the notched glass plate to designate which side is the ‘inside’ and ‘outside’. The same side of the notched plate should always sit against the reservoir gasket. 1. For perpendicular gel casting, locate the spacer which has a channel machined into it on one end which will be referred to as the "channel spacer". -
Page 24: Perpendicular Gradient Formation
3.10 Perpendicular Gradient Formation To determine the range of perpendicular gradient appropriate for your fragment analysis, please read the enclosed paper by Myers, Sheffield and Cox, as well as the Methods and Enzymology V. 212 paper by Abrams and Stanton. This gives you an excellent overview of the determination of melting behavior of your fragments. - Page 25 3.10 Perpendicular Gradient Formation-continued 10. Remove comb and quickly transfer gel sandwich to cassette by removing all #2 clamps. LEAVE GEL WRAP IN PLACE. The Gel Wrap acts as a barrier and prevents perpendicular electrical fields from intenferring with outside lanes. Re-clamp to cassette using #1 clamps/4 per side.
-
Page 26: Buffer Siphon Pump Instructions For Use
3.11 Instructions for Use Buffer Siphon Pump Dispose of solutions in accordance with the safety regulations of your institution. Fig. 3-12 1. Attach pump assembly to corner of tank as shown above. 2. Place the discharge tubing into a waste carboy located LOWER than the pump inlet. 3. -
Page 27: Maximum Well/Comb Volumes
3.12 Maximum Well/Comb Volumes NOTE: To calculate sample well volume expressed in millimeters (mm) of height, divide maximum volume by tooth depth. VGC-xxxx-177 # of Tooth Spacing Overall Tooth 0.75mm 1.0mm 1.5mm 2.0mm wells width between length depth thickness thickness thickness thickness (mm) -
Page 28: References
Polymerization Catalysts: 1. TEMED (10ul/ml gel solution) 2. APS Stock Solution (.6ul/ml gel solution) For 50 ml of APS stock (10%) use 5 g of ammonium persulphate and water to 50ml. Store at 4 Neutral Loading Solution For preparation of 10ml: 20% Ficoll or sucrose, 2 g of Ficoll 400 or sucrose 10mM Tris-HCl, pH 7.8, 100ul of 1.0 M Tris-HCl, pH 7.8 1mM EDTA, 20 ul of 0.5 M EDTA, pH 8.0... -
Page 29: Care And Handling
SECTION 5 Maintenance of Equipment Care and Handling The plastic components of the DGGE units are fabricated from acrylic and polycarbonate. Electrodes and connectors are made from pure platinum, stainless steel, and chrome plated brass. As with any laboratory instrument, adequate care ensures consistent and reliable performance. After each use, rinse buffer chamber, gel tray and combs with de-ionized water. -
Page 30: Dgge System And Accessories
Denaturing Gradient Gel Electrophoresis systems and accessories Cat. # Item DGGE-1001 DENATURING GRADIENT GEL ELECTROPHORESIS SYSTEM, 1 Dual Cassette, (2 place). Gel size 17.7cm (w) x 22cm (l). Includes Electrophoresis tank, 1 dual cassette, heater/stirrer/buffer cycler, gradient maker, 4 combs (2 each 1 well and 2 ea 16 well combs), 4 sets of spacers, (2 sets for vertical DGGE and 2 sets for perpendicular DGGE), 2 glass plate sets, 4 pieces gel wrap gasket, 12ea #2 clamps, and 18ea #1 clamps, glass safety cover, buffer tank drain valve, power leads, gel tape, and thermometer. - Page 31 DGGE ACCESSORIES SPACER SETS Spacer Sets Vertical DGGE Perpendicular DGGE (Heat resistant polycarbonate) (Spacer sets made from heat resistant polycarbonate: 1 standard spacer & 1 spacer with injection port.) Cat.# Spacer Dimensions Cat.# Spacer Dimensions VGS-0420R-177 0.4mm x 22cm VGS7520RC-177 0.75mm x 22cm VGS-0520R-177 0.5mm x 22cm...
- Page 32 858-755-4959 Toll Free: 800-243-4959 Fax: 858-755-0733 Online ordering: www.cbsscientific.com E-mail address: sales@cbssci.com Mailing address: C.B.S. Scientific Company P.O. Box 856 Del Mar, CA 92014 Shipping address: 10805 Vista Sorrento Parkway Ste 100 San Diego, CA 92121 Credit Card Options: Visa/Mastercard Discover/American Express www.cbsscientific.com...
Need help?
Do you have a question about the DGGE-1001 and is the answer not in the manual?
Questions and answers