Sanyo SCP-3100 Operating Manual
Hide thumbs
Also See for SCP-3100:
- User manual (270 pages) ,
- Specifications (2 pages) ,
- Brochure (1 page)
Table of Contents
Advertisement
Quick Links
Advertisement
Table of Contents

Related Manuals for Sanyo SCP-3100


Summary of Contents for Sanyo SCP-3100
- Page 1 SCP-3100 Operating Guide (Draft)
-
Page 2: Table Of Contents
Table of Contents Getting to Know Your Phone ....................6 Front View of Phone ..........................6 Key Functions ............................7 Viewing the Display Screen........................8 Turning Your Phone On and Off ......................9 Unlocking the Phone ..........................9 Using the Battery ..........................10 Displaying Your Phone Number ......................11 Making and Answering Calls ................... - Page 3 Selecting Ringer Types for Voicemail or Calendar/Alarm...............20 Selecting Ringer Types for Messages....................21 Setting Tone Length, Start-up/Power-off Tone or Voice Prompt.............21 Adjusting the Phone’s Volume Settings.....................22 Alert Notification ..........................22 Silence All .............................22 Display Settings...........................23 Changing the Text Greeting .......................23 Changing the Backlight Time Length....................23 Changing the Display Screen Animation..................24 Changing the Display for Incoming Calls..................24 Changing the Display for the Standby Mode ...................25...
- Page 4 Resetting and Locking Your Phone Through SMS ................34 Controlling Your Roaming Experience ..............35 Understanding Roaming........................35 Setting Your Phone’s Roam Mode ......................36 Controlling Roaming Charges Using Call Guard ................36 Navigating Through Menus ....................38 Menu Navigation ..........................38 Menu Structure............................38 Managing Call History ......................39 Viewing History ...........................39 Call History Options..........................39...
- Page 5 Viewing a Feature/Past Day’s Scheduled Events................48 Adding To Do List Items ........................49 Viewing the To Do List ........................49 Editing To Do List Items........................49 Adding a To Do List Item to the Schedule ..................49 Deleting Items from the To Do List ....................50 Viewing Memory in Your Scheduler ....................50 Purging All Events, Call Alarms or To Do List.................50 Displaying Your User Address......................50...
- Page 6 Displaying Messages ...........................64 Changing the Displaying Font Size of a Message................64 Prepending a Phone Number From a Message ................64 Moving a Message Into the Another Folder..................64 Editing Folders.............................65 Erasing a Folder...........................65 Safety ..............................67 General Precautions..........................67 Maintaining Safe Use of and Access to Your Phone.................67 Using Your Phone With a Hearing Aid Device .................68 Caring for the Battery.........................69 Radiofrequency (RF) Energy ......................70...
-
Page 7: Getting To Know Your Phone
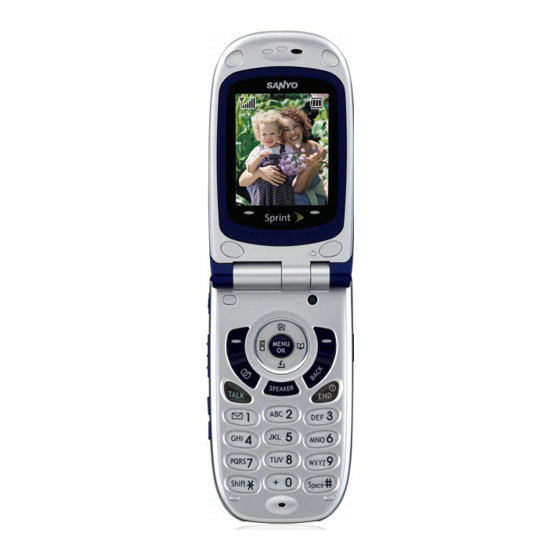
Getting to Know Your Phone Front View of Phone Earpiece Main LCD (display) Navigation Key Softkey (left) 16. Softkey (right) MENU/OK 15. Side Camera Key Camera Key 14. BACK Key TALK Key 13. END/POWER Key 12. SPEAKER Key Microphone 11. Keypad 10. -
Page 8: Key Functions
Key Functions Earpiece lets you hear the caller and automated prompts. Main LCD (display) displays all the information needed to operate your phone Navigation Key scrolls through the phone’s menu options and acts as a shortcut key from standby mode. (Up to access Messaging, Down to access Downloads, Right to launch a Contacts, Left to access your own customized shortcut) Softkey (left) let you select softkey actions or menu items corresponding to the bottom left line on the Main LCD. -
Page 9: Viewing The Display Screen
Viewing the Display Screen This list identifies some of the more common symbols you’ll see on your display screen. shows your current signal strength. The more lines you have, the stronger your signal. means your phone cannot find a signal. tells you a call is in progress. -
Page 10: Turning Your Phone On And Off
Softkeys You can select the menus, which are described at the bottom line of the display by pressing the corresponding softkeys (left/right). In this User Manual, the explanation for selecting such menus are as shown below: Press Memo (left softkey). (Press the left softkey corresponding to Memo.) Turning Your Phone On and Off Turning Your Phone On:... -
Page 11: Using The Battery
Using the Battery Installing the Battery Your PCS Phone comes with a Lithium Ion battery. Follow these steps to install it: 1. Insert the battery into the opening on the back of the phone and gently press down. 2. Place the battery cover into the position, then slide it until you hear it snap into place. Removing the Battery To remove your battery, follow these easy steps: 1. -
Page 12: Displaying Your Phone Number
Displaying Your Phone Number To display your phone number: Press MENU/OK to display the main menu. Select Contacts and press MENU/OK. Select My Phone# and press MENU/OK. Note: To access the phone’s main menu, press MENU/OK from standby mode. Menu items may be selected by highlighting them with the navigation key and pressing MENU/OK, or you can press the number corresponding to the menu item on your keypad. -
Page 13: Answering Calls
Tip: To speed dial a pone number from the standby mode, press and hold appropriate speed dial key locations 2-9. See page 43 for setting. This option appears when you press after entering 4-digit and press MENU/OK. Abbrev. Dial to dial the phone number in your Contacts list that ends with the four digits you enter. -
Page 14: Using The Speakerphone
Using the Speakerphone The speakerphone feature lets you hear audio through the speaker and talk without holding the phone. When the speakerphone is activated, use the Side Up/Down key to adjust the volume. To turn the speakerphone on during a call: Press SPEAKER. -
Page 15: Calling Emergency Numbers
Calling Emergency Numbers You can place calls to 911 (dial 9 1 1 and press TALK), even if your phone is locked or your account is restricted. Once the dial is made, you will enter Emergency mode. The phone tries to dial to 911 automatically until the dial will be connected. -
Page 16: Saving A Phone Number
Saving a Phone Number Your PCS Phone can store a total of 500 phone numbers in 300 Contacts entries. Each entry can store 7 phone numbers, and the entry’s name can contain 16 characters. Your phone automatically sorts the Contacts entries alphabetically. To save a number from the main menu: Enter a phone number. -
Page 17: Abbreviated Dialing
To dial the number, press TALK or SPEAKER. (When dialing a number with a hard pause, press TALK to send the next set of numbers.) - or - To save the number in your Contacts list, press Options (right softkey), highlight Save Phone#, and press MENU/OK. -
Page 18: Entering Text
Entering Text Selecting a Character Input Mode Your PCS Phone provides convenient ways to enter words, letters, punctuation, and numbers whenever you are prompted to enter text (for example, when adding an Contacts List entry). To change the character input mode: 1. -
Page 19: Entering Characters By Tapping The Keypad
Entering Characters by Tapping the Keypad To enter characters by tapping the keypad, select the Alphabet mode (see “Selecting a Character Input Mode” on page 17). Press the corresponding key until the desired character appears. By default, the first letter of a word is capitalized and following letters are lowercase. Characters scroll in the following order: English Sequence Upper Case... -
Page 20: Entering Numbers, Symbols, Preset Suffix And Smileys
Entering Numbers, Symbols, Preset Suffix and Smileys Entering SYMBOLS To enter symbols: 1. In a text entry field, press Mode (right softkey). 2. Select SYMBOL and press MENU/OK. 3. Select the line that includes your desired symbol. 4. Press the corresponding key (1 ~ 8) with each symbol. -or- Select your desired symbol by using the navigation key, and press MENU/OK. -
Page 21: Controlling Your Phone's Settings
Controlling Your Phone’s Settings Reminder: To access the phone ’s main menu, press MENU/OK from standby mode. Menu items may be selected by highlighting them with the navigation key and pressing MENU/OK. Sound Settings Ringer Types Ringer types help you identify incoming calls and messages. You can assign ringer types to individual Contacts entries, types of calls and types of messages. -
Page 22: Selecting Ringer Types For Messages
Selecting Ringer Types for Messages To select a ringer type for text messages: 1. Press MENU/OK to access the main menu. 2. Select Settings and press MENU/OK. 3. Select Sounds and press MENU/OK. 4. Select Ringer Type and press MENU/OK. 5. -
Page 23: Adjusting The Phone's Volume Settings
Adjusting the Phone’s Volume Settings To change the ringer/ key volume: 1. Press MENU/OK to access the main menu. 2. Select Settings and press MENU/OK. 3. Select Sounds and press MENU/OK. 4. Select Ringer/Key Vol., and press MENU/OK. 5. Select Ringer Volume, Calendar/Alarm, Start-up/Pw-off or Key Beep and press MENU/OK. 6. -
Page 24: Display Settings
1. Press MENU/OK to access the main menu. 2. Select Settings and press MENU/OK. 3. Select Sounds and press MENU/OK. 4. Select Ringer/Key Vol. and press MENU/OK. 5. Select the menu under Ringer Volume and press MENU/OK. Select Silence All and press MENU/OK. Tip: When Ringer Volume is set as Silence All, other items are changed to Off and cannot be highlighted. -
Page 25: Changing The Display Screen Animation
Changing the Display Screen Animation Your new PCS Phone offers animation for what you see on the display screen during standby mode, Outgoing Calls, or Service Search. To assign the animation: 1. Press MENU/OK to access the main menu. 2. Select Settings and press MENU/OK. 3. -
Page 26: Changing The Display For The Standby Mode
Changing the Display for the Standby Mode This feature enables you to select a variety of items to display in standby mode. To set your standby display: 1. Press MENU/OK to access the main menu. 2. Select Settings and press MENU/OK. 3. -
Page 27: Changing The Font Size
Changing the Font Size There are four font size settings for the message notification and browser. To change the font size, follow these steps: 1. Press MENU/OK to access the main menu. 2. Select Settings and press MENU/OK. 3. Select Display and press MENU/OK. 4. -
Page 28: Tty Use With Pcs Service
TTY Use With PCS Service This feature set the TTY Mode to On or Off. A TTY (also known as TDD or Text Telephone) is a telecommunications device that allows people who are deaf or hard of hearing, or who have speech or language disabilities, to communicate by telephone. -
Page 29: Setting The Open/Close Flip Options
Setting the Open/Close Flip Options This feature enables you to answer an incoming call by opening the flip or to end a call by closing the flip. To activate the Open Flip feature: Press MENU/OK to access the main menu. Select Settings and press MENU/OK. -
Page 30: Setting Abbreviated Dialing
Note: This feature does not apply when the flip is open. Setting Abbreviated Dialing Abbreviated Dialing is another form of speed dialing. If the last four digits you enter do not match any stored Contacts entry, the digits are automatically prepended with the digits specified using the following steps. -
Page 31: Setting Message Notification
Setting Message Notification You can see message notification when you receive Text message or Voicemail while you are in PCS applications or Browser mode. 1. Press MENU/OK to access the main menu. 2. Select Settings and press MENU/OK. 3. Select Messaging and press MENU/OK. 4. -
Page 32: Setting Your Phone's Security
Setting Your Phone’s Security Accessing the Security Menu You must enter your lock code to view the Security menu. To access the Security menu: 1. Press MENU/OK to access the main menu. 2. Select Settings and press MENU/OK. 3. Select Security and press MENU/OK. 4. -
Page 33: Calling In Lock Mode
Calling in Lock Mode You can place calls to 911 and to your special numbers when in lock mode. To place an outgoing call in lock mode: To call an Emergency number or special number, enter the phone number and press TALK or SPEAKER. -
Page 34: Erasing All My Content
Erasing All My Content To erase all the downloaded data from web: 1.From the Security Menu display (See “Accessing the Security Menu” on page 31), Select Erase Content and press MENU/OK. 2. If you’re sure you want to erase downloaded data from web, select Yes and press MENU/OK. -
Page 35: Resetting And Locking Your Phone Through Sms
Resetting and Locking Your Phone Through SMS When your phone is lost or stolen, you can erase your important personal information (such as Contacts entries, call history and messages) and lock your phone by sending a special formatted SMS message to your phone. Send the following format from your computer: \\RESET **<Passcode>**RESET <Passcode>... -
Page 36: Controlling Your Roaming Experience
Controlling Your Roaming Experience Understanding Roaming Recognizing Icons on the Display Screen Your phone’s display screen always lets you know when you’re off the Nationwide PCS Network and whether your phone is operating in analog or digital mode. The following chart indicates what you’ll see depending on where you’re using your phone. -
Page 37: Setting Your Phone's Roam Mode
Note: If you’re on a call when you leave the Nationwide PCS Network and enter an area where roaming is available (whether digital or analog), your call is dropped. If your call is dropped in an area where you think PCS Service is available, turn your phone off and on again to reconnect to the Nationwide PCS Network. - Page 38 To Place Roaming Calls With Call Guard On: Press any key to erase the pop-up message, press Options (right softkey), highlight Roam Call, or Roam:Speaker On and press MENU/OK. - or - 1. From standby mode, dial 1 + area code + the seven-digit number. (You can also initiate a call from the Contacts directory, Call History, or Messaging.) 2.
-
Page 39: Navigating Through Menus
Navigating Through Menus Menu Navigation The navigation key on your PCS Phone allows you to scroll through menus quickly and easily. To scroll bar at the right of the menu keeps track of your position in the menu at all times. To navigate through a menu, simply press the navigation key up or down. -
Page 40: Managing Call History
Managing Call History Viewing History You’ll find your Call History invaluable. They are lists of the last 20 phone numbers or Contacts entries for each call you placed, accepted or missed. Call History makes redialing a number fast and easy. It is continually updated as new numbers are added to the beginning of the list and the oldest entries are removed from the bottom of the list. -
Page 41: Saving A Phone Number From Call History
Saving a Phone Number From Call History Your PCS Phone can store up to 300 Contacts entries. Contacts entries can store up to a total of 500 phone numbers and each entry’s name can contain 16 characters. To save a phone number from Call History to your Contacts list: 1. -
Page 42: Using The Contacts Directory
Using the Contacts Directory Adding a New Contacts List Entry Your PCS Phone can store up to 300 Contacts entries. Contacts entries can store up to a total of 500 phone numbers and the entry’s name can contain 16 characters. To add a new entry: 1. -
Page 43: Contacts List Entry Options
Contacts List Entry Options To access a contacts entry’s options, display the Contacts list, highlight an entry and press MENU/OK, then select a phone number and press Options (right softkey). To select an option, highlight it and press MENU/OK. Edit to edit the selected entry. Call to dial the selected number. -
Page 44: Editing An Contacts Entry
Editing an Contacts Entry To make changes to an entry: 1. Press the navigation key right. 2. Select the entry you wish to edit and press MENU/OK. 3. Select the Phone number and press Options (right softkey) highlight Edit and press MENU/OK. -
Page 45: Selecting A Ringer/Image Type For An Entry
Selecting a Ringer/Image Type for an Entry You can assign a ringer/image type to a Contacts entry so you can identify the caller by the ringer or image type. To select a ringer type for an entry: 1. Press the navigation key right. 2. -
Page 46: Personal Organizer
Personal Organizer Managing the Scheduler Calendar Use the Calendar to remind you of events or important calls you need to make. You can schedule up to 100 events, 15 Call Alarms and 20 To-Do Items. Setting the Time/Date In no service area or Analog service area, it’s necessary to set actual time and date to use Calendar function. -
Page 47: Event Alerts
4. Select the day you want to add an event to by using the navigation key and press Options (right softkey). 5. Select Add Event and press MENU/OK. 6. Select Schedule and press MENU/OK. 7. Enter the description and press MENU/OK (or press Mode [right softkey] to select a description from “From To Do List”). -
Page 48: Viewing The Event List
Viewing the Event List To View your Event list: 1. Press MENU/OK to access the main menu. 2. Select Tools and press MENU/OK. 3. Select Calendar and press MENU/OK. 4. Select the date for which you set events and press MENU/OK. Editing an Event 1. -
Page 49: Call Alarm Menu
Call Alarm Menu When your phone is turned on and you have scheduled a call alarm, your phone alerts you and displays the event summary. 1. Press TALK to dial the scheduled phone number. 2. Press MENU/OK to see the event details; 3. -
Page 50: Adding To Do List Items
Adding To Do List Items Your phone can store and manage 20 To Do items. To add an entry to your To Do List: 1. From the Event list display, press Options (right softkey). 2. Highlight To Do List and press MENU/OK. 3. -
Page 51: Deleting Items From The To Do List
Deleting Items from the To Do List 1. From To Do List display, highlight the item you want to erase and press Options (right softkey). 2. Select your Erase Item, Erase Selections or Erase All and press MENU/OK. Erase Item erases an item from the To Do List. Erase Selection erases the selected To Do item at one time. -
Page 52: Finding Icon Definitions
Finding Icon Definitions You can see the explanation of icons that appear on the display. 1. Press MENU/OK to display the main menu. 2. Select Settings and press MENU/OK. 3. Select Phone Info and press MENU/OK. 4. Select Help and press MENU/OK. 5. -
Page 53: Using The Calculator
6. Press Done (left softkey) to save the alarm settings. To stop the alarm: Press any key to stop the alarm. Using the Calculator Your phone comes with a built-in calculator function. To use this feature, follow these easy steps: 1. -
Page 54: Using Your Phone's Voice Services
Using Your Phone’s Voice Services Managing Voice Memos You can use your phone’s Voice Services to record brief memos during a call. Recording Voice Memos To record the other party’s voice during a phone call: 1. During a call, press Options (right softkey) to display the options. 2. -
Page 55: Activating Screen Call
3. Select Voice Services and press MENU/OK. 4. Select Voice Memo and press MENU/OK. 5. Select Play or Play:Speaker and press MENU/OK. 6. Display the memo list, highlight the memo you want to erase, and press Options (right softkey). 7. Select Erase and press MENU/OK. 8. -
Page 56: Selecting Announcement For Screen Call
Selecting Announcement for Screen Call To select an announce menu: 1. Press MENU/OK to access the main menu. 2. Select Tools and press MENU/OK. 3. Select Voice Services and press MENU/OK. 4. Select Screen Call and press MENU/OK. 5. Select Announcement and press MENU/OK. 6. -
Page 57: Reviewing An Announcement
Reviewing an Announcement To review an announcement: 1. Press MENU/OK to access the main menu. 2. Select Tools and press MENU/OK. 3. Select Voice Services and press MENU/OK. 4. Select Screen Call and press MENU/OK. 5. Select Announcement and press MENU/OK. 6. -
Page 58: Using Voicemail
Using Voicemail Setting Up Your Voicemail All unanswered calls to your PCS Phone are automatically transferred to voicemail, even if your phone is in use or turned off. Therefore, you will want to set up your PCS voicemail box and personal greeting as soon as your PCS Phone is activated. To set up voicemail: 1. -
Page 59: Voicemail Options
Using the Menu Keys on Your PCS Phone to Access Your Messages: Press MENU/OK to access the main menu. Select Messaging and press MENU/OK. Select Voicemail and press MENU/OK. Select Call Voicemail or Call:Speaker On and press MENU/OK. Note: You are charged for airtime minutes when you are accessing your voicemail from your PCS Phone. - Page 60 Voicemail-to-Voicemail Message Record and send a voice message to other PCS Voicemail customers. 1. From the main voicemail menu, press 2 to send a message. 2. Follow the voice prompts to enter the phone number. 3. Follow the voice prompts to record and send your voice message. Voicemail-to-Voicemail Message Reply Reply to a voice message received from any other PCS Voicemail customer.
-
Page 61: Using Caller Id
Clearing the Message Icon Your phone may temporarily continue to display the icon after you have checked your voice and text messages. To clear the icon from the display screen: Press MENU/OK to access the main menu. Select Messaging and press MENU/OK. Select Voicemail and press MENU/OK. -
Page 62: Using Call Forwarding
dials the second number. 3. Dial the second number you wish to call and press TALK (or press Options [right softkey], highlight Call or Call:Speaker On, and press MENU/OK). 4. When you’re connected to the second party, press TALK again (or press Options [right softkey], highlight Flash, and press MENU/OK) to begin your three-way call. -
Page 63: Using Text Sms Messaging
Using Text SMS Messaging With Text SMS Messaging, you can use a person’s wireless phone number to send instant text messages from your PCS Phone to their messaging-ready phone - and they can send messages to you. In addition, SMS Text Messaging includes a variety of pre-set messages, such as “I’m running late, I’m on my way,”... - Page 64 Message List Options: From the message list display or the Picture Mail list display, press Options (right softkey). To select an option, highlight it and press Menu/OK. Reply to reply to the message. (Inbox only.) Forward to forward the message. Select from From Phone Book, Mobile Phone#, or Email Address.
-
Page 65: Displaying Messages
Displaying Messages To display a Message from the message notification alert, see “New Messages” on page 62. To display a Message from the main menu: Press Menu/OK to access the main menu. Select Messaging and press Menu/OK. Select Text Msgs and press Menu/OK. (The folder list appears.) Select Inbox, Sent, Outbox, Drafts, or your defined folder and press Menu/OK. -
Page 66: Editing Folders
Editing Folders To edit a folder: 1. From the folder list display, highlight a defined folder. 2. Press Options (right softkey). Select Edit Folder and press Menu/OK. Select the box under your desired option and press Menu/OK. Folder Name to edit the folder name. Auto Filing to set auto filing to on or off. - Page 67 To erase selected messages: 1. From the folder list display, press Options (right softkey). 2. Select Erase Messages and press Menu/OK. 3. Select Read, Unread, and/or Sent, and press Menu/OK to check the appropriate box(es). 4. After selecting the boxes, press Done (left softkey). 5.
-
Page 68: Safety
Safety General Precautions There are several simple guidelines to operating your phone properly and maintaining safe, satisfactory service. Hold the phone with the antenna raised, fully-extended, and over your shoulder. Try not to hold, bend, or twist the phone’s antenna. Don’t use the phone if the antenna is damaged. -
Page 69: Using Your Phone With A Hearing Aid Device
The wireless telephone industry has developed ratings for some of their mobile phones, to assist hearing device users in finding phones that may be compatible with their hearing devices. Not all phones have been rated. Phones that are rated will have the rating on the box. Your SCP-3100 by Sanyo has an M3 rating. -
Page 70: Caring For The Battery
Guarantee you may return the phone within 14 days of purchase for a full refund. Getting the Best Hearing Device Experience With Your SCP-3100 by Sanyo One way to minimize interference is to set the phone’s Display and Keypad backlight settings to ensure the minimum time interval. -
Page 71: Radiofrequency (Rf) Energy
In order to avoid damage, charge the battery only in temperatures that range from 32º F to 113º F (0º C to 45º C). Don’t use the battery charger in direct sunlight or in high humidity areas, such as the bathroom. - Page 72 SAR values at or below the federal standard of 1.6 W/kg are considered safe for use by the public. The highest reported SAR values of the SCP-3100 are: AMPS/CDMA modes (Part 22) - Head: 1.400 W/kg; Body-worn: 0.997 W/kg PCS CDMA mode (Part 24) - Head: 0.777 W/kg;...
Need help?
Do you have a question about the SCP-3100 and is the answer not in the manual?
Questions and answers