Table of Contents
Advertisement
Quick Links
Advertisement
Table of Contents

Related Manuals for Viasensor G210-11N


Summary of Contents for Viasensor G210-11N
- Page 1 G200 Analyzer Range Operating Manual G200 N 0 0-1,000ppm G210 N 0 0-100% VIASENSOR 850 South Via Lata Suite 112 Colton, CA 92324 Toll Free: 855 VIASENSOR Tel: +1 (909) 783-9472 Fax: +1 (909) 825-0591 Email: sales@viasensor.com Website: www.viasensor.com VIASENSOR...
- Page 2 G200 Analyzer Range OMG200N1.24 This page is intentionally left blank VIASENSOR Page 2...
-
Page 3: Table Of Contents
Flow Fail ................... 23 5.12.2.6 Logging ..................... 26 5.12.2.7 Reset ....................26 5.12.3 Calibration .................... 27 5.12.4 View Data ..................... 27 5.12.4.1 Delete All ..................28 5.12.4.2 Filter ....................28 5.12.4.3 Goto ....................29 5.12.5 Diagnostics ................... 29 VIASENSOR Page 3... - Page 4 G200 ......................48 11.2 G210 ......................50 12.0 EVENT LOG ....................52 13.0 CERTIFICATE OF CALIBRATION ..............54 14.0 IMPORTANT NOTICE TO ALL CUSTOMERS ............ 55 15.0 EC DECLARATION OF CONFORMITY ............. 56 16.0 GLOSSARY OF TERMS .................. 57 VIASENSOR Page 4...
-
Page 5: Manual Guidelines
Important/useful information and instructions are shown clearly throughout the manual in a note format. For example: Note: For further information, please contact Sales at VIASENSOR Toll Free (855) VIASENSOR, + 1 (909) 783-9472 or email Sales@viasensor.com. VIASENSOR Page 5... -
Page 6: Introduction
0 0-1,000ppm Data storage for 1,000 readings and download EH40 occupational exposure limits calculated (TWA) – applicable to the UK only Leak detection User settable alarms Data download for graphing and reporting VIASENSOR Page 6... -
Page 7: The G210 Analyzer
CO and CO The analyzer has the following features: O 0-100% 0-100% (optional) CO 0-500ppm (optional) 0-2,000ppm Data storage with site and ID input Data download for graphing and reporting VIASENSOR Page 7... -
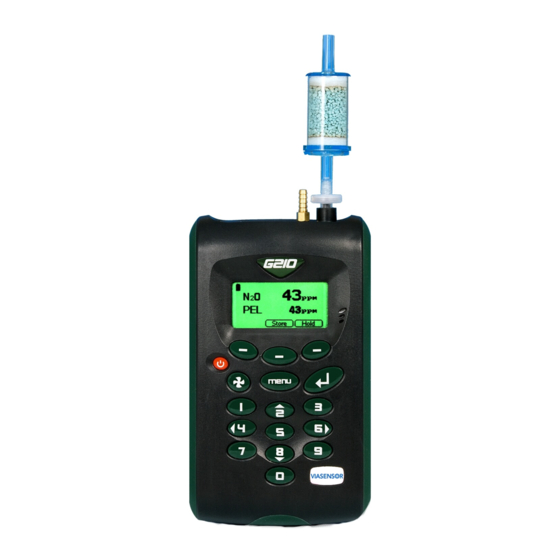
Page 8: Instrument Components - Standard Product
G200 Analyzer Range OMG200N1.24 Instrument Components - Standard Product G200 Model Reference: Analyzer Mains Battery Charger Mains Battery Charger Adaptors: Europe Australia Operating Manual on Digital Media Soda Lime CO Filter (G200 Only) VIASENSOR Page 8... -
Page 9: G200 Range Optional Products And Accessories
The G200 analyzer range has a number of optional products for purchase which enhance the usability and enable further analysis of data and reading information. Note: For further information, please contact Sales at VIASENSOR Toll Free (855) VIASENSOR, + 1 (909) 783-9472 or email Sales@viasensor.com. 3.1.1... -
Page 10: Soda Lime Co 2 Filter
G200 Analyzer Range OMG200N1.24 reduces the pressure to 40.15” W.C. suitable for the instrument. It is recommended that the operator uses the pressure regulator kit supplied by VIASENSOR. Warning Do NOT use the instrument at full piped pressure (maximum pressure 120.44” W.C.). -
Page 11: Instrument Accessory Products
G200 Analyzer Range OMG200N1.24 Instrument Accessory Products Optional accessory and replacement parts may be purchased for the G200 range from VIASENSOR direct. Please refer to the website www.viasensor.com for further information. Description Mfr Order Code USB Lead G-USB Spare Sample Filters (pack of 5) -
Page 12: Instrument Features
Main Read Screen Soft-Keys On/Off Key Pump Key Key 4 – Scroll Left Key 8 – Scroll Down Menu Key Enter Key Key 2 – Scroll Up Key 6 – Scroll Right Back View: Reference: Serial Number Instrument Stand VIASENSOR Page 12... -
Page 13: Panel Key Functions
Also ‘Key 6’. Press scroll right to view further information on the instrument read screen. Back Panel: Serial Number Unique identification for the instrument. Verification of the serial number will be required if Technical Support assistance is needed. Instrument Stand Instrument stand. VIASENSOR Page 13... -
Page 14: Instrument Connection Points
Used to connect the analyzer to a PC via a USB cable on order to download data. Mains Battery Charger Point Used to attach the mains charger to the analyzer for charging. ± 0.5V(max 1000mA) ± 0.5V(max 1000mA) VIASENSOR Page 14... -
Page 15: General Operational Instructions
Switching the Instrument On To switch on the instrument, press the ‘On/Off’ key briefly. There will be a short beep and a slight pause followed by the VIASENSOR logo. The power on self-test will commence. Assuming there are no warnings to display the instrument will continue to the ‘Main Read Screen’. -
Page 16: Instrument Status Icons
Alarm active (Backlight turns red) USB connected to PC (flickers when transferring data) Logging mode active (flashes when memory nearly full) Temperature probe(s) connected Humidity probe connected (flashing) Service due (every 12 months) Service overdue Fault/repair Waiting VIASENSOR Page 16... -
Page 17: Changing Between Parameters
Input 100 – 240V ~ 60/50 Hz 120mA Input 100 – 240V ~ 60/50 Hz 120mA Output Output Output 1000mA 5VA 1000mA 5VA 1000mA 5VA Note: A full charge will take approximately 3 hours. Typically, a fully charged battery will last 8-10 hours. VIASENSOR Page 17... -
Page 18: Instrument Main Read Screen
The ‘Hold’ reading option allows the operator to freeze the currently displayed reading. This allows it to be manually recorded or moved away from the sample point. Once activated, press the soft-key ‘Hold’ and the readings are fixed until the ‘Hold’ key is VIASENSOR Page 18... -
Page 19: Enter Id Codes
It is possible using Analyzer Data Manager to change the name of these fields as displayed on the instrument from ‘Site’ and ‘ID’ to something else up to seven characters, i.e. ‘ward’ and ‘bed’, depending on the application or typical mode of operation. VIASENSOR Page 19... -
Page 20: Main Menu
From the ‘Main Read Screen’ press the ‘Menu’ key on the instrument panel. Press ‘Key 1’ to display general information about the instrument. Information Screen VIASENSOR Page 20... -
Page 21: Utilities
Note: The clock will need to be manually adjusted to cope with daylight saving changes or changes when crossing time zones. 5.12.2.2 Contrast The ‘Contrast’ option enables the operator to adjust the instrument screen contrast to compensate for changes in ambient temperature. The default setting is 0. VIASENSOR Page 21... -
Page 22: Alarms
From the ‘Main Read Screen’ press the ‘Menu’ key on the instrument panel. Press ‘Key 2’ to display the ‘Utilities’ menu. Press ‘Key 3’ to select ‘Alarms’ and the following screen is displayed: Current Alarms – G210 VIASENSOR Page 22... -
Page 23: Settings
; to prevent damage to the pump, the pump will switch off after a few seconds. Press the ‘Pump’ key again to remove the flashing pump icon. Note: Dirty or discolored filters should be changed before use. Filters that have VIASENSOR Page 23... - Page 24 Use the scroll keys ‘Key 4 – Scroll Left’ or ‘Key 6 – Scroll Right’ to adjust the value displayed. The larger the value, the less sensitive the flow fail detection is. Press soft-key ‘Accept’ or ‘Reject’ accordingly. For more information please refer to the following Flow Fail Process. VIASENSOR Page 24...
- Page 25 Wait 5 seconds Flow fail alarm? Flow fail alarm? Blocked or excessive restriction Press pump cancel alarm Refer to Section 8.0 Problem Solving Decrease displayed value by 1 Accept Flow Fail Set-up Process Best Practice G200 Range VIASENSOR Page 25...
-
Page 26: Logging
The instrument can be reset by pressing ‘Key 7 - Reset’ accessed via the ‘Utilities’ menu. Selecting this option will clear all user settings and any stored data including the event log. The following warning message will be displayed ‘This will clear user calibration and VIASENSOR Page 26... -
Page 27: Calibration
View Data – Soft-key ‘More’ The ‘View Data’ option also enables the operator to clear the readings memory, filter the data to view or go to specific data readings listed. 1-Delete All Enables the operator to delete all the readings stored, VIASENSOR Page 27... -
Page 28: Delete All
3) To clear the readings press the soft-key ‘More’ followed by ‘Key 2 - Filter’. 4) Press the appropriate menu key to select the required filter option and enter the filter data. 5) Select the ‘Accept’ button to confirm the filter selection. VIASENSOR Page 28... -
Page 29: Goto
‘Accept’ button to confirm the selection. 5.12.5 Diagnostics The ‘Diagnostics’ option enables VIASENSOR Technical Support to identify and resolve issues with the instrument and readings. If required, the operator may be asked to confirm the diagnostics displayed. - Page 30 It is not possible to store data while in this mode. The operator starts and stops monitoring by selecting the soft-key ‘Leak’. Note: When monitoring gases using any of the above methods the ‘Mute’ key may be activated to eliminate the instrument monitoring sound. VIASENSOR Page 30...
-
Page 31: Taking Readings
Don’t get the instrument wet, for example exposure to rain. Warning Always ensure that the exhaust gases emerge in a safe manner into a well ventilated area. VIASENSOR Page 31... -
Page 32: G200 Gas Measurement Process - Best Practice
If operating in ‘Person’ or ‘Area’ mode readings are continuously taken by the instrument. To stop monitoring the operator must select the appropriate ‘soft-key’ and enter the required stop code. If operating in ‘Leak’ mode the operator may start and stop monitoring by selecting the appropriate soft-key. VIASENSOR Page 32... -
Page 33: G210 Gas Measurement Process - Best Practice
ID codes. Select ID codes and press the ‘Accept’ button to confirm. A message will display confirming that the reading has been stored. The instrument automatically takes the operator back to the ‘Main Read Screen’ ready to take another reading. VIASENSOR Page 33... -
Page 34: Calibration
Only use gases with a known certified gas concentration. Note: Certified calibration gases can be supplied by VIASENSOR. Warning For each gas used the appropriate material safety data sheet must be read and understood before proceeding. Calibration gases and the use of pressure regulators can be dangerous. -
Page 35: Calibration Equipment
OMG200N1.24 Calibration Equipment The diagram below displays the regulator and tubing equipment for user calibration: Certified calibration gas in 58 liter gas canisters is supplied with the VIASENSOR calibration kit. Please refer to the VIASENSOR website www.viasensor.com for further information. -
Page 36: Zero Calibration
If not already preset, enter the correct span target, i.e. certified concentration of your calibration gas. Press ‘Key 1’ and enter the new value. Then attach the gas and open regulator valve to allow the gas to flow. VIASENSOR Page 36... -
Page 37: Reset Factory Settings
Air) and Readings before and after selected gas Successful user span for Target Value, Readings before and after selected gas Successful user span for Target Value, Readings before and after selected gas Failed user zero for selected VIASENSOR Page 37... -
Page 38: Recommended Gases For Calibration
Leak O 50%, 100%, N Zero Calibration Gases 100% O, CO, CO O, CO, CO Span Calibration Gases O 100ppm O 500ppm 100% O 50%, O O, O O 100% CO 100ppm, CO, CO CO, CO 500ppm VIASENSOR Page 38... -
Page 39: G200 Range Calibration - Best Practice
Wait for screen to stabilise Press start target Span another (Now value should Select Accept Select Accept value channel? be close to Ref value) Run the pump Disconnect Refit the Soda Stop the pump Clean Air Purge tubing Lime Filter VIASENSOR Page 39... -
Page 40: Problem Solving
This section outlines various warning and error messages which the operator may receive during general operation of the instrument. For further assistance please contact Technical Support at VIASENSOR at +1 (909) 783-9472 Ext. 7130. Warnings and Errors When switched on the instrument will perform a predetermined self-test sequence taking approximately 15 seconds. -
Page 41: Self-Test Warning Messages
Change O The oxygen cell has not been changed for at least 3 years; its Cell performance and accuracy may be impaired. The instrument will need to be returned to the manufacturer for service. VIASENSOR Page 41... - Page 42 Department. Depending on the type of error it may be possible to correct the configuration file and import it back into the instrument. For further assistance please contact Technical Support at VIASENSOR at +1 (909) 783-9472 Ext. 7130. VIASENSOR Page 42...
-
Page 43: User Calibration Trouble Shooting
User calibration has two operations and each may be performed individually, however for a complete user calibration both must be completed. Factory Calibration (Curve 1) The G200 instruments are ‘Factory’ calibrated and stable. VIASENSOR Page 43... -
Page 44: Cross-Gas Effects
, unlike many other types of oxygen cell. O Cell: Nitrous oxide is measured by infrared absorption at a wavelength specific to nitrous oxide and suffers virtually no influence from CO CO, H S, NO , SO or H VIASENSOR Page 44... -
Page 45: Hardware Reset
Press and hold the ‘On/Off’ key for ten seconds; wait at least 15 seconds and the instrument should restart automatically. Note: Performing a hardware reset may cause loss or corruption of currently stored data including the time/date. VIASENSOR Page 45... -
Page 46: Service
The instrument and accessories (including power supply unit) can be wiped clean using a non- fibrous damp cloth. Note: Do NOT apply pressure to the LCD display as this can cause damage. Do NOT use solvents or any other chemical cleaners. VIASENSOR Page 46... -
Page 47: Warranty Policy
12 months from the date of the shipment to the user. During this period VIASENSOR will repair or replace defective parts on an exchange basis. The decision to repair or replace will be determined by VIASENSOR. -
Page 48: Technical Specification
F, 401.5” W.C. FACILITIES Visual and audible alarm User selectable N O and TWA alarms Communications USB type B mini-connector, HID device class Data storage 1000 reading sets + 270 events PUMP Flow 100cc/min typically (300cc/min MAX) VIASENSOR Page 48... - Page 49 With RGB LED back-light Gas sample filters User replaceable PTFE water trap filter G1.10 - Soda lime filter (CO2 scrubber) Note: Due to VIASENSOR’s continuous program of improvement, this specification is subject to change without prior notice. VIASENSOR Page 49...
- Page 50 (typical at 1000ppm CO Pressure dependence: ±0.02% of reading/hPa (typical at 1000ppm CO Resolution: 0.1% Accuracy: ±2.0% Full Scale @ constant temperature and pressure Temperature dependence: ±3.0% Full Scale over operating temperature range Pressure dependence: ±0.02% of reading/hPa VIASENSOR Page 50...
- Page 51 Liquid crystal display, 128 x 64 pixel With RGB LED back-light Gas sample filters User replaceable PTFE water trap filter Note: Due to VIASENSOR’s continuous program of improvement, this specification is subject to change without prior notice. VIASENSOR Page 51...
-
Page 52: Event Log
Power in self-test, sensor out of range Channel, Reading, Low, High Power on self-test, sensor out of range Channel, Reading, Prev Battery dropped below critical value Limit, Actual User calibration set zero OK Before and After User calibration set span OK Before, After VIASENSOR Page 52... - Page 53 Changing logging mode ID site Site ID Flow fail current limit exceeded Limit, Actual An alarm has changed state Alarm, State, Actual, High, Low Change of alarm setting Alarm, State, High, Low Mode of instrument changed Before, After VIASENSOR Page 53...
-
Page 54: Certificate Of Calibration
G200 Analyzer Range OMG200N1.24 13.0 Certificate of Calibration A certificate of calibration is supplied at the time of purchase and updated when the instrument is serviced. For example: VIASENSOR Page 54... -
Page 55: Important Notice To All Customers
14.0 Important Notice to All Customers ELECTRONIC RECYCLING The wheelie bin symbol now displayed on equipment supplied by VIASENSOR signifies that the apparatus must not be disposed of through the normal municipal waste stream but through a registered recycling scheme. -
Page 56: Ec Declaration Of Conformity
OMG200N1.24 15.0 EC Declaration of Conformity Products G200 range of gas analyzers VIASENSOR declares that the item(s) described above is/are in compliance with the following standards: EMC Directive 2004/108/EC EN 50270 :2006 Electromagnetic compatibility. Electrical apparatus for the detection and measurement of combustible gases, toxic gases or oxygen. -
Page 57: Glossary Of Terms
High temperature causes the display to darken and low temperature causes the display to lighten. Data logging A mode of operation that enables the user to leave the analyzer unattended to take readings automatically at predetermined times. The VIASENSOR Page 57... - Page 58 Firmware is the name given to the analyzer’s internal software. This can be programmed using the re-flash command on Analyzer Data Manager. The latest software release can be downloaded from the VIASENSOR website. It is also automatically updated when the analyzer is returned for servicing. General warnings Displayed throughout the documentation with a warning symbol.
- Page 59 User calibration of the gas analyzer will improve the data accuracy in the range of the calibration gases used. Warm-up self-test Predetermined self-test sequence to test the analyzer functions which takes place after the analyzer is switched on and lasts approximately VIASENSOR Page 59...
- Page 60 Zero The point at which the gas analyzer is calibrated when there is none of the target gas present. VIASENSOR Page 60...
Need help?
Do you have a question about the G210-11N and is the answer not in the manual?
Questions and answers